Flutter状态管理
State 基础
命令式和声明式 UI
以计算器举例子
命令式 UI 实现,以 Android 为例:
// 一、定义展示的内容
private int mCount =0;

// 二、中间展示数字的控件 TextView
private TextView mTvCount;

// 三、关联 TextView 与 xml 中的组件
mTvCount = findViewById(R.id.tv_count)

// 四、点击按钮控制组件更新
private void increase( ){
	mCount++;
	mTvCounter.setText(mCount.toString());
}
声明式 UI 实现,以 Flutter 为例:
// 一、声明变量
int _counter =0;

// 二、展示变量
Text('$_counter')

//  三、变量增加,更新界面
setState(() {
   _counter++;
});
在 Flutter 中,我们只需要使变量增加之后调用 setState((){}) 即可。setState 会刷新整个页面,使得中间展示的值进行变更
可以发现,Flutter 中只对 _counter 属性进行了修改,并没有对 Text 组件进行任何的操作,整个界面随着状态的改变而改变
Flutter 声明式 UI
UI = f(state):

以上面计算器例子来说:状态 (state) 就是 _counter 的值,调用 setState 驱动 f build 方法生成新的 UI。
声明式 UI 优势和存在的问题
**声明式优势:**让开发者摆脱组件的繁琐控制,聚焦于状态处理
Android 原生 UI 开发中,当多个组件之间相互关联时,对于 View 的控制非常麻烦;而在 Flutter 中我们只需要处理好状态即可 (复杂度转移到了状态 -> UI 的映射,也就是 Widget 的构建)。包括 Jetpack Compose、Swift 等技术的最新发展,也是在朝着「声明式」的方向演进
声明式 UI 存在的问题
没有使用状态管理,直接「声明式」开发的时候,遇到的问题总结有三个
- 逻辑和页面 UI 耦合,导致无法复用/单元测试、修改混乱等
- 难以跨组件 (跨页面) 访问数据,如子组件需要父组件的字段
- 无法轻松的控制刷新范围 (页面 setState 的变化会导致全局页面的变化)
什么是状态?
状态是在构建 widget 时可以同步读取的信息,或者在 widget 的生命周期中可能更改的信息。
State 介绍
一个 StatefulWidget 类对应一个 State 类,State 表示与其对应的 StatefulWidget 要维护的状态,State 中保存的状态信息可以:
- 在 widget 构建时可以被同步读取
- 在 widget 生命周期中可以被改变,当 State 被改变时,可以手动调用其
setState()方法通知 Flutter 框架状态发生改变,Flutter 框架收到消息后,会重新调用其 build 方法重新构建 widget 树,达到更新 UI 的目的
State 中常用的 2 个属性:
- widget
它表示与该 State 实例关联的 widget 实例,由 Flutter 框架动态设置。注意,这种关联并非永久的,因为在应用生命周期中,UI 树上的某一个节点的 widget 实例在重新构建时可能会变化,但 State 实例只会在第一次插入到树中时被创建,当在重新构建时,如果 widget 被修改了,Flutter 框架会动态设置 State. widget 为新的 widget 实例。
- context
StatefulWidget 对应的 BuildContext,同 StatelessWidget 的 BuildContext。
State 生命周期
State 生命周期方法
initState()
当 widget 第一次插入到 widget 树时会被调用,对于每一个 State 对象,Flutter 框架只会调用一次该回调,所以,通常在该回调中做一些一次性的操作,如状态初始化、订阅子树的事件通知等。
不能在该回调中调用
BuildContext.dependOnInheritedWidgetOfExactType(该方法用于在 widget 树上获取离当前 widget 最近的一个父级 InheritedWidget,原因是在初始化完成后, widget 树中的 InheritFrom widget 也可能会发生变化,所以正确的做法应该在在build()方法或didChangeDependencies()中调用它。
didChangeDependencies()
当 State 对象的依赖发生变化时会被调用;
例如:在之前 build() 中包含了一个 InheritedWidget ,然后在之后的 build() 中 Inherited widget 发生了变化,那么此时 InheritedWidget 的子 widget 的 didChangeDependencies() 回调都会被调用。典型的场景是当系统语言 Locale 或应用主题改变时,Flutter 框架会通知 widget 调用此回调。需要注意,组件第一次被创建后挂载的时候(包括重创建)对应的 didChangeDependencies 也会被调用。
build()
主要是用于构建 widget 子树的,如下场景被调用:
- 在调用 initState() 之后。
- 在调用 didUpdateWidget() 之后。
- 在调用 setState() 之后。
- 在调用 didChangeDependencies() 之后。
- 在 State 对象从树中一个位置移除后(会调用 deactivate)又重新插入到树的其他位置之后。
reassemble()
此回调是专门为了开发调试而提供的,在热重载 (hot reload) 时会被调用,此回调在 Release 模式下永远不会被调用。
didUpdateWidget()
在 widget 重新构建时,Flutter 框架会调用 widget.canUpdate 来检测 widget 树中同一位置的新旧节点,然后决定是否需要更新,如果 widget.canUpdate 返回 true 则会调用此回调。
widget.canUpdate 会在新旧 widget 的 key 和 runtimeType 同时相等时会返回 true,也就是说在在新旧 widget 的 key 和 runtimeType 同时相等时 didUpdateWidget() 就会被调用。
deactivate()
当 State 对象从树中被移除时,会调用此回调。
在一些场景下,Flutter 框架会将 State 对象重新插到树中,如包含此 State 对象的子树在树的一个位置移动到另一个位置时(可以通过 GlobalKey 来实现)。如果移除后没有重新插入到树中则紧接着会调用 dispose() 方法。
dispose()
当 State 对象从树中被永久移除时调用;通常在此回调中释放资源。
StatefulWidget 生命周期图
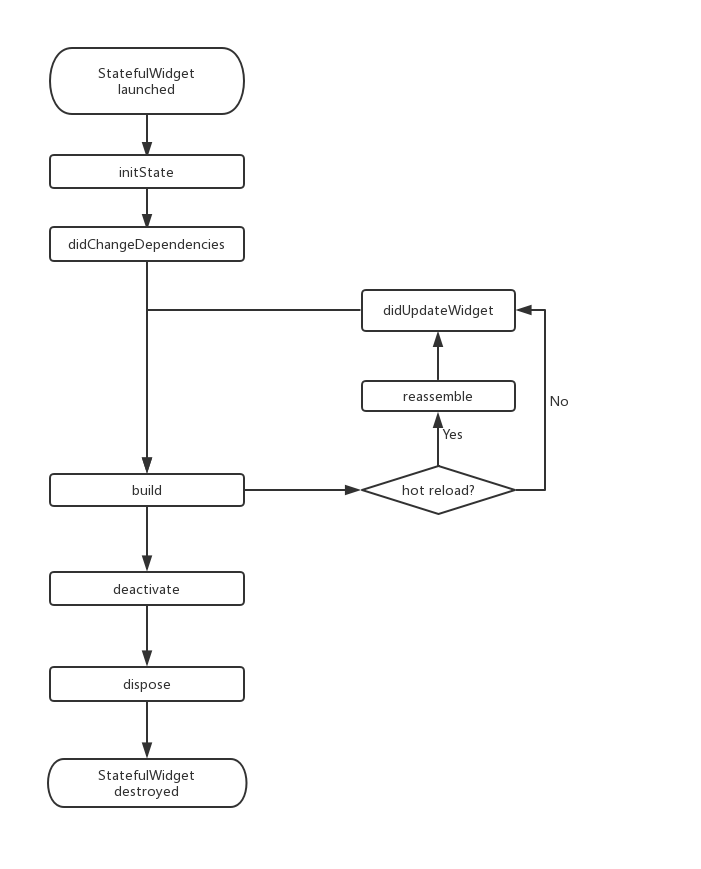
**注意:**在继承 StatefulWidget 重写其方法时,对于包含
@mustCallSuper标注的父类方法,都要在子类方法中调用父类方法。
在 widget 树中获取 State 对象
如果 StatefulWidget 的状态是希望暴露出的,应当在 StatefulWidget 中提供一个 of 静态方法来获取其 State 对象,开发者便可直接通过该方法来获取;如果 State 不希望暴露,则不提供 of 方法。
通过 BuildContext 获取
- BuildContext.findAncestorStateOfType
context 对象有一个 findAncestorStateOfType() 方法,该方法可以从当前节点沿着 widget 树向上查找指定类型的 StatefulWidget 对应的 State 对象。、
class GetStateObjectRoute extends StatefulWidget {
  const GetStateObjectRoute({Key? key}) : super(key: key);
  @override
  State<GetStateObjectRoute> createState() => _GetStateObjectRouteState();
}
class _GetStateObjectRouteState extends State<GetStateObjectRoute> {
  @override
  Widget build(BuildContext context) {
    return MaterialApp(
      title: "State Demo 222",
      theme: ThemeData(
        primarySwatch: Colors.blue,
      ),
      // home: const CounterWidget(),
      home: Scaffold(
        appBar: AppBar(
          title: const Text('子树中获取State对象'),
        ),
        body: Center(
          child: Column(
            children: [
              Builder(builder: (context) {
                return ElevatedButton(
                    onPressed: () {
                      // 查找父级最近的Scaffold对应的ScaffoldState对象
                      ScaffoldState? scaffoldState =
                          context.findAncestorStateOfType<ScaffoldState>();
                      // 打开抽屉菜单
                      scaffoldState?.openDrawer();
                    },
                    child: const Text('打开抽屉菜单1'));
              })
            ],
          ),
        ),
        drawer: const Drawer(),
      ),
    );
  }
}
- Xxx.of
ScaffoldState? scaffoldState = Scaffold.of(context);
通过 GlobalKey
GlobalKey 是 Flutter 提供的一种在整个 App 中引用 element 的机制。如果一个 widget 设置了 GlobalKey,那么我们便可以通过 globalKey.currentWidget 获得该 widget 对象;globalKey.currentElement 来获得 widget 对应的 element 对象,如果当前 widget 是 StatefulWidget,则可以通过 globalKey.currentState 来获得该 widget 对应的 state 对象。
注意:使用 GlobalKey 开销较大,如果有其他可选方案,应尽量避免使用它。另外,同一个 GlobalKey 在整个 widget 树中必须是唯一的,不能重复
- 给目标 StatefulWidget 添加 GlobalKey
// 定义一个globalKey, 由于GlobalKey要保持全局唯一性,我们使用静态变量存储
static GlobalKey<ScaffoldState> _globalKey= GlobalKey();
// ...
Scaffold(
    key: _globalKey , //设置key
    // ...
)
- 通过 GlobalKey 来获取 State 对象
_globalKey.currentState.openDrawer()
示例代码
class StateLifecycleTest extends StatelessWidget {
  const StateLifecycleTest({super.key});

  @override
  Widget build(BuildContext context) {
    return MaterialApp(
      title: "State Demo 222",
      theme: ThemeData(
        primarySwatch: Colors.blue,
      ),
      home: const CounterWidget(),
      // home: const Text("remove ..."),
    );
  }
}
class CounterWidget extends StatefulWidget {
  const CounterWidget({super.key, this.initValue = 0});

  final int initValue;

  @override
  _CounterWidgetState createState() => _CounterWidgetState();
}

class _CounterWidgetState extends State<CounterWidget> {
  int _counter = 0;

  @override
  void initState() {
    super.initState();
    _counter = widget.initValue;
    print("initState, initValue=$initState");
  }

  @override
  Widget build(BuildContext context) {
    print('build');
    return Center(
      child: TextButton(
        child: Text('$_counter'),
        onPressed: () => setState(() {
          ++_counter;
        }),
      ),
    );
  }

  @override
  void didUpdateWidget(CounterWidget oldWidget) {
    super.didUpdateWidget(oldWidget);
    print("didUpdateWidget ");
  }

  @override
  void deactivate() {
    super.deactivate();
    print("deactivate");
  }

  @override
  void dispose() {
    super.dispose();
    print("dispose");
  }

  @override
  void reassemble() {
    super.reassemble();
    print("reassemble");
  }

  @override
  void didChangeDependencies() {
    super.didChangeDependencies();
    print("didChangeDependencies");
  }
}
打开 app:
I/flutter ( 5436): initState
I/flutter ( 5436): didChangeDependencies
I/flutter ( 5436): build
点击⚡️按钮热重载:
I/flutter ( 5436): reassemble
I/flutter ( 5436): didUpdateWidget
I/flutter ( 5436): build
可以看到此时 initState 和 didChangeDependencies 都没有被调用,而此时 didUpdateWidget 被调用。
将 CounterWidget 从 StateLifecycleTest widget 树中移除时:
I/flutter ( 5436): reassemble
I/flutter ( 5436): deactivate
I/flutter ( 5436): dispose
在 CounterWidget 从 widget 树中移除时,deactivate 和 dispose 会依次被调用。
为什么要将 build 方法放在 State 中,而不是放在 StatefulWidget 中?
这主要是为了提高开发的灵活性。如果将 build() 方法放在 StatefulWidget 中则会有两个问题:
- 状态访问不便
build 放在 StatefulWidget 中,构建页面时需要 State,所以就需要在 build 方法增加参数 state,导致 State 会全部为公开方法,这时状态将不可控了
- 继承 StatefulWidget 不便
状态管理
状态由谁来管理?
以下是管理状态的最常见的方法:
- Widget 管理自己的状态
- Widget 管理子 Widget 状态
- 混合管理(父 Widget 和子 Widget 都管理状态)
如何决定使用哪种管理方法?下面是官方给出的一些原则可以帮助你做决定:
- 如果状态是用户数据,如复选框的选中状态、滑块的位置,则该状态最好由父 Widget 管理。
- 如果状态是有关界面外观效果的,例如颜色、动画,那么状态最好由 Widget 本身来管理。
- 如果某一个状态是不同 Widget 共享的则最好由它们共同的父 Widget 管理。
在 Widget 内部管理状态封装性会好一些,而在父 Widget 中管理会比较灵活。有些时候,如果不确定到底该怎么管理状态,那么推荐的首选是在父 Widget 中管理(灵活会显得更重要一些)。
Widget 管理自己的状态
实现的效果:创建一个盒子,当点击它时,盒子背景会在绿色与灰色之间切换。状态 _active 确定颜色:绿色为 true ,灰色为 false
class TapboxA extends StatefulWidget {
  const TapboxA({super.key});

  @override
  State<StatefulWidget> createState() => _TapboxAState();
}

class _TapboxAState extends State<TapboxA> {
  bool _active = false;

  void _handleTap() {
    setState(() {
      _active = !_active;
    });
  }

  @override
  Widget build(BuildContext context) {
    return MaterialApp(
        // home: const CounterWidget(),
        home: GestureDetector(
          onTap: () {
            _handleTap();
          },
          child: Container(
            width: 200.0,
            height: 200.0,
            decoration: BoxDecoration(
                color: _active ? Colors.lightGreen[700] : Colors.grey[700]),
            child: Center(
              child: Text(
                _active ? 'Active' : "Inactive",
                style: const TextStyle(fontSize: 32.0, color: Colors.white),
              ),
            ),
          ),
        ));
  }
}
父 Widget 管理子 Widget 状态
实现的效果:创建一个盒子,当点击它时,盒子背景会在绿色与灰色之间切换。状态 _active 确定颜色:绿色为 true ,灰色为 false
- 子 Widget 是无状态的 StatelessWidget
- 子 Widget 通过回调告知父 Widget 需要状态变更
class ParentWidget extends StatefulWidget {
  const ParentWidget({super.key});

  @override
  _ParentWidgetState createState() => _ParentWidgetState();
}

class _ParentWidgetState extends State<ParentWidget> {
  bool _active = false;

  void _handleTapBoxBChanged(bool newValue) {
    setState(() {
      _active = newValue;
    });
  }

  @override
  Widget build(BuildContext context) {
    return MaterialApp(
        home: Tapboxb(
      active: _active,
      onChanged: _handleTapBoxBChanged,
    ));
  }
}

/// 无状态的,通过回调将状态带到parent来管理
class Tapboxb extends StatelessWidget {
  const Tapboxb({super.key, required this.active, required this.onChanged});

  final bool active;
  final ValueChanged<bool> onChanged;

  @override
  Widget build(BuildContext context) {
    return GestureDetector(
      onTap: _handleTap,
      child: Container(
        width: 200.0,
        height: 200.0,
        decoration: BoxDecoration(
          color: active ? Colors.lightGreen[700] : Colors.grey[600],
        ),
        child: Center(
          child: Text(
            active ? 'Active' : 'Inactive',
            style: const TextStyle(fontSize: 32.0, color: Colors.white),
          ),
        ),
      ),
    );
  }

  void _handleTap() {
    onChanged(!active);
  }
}
混合状态管理
实现的效果:创建一个盒子,当点击它时,盒子背景会在绿色与灰色之间切换。状态 _active 确定颜色:绿色为 true ,灰色为 false;子 Widget 当用户点下时,它添加高亮(深绿色边框);当用户释放时,会移除高亮。
class ParentWidgetC extends StatefulWidget {
  const ParentWidgetC({super.key});

  @override
  _ParentWidgetCState createState() => _ParentWidgetCState();
}

class _ParentWidgetCState extends State<ParentWidgetC> {
  bool _active = false;

  void _handleTapboxChanged(bool newValue) {
    setState(() {
      _active = newValue;
    });
  }

  @override
  Widget build(BuildContext context) {
    return MaterialApp(
      home: TapboxC(
        active: _active,
        onChanged: _handleTapboxChanged,
      ),
    );
  }
}

class TapboxC extends StatefulWidget {
  const TapboxC({Key? key, this.active = false, required this.onChanged})
      : super(key: key);

  final bool active;
  final ValueChanged<bool> onChanged;

  @override
  _TapboxCState createState() => _TapboxCState();
}

class _TapboxCState extends State<TapboxC> {
  bool _highlight = false;

  void _handleTapDown(TapDownDetails? details) {
    setState(() {
      _highlight = true;
    });
  }

  void _handleTapUp(TapUpDetails? details) {
    setState(() {
      _highlight = false;
    });
  }

  void _handleTapCancel() {
    setState(() {
      _highlight = false;
    });
  }

  void _handleTap() {
    widget.onChanged(!widget.active);
  }

  @override
  Widget build(BuildContext context) {
    // 在按下时添加绿色边框,当抬起时,取消高亮
    return GestureDetector(
      onTapDown: _handleTapDown,
      onTapUp: _handleTapUp,
      onTapCancel: _handleTapCancel,
      onTap: _handleTap,
      child: Container(
        width: 200.0,
        height: 200.0,
        decoration: BoxDecoration(
            color: widget.active ? Colors.lightGreen[700] : Colors.grey[600],
            border: _highlight
                ? Border.all(width: 10.0, color: Colors.teal[700]!)
                : null),
        child: Center(
          child: Text(
            widget.active ? 'Active' : 'Inactive',
            style: const TextStyle(fontSize: 32.0, color: Colors.white),
          ),
        ),
      ),
    );
  }
}
全局状态管理
当应用中需要一些跨组件(包括跨路由)的状态需要同步时,上面介绍的方法便很难胜任了。比如,我们有一个设置页,里面可以设置应用的语言,我们为了让设置实时生效,我们期望在语言状态发生改变时,App 中依赖应用语言的组件能够重新 build 一下,但这些依赖应用语言的组件和设置页并不在一起,所以这种情况用上面的方法很难管理。这时,正确的做法是通过一个全局状态管理器来处理这种相距较远的组件之间的通信。目前主要有两种办法:
- 实现一个全局的事件总线,将语言状态改变对应为一个事件,然后在 APP 中依赖应用语言的组件的 initState 方法中订阅语言改变的事件。当用户在设置页切换语言后,我们发布语言改变事件,而订阅了此事件的组件就会收到通知,收到通知后调用 setState(…) 方法重新 build 一下自身即可。
- 使用一些专门用于状态管理的包,如 Provider、Redux
InheritedWidget 数据共享
什么是 InheritedWidget?
InheritedWidget 是 Flutter 中非常重要的一个功能型组件,它提供了一种在 widget 树中从上到下共享数据的方式。
比如我们在应用的根 widget 中通过 InheritedWidget 共享了一个数据,那么我们便可以在任意子 widget 中来获取该共享的数据。这个特性在一些需要在整个 widget 树中共享数据的场景中非常方便。
如 Flutter SDK 中正是通过 InheritedWidget 来共享应用主题(Theme)和 Locale (当前语言环境) 信息的
MediaQuery.of(context)、Theme.of(context) 都是使用 InheritedWidget 来实现数据共享的。
Flutter 中使用 setState() 和 InheritedWidget 足以解决绝大部分的状态管理问题,现有的很多状态管理框架也是基于 InheritedWidget 封装的。
didChangeDependencies
State 对象有一个 didChangeDependencies() 回调,它会在 " 依赖 " 发生变化时被 Flutter 框架调用。而这个 " 依赖 " 指的就是子 widget 是否使用了父 widget 中 InheritedWidget 的数据;如果使用了,则代表子 widget 有依赖;如果没有使用则代表没有依赖。这种机制可以使子组件在所依赖的 InheritedWidget 变化时来更新自身!比如当主题、locale(语言) 等发生变化时,依赖其的子 widget 的 didChangeDependencies 方法将会被调用。
一般来说,子 widget 很少会重写此方法,因为在依赖改变后 Flutter 框架也都会调用 build() 方法重新构建组件树。但是,如果你需要在依赖改变后执行一些昂贵的操作,比如网络请求,这时最好的方式就是在此方法中执行,这样可以避免每次 build() 都执行这些昂贵操作。
示例
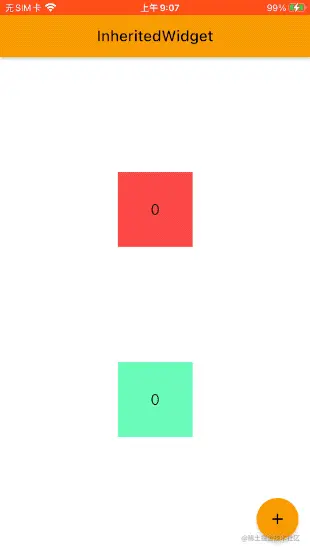
InheritedWidget 实现计时器
class _MyHomePageState extends State<CounterPage> {
  int _count = 0;

  @override
  Widget build(BuildContext context) {
    return Scaffold(
      appBar: AppBar(
        title: const Text("InheritedWidget"),
      ),
      body: CounterInheritedWidget(
        /// 父节点使用
        count: _count,
        child: const Center(
          child: Column(
            mainAxisAlignment: MainAxisAlignment.spaceEvenly,
            children: [
              /// 所有子节点均可以共享数据
              CounterOneWidget(),
              CounterTwoWidget(),
            ],
          ),
        ),
      ),
      floatingActionButton: FloatingActionButton(
        onPressed: () {
          if (!mounted) return;
          setState(() {
            _count += 1;
          });
        },
        child: const Icon(Icons.add),
      ),
    );
  }
}

class CounterInheritedWidget extends InheritedWidget {
  /// 构造方法
  const CounterInheritedWidget(
      {Key? key, required this.count, required Widget child})
      : super(key: key, child: child);

  /// 需要共享的数据
  final int count;

  /// 默认的约定:如果状态是希望暴露出的,应当提供一个`of`静态方法来获取其对象,开发者便可直接通过该方法来获取
  /// 返回实例对象,方便子树中的widget获取共享数据
  static CounterInheritedWidget? of(BuildContext context) {
    return context.dependOnInheritedWidgetOfExactType<CounterInheritedWidget>();
  }

  /// 是否通知widget树中依赖该共享数据的子widget
  /// 这里当count发生变化时,是否通知子树中所有依赖count的Widget重新build
  /// 这里判断注意:是值改变还是内存地址改变。
  @override
  bool updateShouldNotify(covariant CounterInheritedWidget oldWidget) {
    return count != oldWidget.count;
  }
}

class CounterOneWidget extends StatelessWidget {
  const CounterOneWidget({Key? key}) : super(key: key);

  @override
  Widget build(BuildContext context) {
    return Container(
      width: 100,
      height: 100,
      color: Colors.redAccent,
      alignment: Alignment.center,
      child: Text(
        CounterInheritedWidget.of(context)!.count.toString(),
        style: const TextStyle(fontSize: 20),
      ),
    );
  }
}

class CounterTwoWidget extends StatefulWidget {
  const CounterTwoWidget({Key? key}) : super(key: key);

  @override
  State<CounterTwoWidget> createState() => _CounterTwoWidgetState();
}

class _CounterTwoWidgetState extends State<CounterTwoWidget> {
  @override
  Widget build(BuildContext context) {
    return Container(
      width: 100,
      height: 100,
      color: Colors.greenAccent,
      alignment: Alignment.center,
      child: Text(
        CounterInheritedWidget.of(context)!.count.toString(),
        style: const TextStyle(fontSize: 20),
      ),
    );
  }
}
深入了解 InheritedWidget
如果我们只想在 __TestWidgetState 中引用 ShareDataWidget 数据,但却不希望在 ShareDataWidget 发生变化时调用 __TestWidgetState 的 didChangeDependencies() 方法应该怎么办?其实答案很简单,我们只需要将 ShareDataWidget.of() 的实现改一下即可:
//定义一个便捷方法,方便子树中的widget获取共享数据
static ShareDataWidget of(BuildContext context) {
  //return context.dependOnInheritedWidgetOfExactType<ShareDataWidget>();
	return context.getElementForInheritedWidgetOfExactType<ShareDataWidget>()!.widget as ShareDataWidget;
}
唯一的改动就是获取 ShareDataWidget 对象的方式,把 dependOnInheritedWidgetOfExactType() 方法换成了 context.getElementForInheritedWidgetOfExactType<ShareDataWidget>().widget。
- dependOnInheritedWidgetOfExactType 会调用子孙的 didChangeDependencies 和 build 方法
- getElementForInheritedWidgetOfExactType 不会调用子孙的 build 方法
调用 dependOnInheritedWidgetOfExactType() 和 getElementForInheritedWidgetOfExactType() 的区别就是前者会注册依赖关系,而后者不会;所以在调用 dependOnInheritedWidgetOfExactType() 时,InheritedWidget 和依赖它的子孙组件关系便完成了注册,之后当 InheritedWidget 发生变化时,就会更新依赖它的子孙组件,也就是会调这些子孙组件的 didChangeDependencies() 方法和 build() 方法。而当调用的是 getElementForInheritedWidgetOfExactType() 时,由于没有注册依赖关系,所以之后当 InheritedWidget 发生变化时,就不会更新相应的子孙 Widget。
ValueListenableBuilder 按需 rebuild
InheritedWidget 提供一种在 widget 树中从上到下共享数据的方式,但是也有很多场景数据流向并非从上到下,比如从下到上或者横向等。为了解决这个问题,Flutter 提供了一个 ValueListenableBuilder 组件,它的功能是监听一个数据源,如果数据源发生变化,则会重新执行其 builder。
const ValueListenableBuilder({
    super.key,
    required this.valueListenable, // ValueListenable<T>
    required this.builder, // Widget Function(BuildContext context, T value, Widget? child)
    this.child,
})
- valueListenable:类型为
ValueListenable<T>,表示一个可监听的数据源。 - builder:数据源发生变化通知时,会重新调用 builder 重新 build 子组件树。
- child:builder 中每次都会重新构建整个子组件树,如果子组件树中有一些不变的部分,可以传递给 child,child 会作为 builder 的第三个参数传递给 builder,通过这种方式就可以实现组件缓存,原理和 AnimatedBuilder 第三个 child 相同。
ValueListenableBuilder 和数据流向是无关的,只要数据源发生变化它就会重新构建子组件树,因此可以实现任意流向的数据共享。
class ValueListenableRoute extends StatefulWidget {
  const ValueListenableRoute({Key? key}) : super(key: key);

  @override
  State<ValueListenableRoute> createState() => _ValueListenableState();
}

class _ValueListenableState extends State<ValueListenableRoute> {
  // 定义一个ValueNotifier,当数字变化时会通知 ValueListenableBuilder
  final ValueNotifier<int> _counter = ValueNotifier<int>(0);
  static const double textScaleFactor = 1.5;

  @override
  Widget build(BuildContext context) {
    // 添加 + 按钮不会触发整个 ValueListenableRoute 组件的 build
    print('build');
    return Scaffold(
      appBar: AppBar(title: const Text('ValueListenableBuilder 测试')),
      body: Center(
        child: ValueListenableBuilder<int>(
          builder: (BuildContext context, int value, Widget? child) {
            // builder 方法只会在 _counter 变化时被调用
            print('ValueListenableBuilder builder value=$value');
            return Row(
              mainAxisAlignment: MainAxisAlignment.center,
              children: <Widget>[
                child!,
                Text('$value 次', textScaleFactor: textScaleFactor),
              ],
            );
          },
          valueListenable: _counter,
          // 当子组件不依赖变化的数据,且子组件收件开销比较大时,指定 child 属性来缓存子组件非常有用
          child: const Text('点击了 ', textScaleFactor: textScaleFactor),
        ),
      ),
      floatingActionButton: FloatingActionButton(
        child: const Icon(Icons.add),
        // 点击后值 +1,触发 ValueListenableBuilder 重新构建
        onPressed: () => _counter.value += 1,
      ),
    );
  }
}
可以看见,功能正常实现了,同时控制台只在页面打开时 build 了一次,点击 + 按钮的时候只是 ValueListenableBuilder 重新构建了子组件树,而整个页面并没有重新 build ,因此日志面板只打印了一次 "build" 。
尽可能让 ValueListenableBuilder 只构建依赖数据源的 widget,这样的话可以缩小重新构建的范围,也就是说 ValueListenableBuilder 的拆分粒度应该尽可能细
跨组件状态共享
NotificationListener
什么是 NotificationListener?
Flu 通知(Notification)是 Flutter 中一个重要的机制,在 widget 树中,每一个节点都可以分发通知,通知会沿着当前节点向上传递,所有父节点都可以通过 NotificationListener 来监听通知。Flutter 中将这种由子向父的传递通知的机制称为通知冒泡(Notification Bubbling)。通知冒泡和用户触摸事件冒泡是相似的,但有一点不同:通知冒泡可以中止,但用户触摸事件不行。
注意:通知冒泡和 Web 开发中浏览器事件冒泡原理是相似的,都是事件从出发源逐层向上传递,我们可以在上层节点任意位置来监听通知/事件,也可以终止冒泡过程,终止冒泡后,通知将不会再向上传递。
NotificationListener 定义
class NotificationListener<T extends Notification> extends StatelessWidget {
  const NotificationListener({
    Key key,
    required this.child,
    this.onNotification,
  }) : super(key: key);
	// ...
}
- NotificationListener 继承自 StatelessWidget 类,所以它可以直接嵌套到 Widget 树中
- NotificationListener 可以指定一个模板参数,该模板参数类型必须是继承自 Notification;当显式指定模板参数时,NotificationListener 便只会接收该参数类型的通知
- onNotification 回调为通知处理回调,其函数签名如下:
typedef NotificationListenerCallback<T extends Notification> = bool Function(T notification);
它的返回值类型为布尔值,当返回值为 true 时,阻止冒泡,其父级 Widget 将再也收不到该通知;当返回值为 false 时继续向上冒泡通知。
Flutter 的 UI 框架实现中,除了在可滚动组件在滚动过程中会发出 ScrollNotification 之外,还有一些其他的通知,如 SizeChangedLayoutNotification、KeepAliveNotification 、LayoutChangedNotification 等,Flutter 正是通过这种通知机制来使父元素可以在一些特定时机来做一些事情。
监听通知
Scrollable 组件
Flutter 中很多地方使用了通知, Scrollable 组件,它在滑动时就会分发滚动通知(ScrollNotification),而 Scrollbar 正是通过监听 ScrollNotification 来确定滚动条位置的。
监听可滚动组件滚动通知的例子:
NotificationListener(
  onNotification: (notification){
    switch (notification.runtimeType){
      case ScrollStartNotification: print("开始滚动"); break;
      case ScrollUpdateNotification: print("正在滚动"); break;
      case ScrollEndNotification: print("滚动停止"); break;
      case OverscrollNotification: print("滚动到边界"); break;
    }
  },
  child: ListView.builder(
    itemCount: 100,
    itemBuilder: (context, index) {
      return ListTile(title: Text("$index"),);
    }
  ),
);
ScrollNotification
在接收到滚动事件时,参数类型为 ScrollNotification,它包括一个 metrics 属性,它的类型是 ScrollMetrics,该属性包含当前 ViewPort 及滚动位置等信息:
- pixels:当前滚动位置。
- maxScrollExtent:最大可滚动长度。
- extentBefore:滑出 ViewPort 顶部的长度;此示例中相当于顶部滑出屏幕上方的列表长度。
- extentInside:ViewPort 内部长度;此示例中屏幕显示的列表部分的长度。
- extentAfter:列表中未滑入 ViewPort 部分的长度;此示例中列表底部未显示到屏幕范围部分的长度。
- atEdge:是否滑到了可滚动组件的边界(此示例中相当于列表顶或底部)
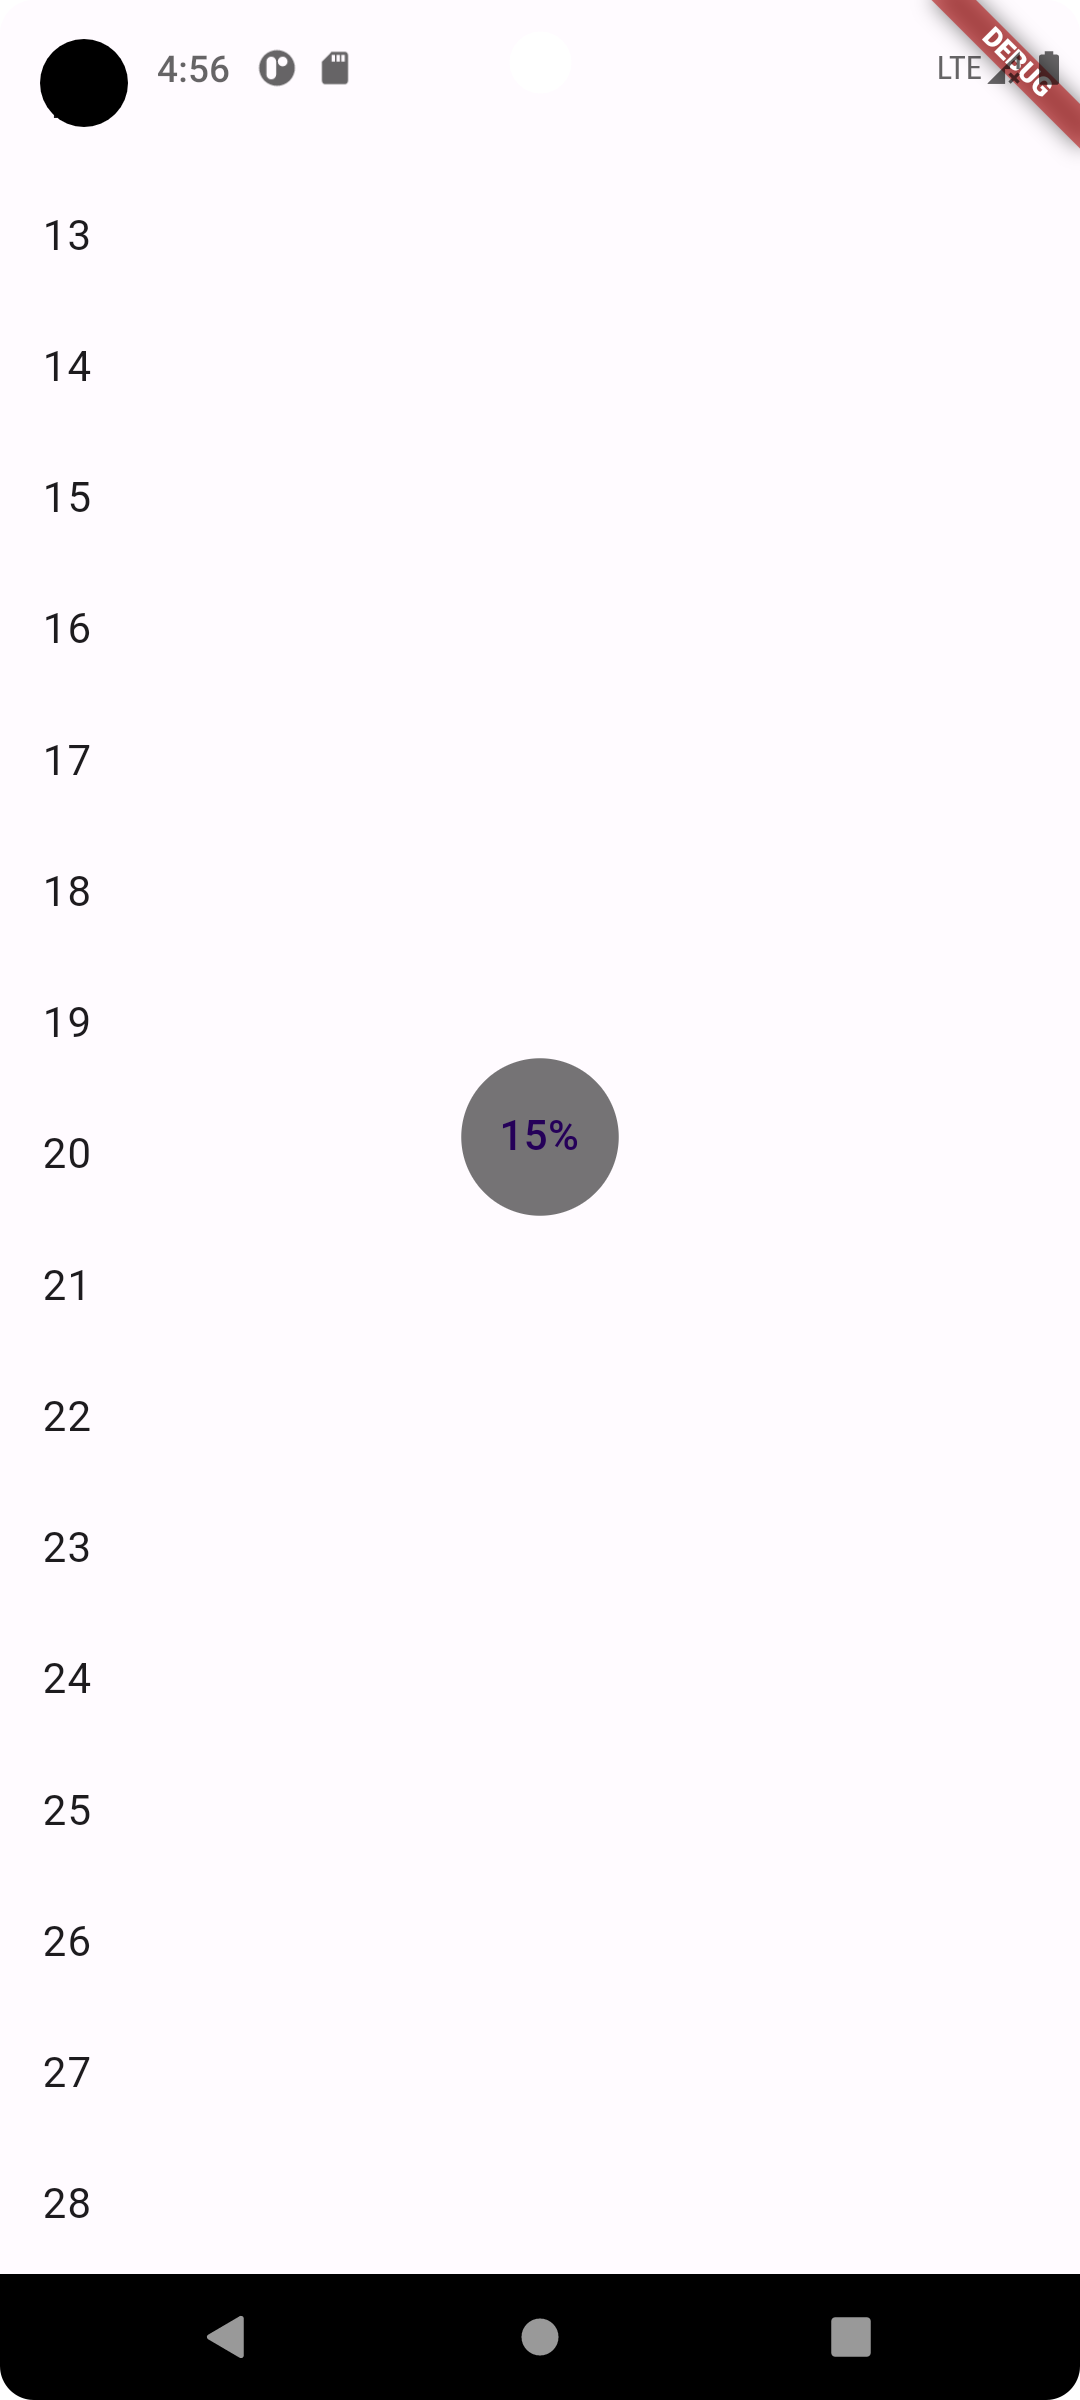
示例:滚动时显示滚动比例
监听 ListView 的滚动通知,然后显示当前滚动进度百分比:
class ScrollNotificationTestRoute extends StatefulWidget {
  const ScrollNotificationTestRoute({super.key});

  @override
  _ScrollNotificationTestRouteState createState() =>
      _ScrollNotificationTestRouteState();
}

class _ScrollNotificationTestRouteState
    extends State<ScrollNotificationTestRoute> {
  String _progress = "0%"; //保存进度百分比

  @override
  Widget build(BuildContext context) {
    return Scrollbar(
      //进度条
      // 监听滚动通知
      child: NotificationListener<ScrollNotification>(
        onNotification: (ScrollNotification notification) {
          double progress = notification.metrics.pixels /
              notification.metrics.maxScrollExtent;
          //重新构建
          setState(() {
            _progress = "${(progress * 100).toInt()}%";
          });
          print("BottomEdge: ${notification.metrics.extentAfter == 0}");
          return false;
          //return true; //放开此行注释后,进度条将失效
        },
        child: Stack(
          alignment: Alignment.center,
          children: <Widget>[
            ListView.builder(
              itemCount: 100,
              itemExtent: 50.0,
              itemBuilder: (context, index) => ListTile(title: Text("$index")),
            ),
            CircleAvatar(
              //显示进度百分比
              radius: 30.0,
              backgroundColor: Colors.black54,
              child: Text(_progress),
            )
          ],
        ),
      ),
    );
  }
}
NotificationListener 和 ScrollController 区别
可滚动组件在滚动时会发送 ScrollNotification 类型的通知,ScrollBar 正是通过监听滚动通知来实现的。通过 NotificationListener 监听滚动事件和通过 ScrollController 有两个主要的不同:
- NotificationListener 可以在可滚动组件到 widget 树根之间任意位置监听。而 ScrollController 只能和具体的可滚动组件关联后才可以。
- 收到滚动事件后获得的信息不同;NotificationListener 在收到滚动事件时,通知中会携带当前滚动位置和 ViewPort 的一些信息,而 ScrollController 只能获取当前滚动位置。
自定义通知
- 定义一个通知类,要继承自 Notification 类;
- 分发通知
Notification 有一个 dispatch(context) 方法,它是用于分发通知的,我们说过 context 实际上就是操作 Element 的一个接口,它与 Element 树上的节点是对应的,通知会从 context 对应的 Element 节点向上冒泡。
案例:
class NotificationRoute extends StatefulWidget {
  const NotificationRoute({super.key});

  @override
  NotificationRouteState createState() {
    return NotificationRouteState();
  }
}

class NotificationRouteState extends State<NotificationRoute> {
  String _msg = "";

  @override
  Widget build(BuildContext context) {
    //监听通知
    return NotificationListener<MyNotification>(
      onNotification: (notification) {
        setState(() {
          _msg += "${notification.msg}  ";
        });
        return true;
      },
      child: Center(
        child: Column(
          mainAxisSize: MainAxisSize.min,
          children: <Widget>[
//           ElevatedButton(
//           onPressed: () => MyNotification("Hi").dispatch(context),
//           child: Text("Send Notification"),
//          ),
            // 注意:代码中注释的部分是不能正常工作的,因为这个context是根Context,
            // 而NotificationListener是监听的子树,所以我们通过Builder来构建ElevatedButton,
            // 来获得按钮位置的context。
            Builder(
              builder: (context) {
                return ElevatedButton(
                  //按钮点击时分发通知
                  onPressed: () => MyNotification("Hi").dispatch(context),
                  child: const Text("Send Notification"),
                );
              },
            ),
            Text(_msg)
          ],
        ),
      ),
    );
  }
}
每点一次按钮就会分发一个 MyNotification 类型的通知,我们在 Widget 根上监听通知,收到通知后我们将通知通过 Text 显示在屏幕上。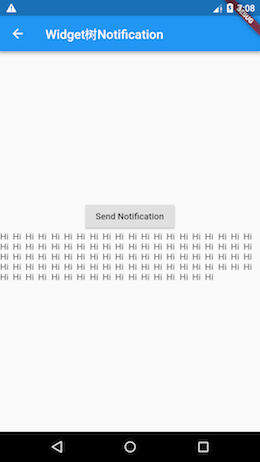
阻止通知冒泡
onNotification 返回 true
// 组织通知
class NotificationRouteState2 extends State<NotificationRoute> {
  String _msg = "";

  @override
  Widget build(BuildContext context) {
    //监听通知
    return NotificationListener<MyNotification>(
      onNotification: (notification) {
        print(notification.msg); //打印通知
        return false;
      },
      child: NotificationListener<MyNotification>(
        onNotification: (notification) {
          setState(() {
            _msg += "${notification.msg}  ";
          });
          return true; // 阻止冒泡
        },
        child: Center(
          child: Column(
            mainAxisSize: MainAxisSize.min,
            children: <Widget>[
//           ElevatedButton(
//           onPressed: () => MyNotification("Hi").dispatch(context),
//           child: Text("Send Notification"),
//          ),
              Builder(
                builder: (context) {
                  return ElevatedButton(
                    //按钮点击时分发通知
                    onPressed: () => MyNotification("Hi2").dispatch(context),
                    child: const Text("Send Notification"),
                  );
                },
              ),
              Text(_msg)
            ],
          ),
        ),
      ),
    );
  }
}
上列中两个 NotificationListener 进行了嵌套,子 NotificationListener 的 onNotification 回调返回了 false,表示不阻止冒泡,所以父 NotificationListener 仍然会受到通知,所以控制台会打印出通知信息;如果将子 NotificationListener 的 onNotification 回调的返回值改为 true,则父 NotificationListener 便不会再打印通知了,因为子 NotificationListener 已经终止通知冒泡了。
冒泡原理
EventBus
Provider
https://flutter.cn/docs/development/data-and-backend/state-mgmt/simple
Provider 是 Flutter 官方出的状态管理包。
见 provider
手写一个 Provider
简单实现一个 Provider
// 一个继承自InheritedWidget的通用provider,保存数据
class InheritedProviderWidget<T> extends InheritedWidget {
  final T data;

  const InheritedProviderWidget(this.data, {super.key, required super.child});

  @override
  bool updateShouldNotify(covariant InheritedWidget oldWidget) {
    // 返回true,每次更新都会调用依赖其的子孙widget的didChangeDependencies
    return true;
  }
}

// 一个通用的数据模型,实现了Listenable,观察者模式: 通过调用addListener()和removeListener()来添加、移除监听器(订阅者);通过调用notifyListeners() 可以触发所有监听器回调
class ProviderObservable implements Listenable {
  List<VoidCallback> listeners = [];

  @override
  void addListener(VoidCallback listener) {
    // 添加监听器
    listeners.add(listener);
  }

  @override
  void removeListener(VoidCallback listener) {
    // 移除监听器
    listeners.remove(listener);
  }

  void notifyListeners() {
    // 通知所有监听器,触发监听器回调
    for (var item in listeners) {
      item();
    }
  }
}

class ProviderStatefulWidget<T extends ProviderObservable> extends StatefulWidget {
  final Widget child;
  final T data;

  const ProviderStatefulWidget(
      {super.key, required this.data, required this.child});

  @override
  _ProviderStatefulWidgetState<T> createState() =>
      _ProviderStatefulWidgetState<T>();

  // 定义一个便捷方法,方便子树中的widget获取共享数据
  static T? of<T>(BuildContext context) {
    final provider =
        context.dependOnInheritedWidgetOfExactType<InheritedProviderWidget<T>>();
    return provider?.data;
  }
}

// 主要作用就是监听到共享状态(model)改变时重新构建Widget树
class _ProviderStatefulWidgetState<T extends ProviderObservable>
    extends State<ProviderStatefulWidget<T>> {
  void update() {
    // 如果数据发生变化(model类调用了notifyListeners),重新构建InheritedProvider
    setState(() => {});
  }

  @override
  void initState() {
    // 给model添加监听器
    widget.data.addListener(update);
    super.initState();
  }

  @override
  void didUpdateWidget(covariant ProviderStatefulWidget<T> oldWidget) {
    // 当Provider更新时,如果新旧数据不"==",则解绑旧数据监听,同时添加新数据监听
    if (widget.data != oldWidget.data) {
      oldWidget.data.removeListener(update);
      widget.data.addListener(update);
    }
    super.didUpdateWidget(oldWidget);
  }

  @override
  Widget build(BuildContext context) {
    // 在_ProviderStatefulWidgetState类中调用setState()方法,widget.child始终是同一个,所以执行build时,InheritedProvider的child引用的始终是同一个子widget,所以widget.child并不会重新build,这也就相当于对child进行了缓存
    return InheritedProviderWidget<T>(
      widget.data,
      child: widget.child,
    );
  }

  @override
  void dispose() {
    // 移除model的监听器
    widget.data.removeListener(update);
    super.dispose();
  }
}
示例:
class Item {
  Item(this.price, this.count);

  double price; //商品单价
  int count; // 商品份数
}

class CartModel extends ProviderObservable {
  // 用于保存购物车中商品列表
  final List<Item> _items = [];

  // 禁止改变购物车里的商品信息
  UnmodifiableListView<Item> get items => UnmodifiableListView(_items);

  // 购物车中商品的总价
  double get totalPrice =>
      _items.fold(0, (value, item) => value + item.count * item.price);

  // 将 [item] 添加到购物车。这是唯一一种能从外部改变购物车的方法。
  void add(Item item) {
    _items.add(item);
    // 通知监听器(订阅者),重新构建InheritedProvider, 更新状态。
    notifyListeners();
  }
}


class ProviderRoute extends StatefulWidget {
  const ProviderRoute({super.key});

  @override
  _ProviderRouteState createState() => _ProviderRouteState();
}

class _ProviderRouteState extends State<ProviderRoute> {
  @override
  Widget build(BuildContext context) {
    return Center(
      child: ProviderStatefulWidget(
        data: CartModel(),
        child: Column(
          children: [
            Builder(
              builder: (BuildContext context) {
                CartModel? data = ProviderStatefulWidget.of<CartModel>(context);
                return Text('总价:${data?.totalPrice}');
              },
            ),
            Builder(builder: (BuildContext context) {
              print('RaisedButton build');
              return ElevatedButton(
                onPressed: () {
                  // 给购物车中添加商品,添加后总价会更新
                  ProviderStatefulWidget.of<CartModel>(context)
                      ?.add(Item(20.0, 1));
                },
                child: const Text('添加商品'),
              );
            })
          ],
        ),
      ),
    );
  }
}
class InheritedProviderDemo extends StatelessWidget {
  const InheritedProviderDemo({super.key});
  @override
  Widget build(BuildContext context) {
    return MaterialApp(
      theme: ThemeData(
        colorScheme: ColorScheme.fromSeed(seedColor: Colors.deepPurple),
        useMaterial3: true,
      ),
      home: Scaffold(
        appBar: AppBar(
          title: const Text("InheritedProvider Demo"),
        ),
        body: Container(
          decoration: const BoxDecoration(
            color: Colors.transparent,
          ),
          child: const ProviderRoute(),
        ),
      ),
    );
  }
}
效果:
优化
Consumer
Builder(
    builder: (BuildContext context) {
      CartModel? data = ProviderStatefulWidget.of<CartModel>(context);
      return Text('总价:${data?.totalPrice}');
    },
  )
- 需要显式调用 ProviderStatefulWidget.of,当 APP 内部依赖 CartModel 很多时,这样的代码将很冗余。
- 语义不明确;由于 ProviderStatefulWidget 是订阅者,那么依赖 CartModel 的 Widget 自然就是订阅者,其实也就是状态的消费者,如果我们用 Builder 来构建,语义就不是很明确;如果我们能使用一个具有明确语义的 Widget,比如就叫 Consumer,这样最终的代码语义将会很明确,只要看到 Consumer,我们就知道它是依赖某个跨组件或全局的状态。
可以封装一个 Consumer Widget:
// 这是一个便捷类,会获得当前context和指定数据类型的Provider
class Consumer<T> extends StatelessWidget {
  const Consumer({
    Key? key,
    required this.builder,
  }) : super(key: key);

  final Widget Function(BuildContext context, T? value) builder;

  @override
  Widget build(BuildContext context) {
    return builder(
      context,
      ProviderStatefulWidget.of<T>(context),
    );
  }
}
Consumer 实现非常简单,它通过指定模板参数,然后再内部自动调用 ProviderStatefulWidget.of 获取相应的 Model,并且 Consumer 这个名字本身也是具有确切语义(消费者)。现在上面的代码块可以优化为如下这样:
Consumer<CartModel>( builder: (context, cart) => Text("[总价: ${cart?.totalPrice}"))
性能问题
我们点击 " 添加商品 " 按钮后,由于购物车商品总价会变化,所以显示总价的 Text 更新是符合预期的,但是 " 添加商品 " 按钮本身没有变化,是不应该被重新 build 的。但是我们运行示例,每次点击 " 添加商品 " 按钮,控制台都会输出 "ElevatedButton build" 日志,也就是说 " 添加商品 " 按钮在每次点击时其自身都会重新 build!这是为什么呢?如果你已经理解了 InheritedWidget 的更新机制,那么答案一眼就能看出:这是因为构建 ElevatedButton 的 Builder 中调用了 ProviderStatefulWidget.of,也就是说依赖了 Widget 树上面的 InheritedWidget(即 InheritedProviderWidget )Widget,所以当添加完商品后,CartModel 发生变化,会通知 ProviderStatefulWidget, 而 ProviderStatefulWidget 则会重新构建子树,所以 InheritedProviderWidget 将会更新,此时依赖它的子孙 Widget 就会被重新构建。
解决:用 getElementForInheritedWidgetOfExactType 替换 dependOnInheritedWidgetOfExactType
  // 添加一个listen参数,表示是否建立依赖关系
  static T? of2<T>(BuildContext context, {bool listen = true}) {
    final provider = listen
        ? context.dependOnInheritedWidgetOfExactType<InheritedProviderWidget<T>>()
        : context.getElementForInheritedWidgetOfExactType<InheritedProviderWidget<T>>()?.widget as InheritedProviderWidget<T>;
    return provider?.data;
  }
改成:
ElevatedButton(
    onPressed: () {
      // 给购物车中添加商品,添加后总价会更新
      ProviderStatefulWidget.of2<CartModel>(context, listen: false)
          ?.add(Item(20.0, 1));
    },
    child: const Text('添加商品'),
  )
点击 " 添加商品 " 按钮后,控制台不会再输出 "ElevatedButton build" 了,即按钮不会被重新构建了。而总价仍然会更新,这是因为 Consumer 中调用 ProviderStatefulWidget.of 时 listen 值为默认值 true,所以还是会建立依赖关系。
其他状态管理包
| 包名 | 介绍 |
|---|---|
| Provider & Scoped Model |
这两个包都是基于 InheritedWidget 的,原理相似 |
| Redux | 是 Web 开发中 React 生态链中 Redux 包的 Flutter 实现 |
| MobX | 是 Web 开发中 React 生态链中 MobX 包的 Flutter 实现 |
| BLoC | 是 BLoC 模式的 Flutter 实现 |