01 .FCM基础
FCM(Firebase Cloud Messaging)
Google FCM 框架概览
Firebase Cloud Messaging(FCM),之前称为 Google 云消息传递(GCM),是一种跨平台消息传递解决方案,它允许开发者安全地向在 iOS、Android 和 Web 上运行的应用发送通知和消息。这项服务由 Firebase 提供,Firebase 是 Google 旗下的一个为移动和网络应用程序提供平台的公司。
FCM 框架的整体工作流程如下:
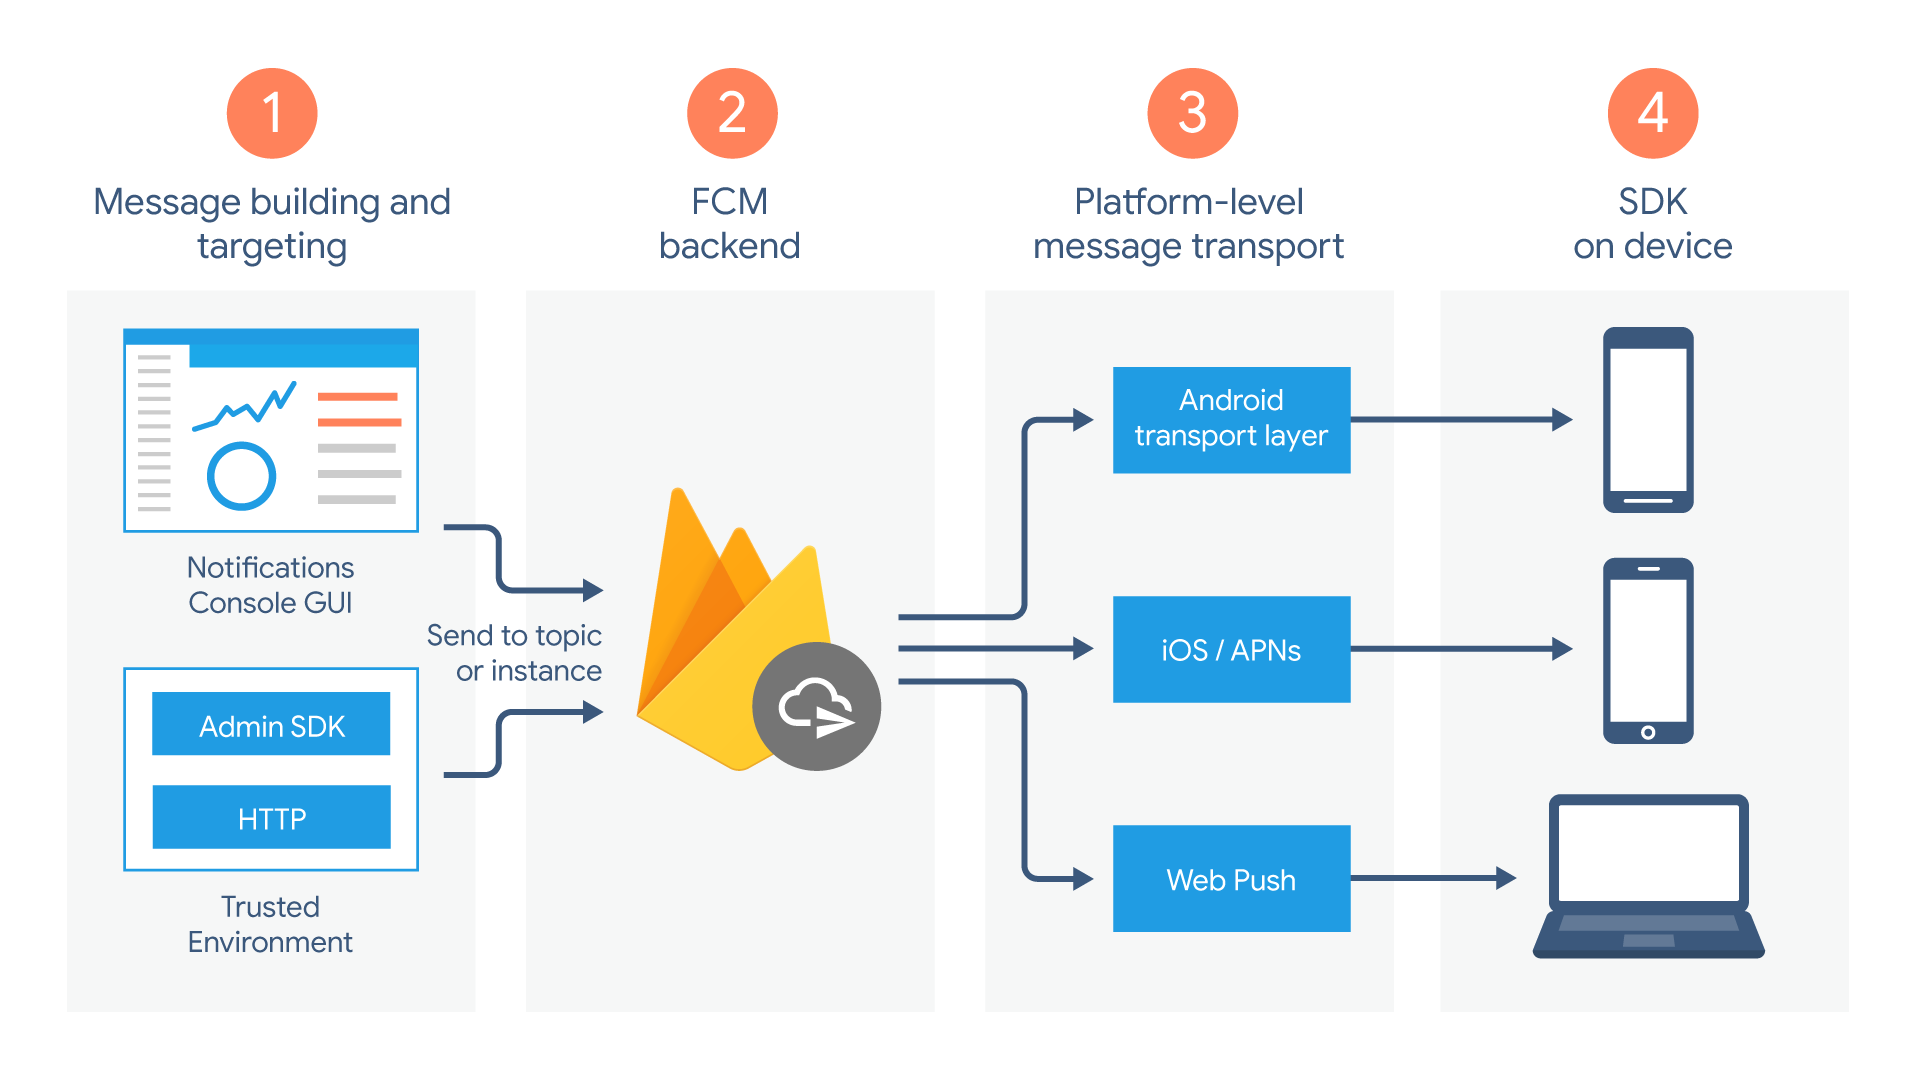
第一部分:消息的构建。消息的构建有两种方式:
- Firebase 控制台(Notifications Console GUI)
- FCM Admin SDK:服务端接入
FCM Admin SDK后按照一定规则构建通知消息,此种更加灵活,方便我们根据不同用户画像做不同的 App 营销处理。
第二部分:FCM BackEnd(FCM 后端),由 Google 负责,对已构建消息的分流处理,根据不同目标发送至不同平台用户。
第三部分:平台层,也就是我们 Android 设备,这里更多指的是 Android 设备上的 Google 服务,完成最原始消息的接收。也就是说,只有有 Google 服务的手机才能收到 FCM 推送。
第四部分:FCM SDK,进一步对消息进行处理,确定分发策略,最终会发送(回调)给接入了 FCM SDK 的目标 App。
当我们接入 FCM 时,只需关心第一、四部分即可。Google 大大简化了我们的使用过程。
FCM 集成
FCM 使用条件
- Android4.4 及以上设备
- 安装了 Google Play Store(Google Service 服务)
GCM uses an existing connection for Google services. For pre-3.0 devices, this requires users to set up their Google account on their mobile devices. A Google account is not a requirement on devices running Android 4.0.4 or higher
- 使用 Jetpack (AndroidX),这需要满足以下版本要求:
com.android.tools.build:gradle 3.2.1或更高版本compileSdkVersion 28或更高版本
- 不需要你的 APP 通过 Google Play Store 发布
- 也不需要 Google 账号
A Google account is not a requirement on devices running Android 4.0.4 or higher
FCM 集成步骤
Add Firebase to your Android project
方式一:
- 配置项目,下载
google-services.json放到 app module - 引入 GMS 服务插件,并应用
- 引入相关依赖
方式二:
通过 Firebase Assistant(Tools > Firebase)
Ref:
添加依赖 FCM SDK 依赖
有两种方式:
- 通过
Firebase Android BoM - 单独引入
FCM SDK
因为 Firebase SDK 集合除了 FCM 还有很多其他比较有用的 SDK,如果需要同时引入这些 SDK,难免会有一些依赖版本冲突的情况发生,所以更推荐使用 Firebase Android BoM 的方式引入,只需要指定目标 BoM 版本,后续只需按需引入其他 Firebase SDK 即可,这样可以保证所有引入的库的版本是兼容的。
这里我们选择引入 google-services 插件的方式,这样一方面在编译期 gradle 可以自动读取 google-services.json 中的内容,可以很大程度上减少了手动编码出错的可能。
另一方面,我们也无需在应用启动时,手动的编写初始化代码,让业务代码更加简洁。初始化步骤如下:
- 在项目级别
build.gradle文件中引入google-services插件:
buildscript {
    repositories {
        maven { url 'http://maven.aliyun.com/nexus/content/groups/public' }
        maven { url "https://dl.google.com/dl/android/maven2" }
        mavenCentral()
        google()
    }
    dependencies {
        // 引入 google-service插件
        classpath 'com.google.gms:google-services:4.3.15'
        // ...省略无关代码
    }
}
allprojects {
    repositories {
        mavenCentral()
        maven { url 'http://maven.aliyun.com/nexus/content/groups/public' }
        maven { url "https://dl.google.com/dl/android/maven2" }
        maven { url 'https://jitpack.io' }
        google()
    }
}
- 在应用级目录下的
build.gradle文件中应用插件(应用级目录):
plugins {
    id 'com.android.application'
    id 'org.jetbrains.kotlin.android'
    id 'com.google.gms.google-services' // 应用 google-service插件
}
Edit your app manifest
- 添加 FirebaseMessagingService 的实现类,用于 APP 在后台时接收消息数据
<service
  android:name="me.hacket.assistant.samples.google.firebase.fcm.MyFirebaseMessagingService"
  android:exported="false">
  <intent-filter>
    <action android:name="com.google.firebase.MESSAGING_EVENT" />
  </intent-filter>
</service>
- 可选,添加 notification 的 icon 和 color 如果消息没有的话
<!-- Set custom default icon. This is used when no icon is set for incoming notification messages.
     See README(https://goo.gl/l4GJaQ) for more. -->
<meta-data
    android:name="com.google.firebase.messaging.default_notification_icon"
    android:resource="@drawable/ic_stat_ic_notification" />
<!-- Set color used with incoming notification messages. This is used when no color is set for the incoming
     notification message. See README(https://goo.gl/6BKBk7) for more. -->
<meta-data
    android:name="com.google.firebase.messaging.default_notification_color"
    android:resource="@color/colorAccent" />
左上角的 icon 和 color
- 可选,FCM 提供了默认的 channel;Android8.0(API26) 及以上,如果需要自定义定义 notification channel,就用下面的来覆盖;用于到来的消息没有显示的指定 notification channel
<meta-data
    android:name="com.google.firebase.messaging.default_notification_channel_id"
    android:value="@string/default_notification_channel_id" />
Ref: Set up a Firebase Cloud Messaging client app on Android | Edit your app manifest
检查 Google Play 服务是否可用
依靠 Play 服务 SDK 运行的应用在访问 Google Play 服务功能之前,应始终检查设备是否拥有兼容的 Google Play 服务 APK。我们建议您在以下两个位置进行检查:主 Activity 的 onCreate() 方法中,及其 onResume() 方法中。onCreate() 中的检查可确保该应用在检查成功之前无法使用。onResume() 中的检查可确保当用户通过一些其他方式返回正在运行的应用(比如通过返回按钮)时,检查仍将继续进行。
如果设备没有兼容的 Google Play 服务版本,您的应用可以调用 GoogleApiAvailability.makeGooglePlayServicesAvailable(),以便让用户从 Play 商店下载 Google Play 服务。
检测 Google Play Service 是否可用
https://developers.google.com/android/reference/com/google/android/gms/common/GoogleApiAvailability
- isGooglePlayServicesAvailable(Context)
校验 Google Play services 是否安装和可用在这台设备上,并且设备安装的版本不低于 App 需要的版本
object GoogleUtils {
    private const val TAG = "google"
    /**
     * 检查 Google Play 服务
     */
    @JvmStatic
    fun onCheckGooglePlayServices(activity: Activity) {
        // 验证是否已在此设备上安装并启用Google Play服务,以及此设备上安装的旧版本是否为此客户端所需的版本
        val code = GoogleApiAvailability.getInstance().isGooglePlayServicesAvailable(activity)
        if (code == ConnectionResult.SUCCESS) {
            // 支持Google服务
            LogUtils.i(TAG, "支持Google服务")
        } else {
            GoogleApiAvailability.getInstance()
                    .makeGooglePlayServicesAvailable(activity)
                    .addOnCanceledListener {
                        LogUtils.w(TAG, "Google服务cancel")
                    }
                    .addOnFailureListener {
                        LogUtils.printStackTrace(it)
                        LogUtils.w(TAG, "Google服务failure ${it.message}")
                    }
                    .addOnSuccessListener {
                        LogUtils.i(TAG, "Google服务success")
                    }
                    .addOnCompleteListener {
                        LogUtils.i(TAG, "Google服务complete")
                    }
            T.logAndToast(TAG, "不支持Google服务.")
            //不支持时,可以利用getErrorDialog得到一个提示框, 其中第2个参数传入错误信息
            //提示框将根据错误信息,生成不同的样式
            //例如,我自己测试时,第一次Google Play Service不是最新的,
            //对话框就会显示这些信息,并提供下载更新的按键
            if (GlobalContext.isDebugMode()) {
                if (GoogleApiAvailability.getInstance().isUserResolvableError(code)) {
                    GoogleApiAvailability.getInstance().getErrorDialog(activity, code, 0).show()
                }
            }
        }
    }

}
获取 token,上报 token,更新 token
初次启动您的应用时,FCM SDK 会为客户端应用实例生成一个注册令牌 (registration token)。如果您希望指定单一目标设备或者创建设备组,需要扩展 FirebaseMessagingService 并重写 onNewToken 来获取此令牌。
Token 更新时机:
- 应用删除实例 ID
- 应用在新设备上恢复
- 用户卸载/重新安装应用
- 用户清除应用数据
检索当前注册令牌
如果需要检索当前令牌,请调用 FirebaseMessaging.getInstance().getToken()。
object PushToken {
    internal const val TAG = "hacket.firebase"
    /**
     * 刷新FCM token
     * 注册令牌可能会在发生下列情况时更改:
     * 1. 应用删除实例 ID
     * 2. 应用在新设备上恢复
     * 3. 用户卸载/重新安装应用
     * 4. 用户清除应用数据
     */
    @JvmStatic
    @JvmOverloads
    fun updatePushToken(@From from: String = From.launch) {
//        Log.d(TAG, "updatePushToken from=$from")
        FirebaseMessaging.getInstance().token
            .addOnCompleteListener(
                OnCompleteListener { task ->
                    if (!task.isSuccessful) {
                        task.exception?.printStackTrace()
                        return@OnCompleteListener
                    }
                    val result = task.result
                    if (result != null) {
                        // 获取新的token
                        val token = result
//                        sendRegistrationToServer(from, token)
                    } else {
                        return@OnCompleteListener
                    }
                }
            )
    }
    @StringDef(
        From.launch,
        From.login_in,
        From.login_out,
        From.app_clear,
        From.refresh_token
    )
    annotation class From {
        companion object {
            const val launch = "launch"
            const val login_in = "login_in"
            const val login_out = "login_out"
            const val app_clear = "app_clear"
            const val refresh_token = "refresh_token"
        }
    }
}
监控令牌的生成
每当生成新令牌时,都会触发 onNewToken 回调函数。
/**
 * Called if the FCM registration token is updated. This may occur if the security of
 * the previous token had been compromised. Note that this is called when the
 * FCM registration token is initially generated so this is where you would retrieve the token.
 */
override fun onNewToken(token: String) {
    Log.d(TAG, "Refreshed token: $token")

    // If you want to send messages to this application instance or
    // manage this apps subscriptions on the server side, send the
    // FCM registration token to your app server.
    sendRegistrationToServer(token)
}
消息的处理
AndroidMainfest 定义
- 扩展 FirebaseMessagingService 并在
AndroidMainfest.xml中声明:
<service
	android:name="me.hacket.assistant.samples.google.firebase.fcm.MyFirebaseMessagingService"
	android:exported="false">
	<intent-filter>
		<action android:name="com.google.firebase.MESSAGING_EVENT" />
	</intent-filter>
</service>
扩展 FirebaseMessagingService
- token 的保存和消息的接收
/**
 * FCM 消息接收服务
 *
 * 推送分为 dataMessage(数据消息)和notification(通知消息)两种
 *
 * 区别在于:
 *
 * 1.无论应用程序位于前台还是后台,dataMessage(数据消息)都会在onMessageReceived()中处理。 数据消息是传统上与GCM一起使用的类型。
 *
 * 2.notification(通知消息)仅当应用程序位于前台时,才会在onMessageReceived()中接收。 当应用程序在后台时,将显示自动生成的通知,不会再onMessageReceived()中接收。
 *
 * 当用户点击通知时,他们将返回到应用程序。 包含通知和数据有效负载的消息将被视为通知消息。 Firebase控制台始终发送通知消息。
 */
class MyFirebaseMessagingService : FirebaseMessagingService() {
    companion object {
        private const val TAG = PushToken.TAG
        const val IS_CLICK_FROM_PUSH = "is_click_from_push"
        const val PUSH_REPORT_TITLE = "report_title"
        const val PUSH_REPORT_CONTENT = "report_cnt"
        const val PUSH_REPORT_ID = "report_push_id"

        private const val NOTIFICATION_ID = 0x113

        fun getCurrentProcessName(context: Context): String? {
            val mypid = Process.myPid()
            val manager = context.getSystemService(ACTIVITY_SERVICE) as ActivityManager
            val infos = manager.runningAppProcesses
            if (ListUtils.isEmpty(infos)) {
                return null
            }
            for (info in infos) {
                if (info.pid == mypid) {
                    return info.processName
                }
            }
            // may never return null
            return null
        }
    }
    /**
     * @param remoteMessage 表示从Firebase Cloud Messaging收到的消息的对象,它包含了接收到的推送的所有内容
     */
    override fun onMessageReceived(remoteMessage: RemoteMessage) {
        super.onMessageReceived(remoteMessage)
        dispatchNotification(remoteMessage)
    }

    private fun dispatchNotification(message: RemoteMessage) {
        // 公共的
        val ttl = message.ttl
        val collapseKey = message.collapseKey
        val priority = message.priority
        val from = message.from
        val rawData = message.rawData
        val rawDateStr = String(rawData ?: ByteArray(0))
        // notification
        val notification = message.notification
        // data
        val data = message.data

        val foreground = ForegroundCallbacks.get().isForeground
        Log.d(
            TAG,
            "1.dispatchNotification\n foreground=$foreground,priority=$priority,collapseKey=$collapseKey,ttl=$ttl,from=$from\n notification=$notification \n data=${data}\n rawData=$rawDateStr \n bundle=${
            GsonUtils.toJson(
                message
            )
            }\n process=${getCurrentProcessName(applicationContext)}"
        )
        buildNotificationMessage(message)
        buildDataMessage(message)
    }
    private fun buildDataMessage(message: RemoteMessage) {
        val data = message.data
        if (data.isEmpty()) {
            Log.e(
                TAG,
                "3.buildDataMessage[data=null] process=${getCurrentProcessName(applicationContext)}"
            )
            return
        }
        Log.i(
            TAG,
            "3-1.buildDataMessage[data!=null]\n data=${message.data}\nprocess=${
            getCurrentProcessName(
                applicationContext
            )
            }"
        )
    }
    private fun buildNotificationMessage(
        message: RemoteMessage
    ) {
        val notification = message.notification
        if (notification == null) {
            Log.e(
                TAG,
                "2.buildNotificationMessage[notification=null] process=${
                getCurrentProcessName(
                    applicationContext
                )
                }"
            )
            return
        }

        val title = notification.title
        val body = notification.body
        val icon = notification.icon
        val imageUrl = notification.imageUrl
        val link = notification.link
        val channelId = notification.channelId
        val clickAction = notification.clickAction
        Log.i(
            TAG,
            "2-1.buildNotificationMessage[notification!=null]\n title=$title,body=$body,icon=$icon" +
                ",imageUrl=$imageUrl,clickAction=$clickAction,link=$link,channelId=$channelId\nprocess=${
                getCurrentProcessName(
                    applicationContext
                )
                }"
        )
        val notificationUtils = NotificationUtils(applicationContext)
            .setContentIntent(buildPendingIntent(message))

        val url = if (!icon.isNullOrBlank()) icon else imageUrl?.toString()
        if (url.isNullOrBlank()) {
            Log.i(
                TAG,
                "2-2.buildNotificationMessage[推送]无图,send默认Notification process=${
                getCurrentProcessName(applicationContext)
                }"
            )
            notificationUtils.sendNotification(
                NOTIFICATION_ID,
                title,
                body,
                R.drawable.ic_notitification
            )
        } else {
            val bitmap = BitmapUtils.getBitmapFormUrl(url)
            if (bitmap != null) {
                Log.i(
                    TAG,
                    "2-3.buildNotificationMessage loadBitmap[推送]有大图,send带图片Notification process=${
                    getCurrentProcessName(applicationContext)
                    }"
                )
                notificationUtils.setLarge(bitmap)
            }
            notificationUtils.sendNotification(
                NOTIFICATION_ID,
                "local_$title",
                "local_$body",
                R.drawable.ic_notitification
            )
        }
    }

    private fun buildPendingIntent(message: RemoteMessage): PendingIntent {
        val data = message.data
        val intent = Intent(applicationContext, FCMResultActivity::class.java)
        val deepLink = data[PushResModel.KEY_DEEPLINK]
        val reportTitle = data[PushResModel.KEY_REPORT_TITLE]
        val reportContent = data[PushResModel.KEY_REPORT_CNT]
        val reportPushId = data[PushResModel.KEY_REPORT_PUSH_ID]
        // val pushId = data[PushResModel.KEY_PUSH_ID]
        if (deepLink.isNullOrBlank().not()) {
            intent.data = Uri.parse(deepLink)
        }
        intent.putExtra(IS_CLICK_FROM_PUSH, true)
        intent.putExtra(PUSH_REPORT_TITLE, reportTitle)
        intent.putExtra(PUSH_REPORT_CONTENT, reportContent)
        intent.putExtra(PUSH_REPORT_ID, reportPushId)

        Log.d(
            TAG,
            "9.buildPendingIntent[推送]deepLink=$deepLink process=${
            getCurrentProcessName(applicationContext)
            }"
        )
        val flag = if (Build.VERSION.SDK_INT >= Build.VERSION_CODES.S) {
            PendingIntent.FLAG_IMMUTABLE
        } else {
            PendingIntent.FLAG_UPDATE_CURRENT
        }
        return PendingIntent.getActivity(applicationContext, 0, intent, flag)
    }

    /**
     * 如果更新了InstanceID令牌,则调用此方法。 当先前令牌的安全性受到损害,则可能更新令牌。 最初生成InstanceID令牌时也会调用此方法,因此您可以在此处检索令牌。
     *
     * 该回调方法可以代替Demo工程中的的MyFirebaseInstanceIDService。 Demo工程中FirebaseInstanceIdService这个类也已经被废弃了。
     */
    override fun onNewToken(newToken: String) {
        Log.w(
            TAG,
            "[推送]10.Refreshed newToken\n $newToken process=${
            getCurrentProcessName(applicationContext)
            }"
        )
        SchedulerUtils.runInMain {
            CompatUtil.copyToClipboard(GlobalContext.getAppContext(), newToken)
            toast("[推送]11.newToken=$newToken process=${getCurrentProcessName(applicationContext)}")
        }
        // 可以在这里将用户的FCM InstanceID令牌与应用程序维护的任何服务器端帐户关联起来。
//        PushToken.sendRegistrationToServer(PushToken.From.refresh_token, newToken)
    }
}
扩展 FirebaseMessagingService 后,有三个方法可以重写:
- onNewToken:每次有新 token 生成时回调,我们可以利用这个机制保存 token
- onMessageReceived:
- 对于
notification通知消息:如果 App 在前台并收到消息时,这个方法就会回调。RemoteMessage 的数据结构和之前提到的 Json 一一对应,这就不展开了。若果 App 处于后台,消息则会直接展示在通知栏(需通知权限) - 对于
data数据消息:无论 App 处于前台还是后台,都会回调到这个方法 - 参数 RemoteMessage 中的 Notification 类型的 notification 对象,用于承载通知消息的数据
- 对于
- onDeletedMessages : Push 消息被删除时回调
通知权限
Android13 及以上新增运行时通知权限
Android 13 中引入了用于显示通知的新运行时权限。该项引入会影响在 Android 13 或更高版本上使用 FCM 通知的所有应用。
默认情况下,FCM SDK(23.0.6 或更高版本)中包含清单中定义的 POST_NOTIFICATIONS 权限。不过,您的应用还需要通过常量 android.permission.POST_NOTIFICATIONS 请求此权限的运行时版本。在用户授予此权限之前,您的应用将无法显示通知。
<uses-permission android:name="android.permission.POST_NOTIFICATIONS" />
如需请求该项新运行时权限,请执行以下操作:
// 旧的权限申请代码
if (Build.VERSION.SDK_INT >= Build.VERSION_CODES.TIRAMISU) {
    if (ContextCompat.checkSelfPermission(this, "android.permission.POST_NOTIFICATIONS") ==
        PackageManager.PERMISSION_GRANTED
    ) {
    }  else {

    }
}

// 使用registerForActivityResult
// Declare the launcher at the top of your Activity/Fragment:
private val requestPermissionLauncher = registerForActivityResult(
    ActivityResultContracts.RequestPermission(),
) { isGranted: Boolean ->
    if (isGranted) {
        // FCM SDK (and your app) can post notifications.
    } else {
        // TODO: Inform user that that your app will not show notifications.
    }
}
private fun askNotificationPermission() {
    // This is only necessary for API level >= 33 (TIRAMISU)
    if (Build.VERSION.SDK_INT >= Build.VERSION_CODES.TIRAMISU) {
        if (ContextCompat.checkSelfPermission(this, Manifest.permission.POST_NOTIFICATIONS) ==
            PackageManager.PERMISSION_GRANTED
        ) {
            // FCM SDK (and your app) can post notifications.
        } else if (shouldShowRequestPermissionRationale(Manifest.permission.POST_NOTIFICATIONS)) {
            // TODO: display an educational UI explaining to the user the features that will be enabled
            //       by them granting the POST_NOTIFICATION permission. This UI should provide the user
            //       "OK" and "No thanks" buttons. If the user selects "OK," directly request the permission.
            //       If the user selects "No thanks," allow the user to continue without notifications.
        } else {
            // Directly ask for the permission
            requestPermissionLauncher.launch(Manifest.permission.POST_NOTIFICATIONS)
        }
    }
}
Android13 以下
Android 12L(API 级别 32)或更低版本的应用上的通知权限:当您的应用首次创建通知 Channel 时,只要应用处于前台,Android 便会自动请求用户授予该权限。不过,关于创建 Channel 和请求权限的时机,需要注意下面一些重要事项:
- 如果您的应用是在后台运行时创建的第一个通知渠道(FCM SDK 在收到 FCM 通知时便会在后台创建通知渠道),Android 不会允许该通知显示出来,并且直到用户下次打开应用时才会提示他们授予通知权限。这意味着,在用户打开应用并授予该权限之前收到的所有通知都将丢失。
- 我们强烈建议您将应用更新为使用 Android 13 及更高版本,以便能够利用平台的 API 来请求权限。如果您无法进行此更新,您的应用应该在您向其发送任何通知之前创建通知渠道,以便触发通知权限对话框,并确保不会丢失通知。如需了解详情,请参阅 通知权限最佳实践。
移除 POST_NOTIFICATIONS 权限
默认情况下,FCM SDK 包含 POST_NOTIFICATIONS 权限。如果您的应用不使用通知消息(无论是通过 FCM 通知、通过其他 SDK 还是由您的应用直接发布),并且您不想让应用包含该权限,则可以使用 清单合并 的 remove 标记移除该权限。请注意,移除此权限会阻止系统显示所有通知,而不仅仅是 FCM 通知。将以下内容添加到应用的清单文件中:
<uses-permission android:name="android.permission.POST_NOTIFICATIONS" tools:node="remove"/>
防止自动初始化
在生成 FCM 注册令牌后,库会将标识符和配置数据上传到 Firebase。如果您希望阻止自动生成令牌,请将以下元数据值添加到 AndroidManifest.xml,以停用 Analytics 数据收集和 FCM 自动初始化功能(您必须同时停用这两项功能):
<meta-data
    android:name="firebase_messaging_auto_init_enabled"
    android:value="false" />
<meta-data
    android:name="firebase_analytics_collection_enabled"
    android:value="false" />
如需重新启用 FCM 自动初始化功能,请执行运行时调用:
Firebase.messaging.isAutoInitEnabled = true
如需重新启用 Analytics 数据收集,请调用 FirebaseAnalytics 类的 setAnalyticsCollectionEnabled() 方法。例如:
setAnalyticsCollectionEnabled(true);
这些值一经设置,即使应用重启也将持续生效。
设备解锁
如果 App 只能在设备解锁的前提下收到消息,如果想要在解锁前收到消息,还需要完成如下设置:
添加 firebase-messaging-directboot 依赖:
// 如果是Firebase BoM方式依赖
implementation 'com.google.firebase: firebase-messaging-directboot'
// 否则
implementation 'com.google.firebase:firebase-messaging-directboot:20.2.0'
给 Service 添加directBootAware属性
<service
	android:name="me.hacket.assistant.samples.google.firebase.fcm.MyFirebaseMessagingService"
	android:directBootAware="true"
	android:exported="false">
	<intent-filter>
		<action android:name="com.google.firebase.MESSAGING_EVENT" />
	</intent-filter>
</service>
FCM 消息类型
FCM 消息简介 | Firebase Cloud Messaging
Notification message(通知消息)
- 包含了一些预定于的用户可见的 keys
- 包含了一些可选的 data payload,最大的 payload 数据大小为 4KB,但从 Firebase 控制台发送消息时除外,在那种情况下,系统会强制执行 1024 个字符的限制
- APP 在后台时由 FCM SDK 内部自己处理;在前台时,回调
FirebaseMessagingService#onMessageReceived这个方法自行处理
用 HTTP v1 推送的 json 文件,设置 notification 节点:
{
  "message":{
    "token":"bk3RNwTe3H0:CI2k_HHwgIpoDKCIZvvDMExUdFQ3P1...",
    "notification":{
      "title":"Portugal vs. Denmark",
      "body":"great match!"
    }
  }
}
在启动页,添加处理,将数据传递到启动页 Intent
// Handle possible data accompanying notification message.
// [START handle_data_extras]
if (getIntent().getExtras() != null) {
    for (String key : getIntent().getExtras().keySet()) {
        Object value = getIntent().getExtras().get(key);
        Log.d(TAG, "Key: " + key + " Value: " + value);
    }
}
Data message(数据消息)
- Data messages 只包含用户自定义的 keys,key 不能是保留的字段,包括
from、notification、message_type、google或gcm等 - 用户只能在应用内收到应用内消息,消息到来会回调到
FirebaseMessagingService#onMessageReceived方法
带 data 的 json 文件:
{
  "message":{
    "token":"bk3RNwTe3H0:CI2k_HHwgIpoDKCIZvvDMExUdFQ3P1...",
    "data":{
      "Nick" : "Mario",
      "body" : "great match!",
      "Room" : "PortugalVSDenmark"
    }
  }
}
/**
 * FCM 消息接收服务
 *
 * 推送分为 dataMessage(数据消息)和notification(通知消息)两种
 *
 * 区别在于:
 *
 * 1.无论应用程序位于前台还是后台,dataMessage(数据消息)都会在onMessageReceived()中处理。 数据消息是传统上与GCM一起使用的类型。
 *
 * 2.notification(通知消息)仅当应用程序位于前台时,才会在onMessageReceived()中接收。 当应用程序在后台时,将显示自动生成的通知,不会再onMessageReceived()中接收。
 *
 * 当用户点击通知时,他们将返回到应用程序。 包含通知和数据有效负载的消息将被视为通知消息。 Firebase控制台始终发送通知消息。
 */
class MyFirebaseMessagingService : FirebaseMessagingService() {
    companion object {
        private val TAG = PushToken.TAG
        private val NOTIFICATION_ID = 0x113
    }

    init {
        LogUtils.i(TAG, "${anchor("init")}.")
        RxBus.getDefault<Int>().receive(Constants.RxBusTag.TAG_LOGIN_EVENT_LOGIN_IN,
                object : RxBusReceiver<Int>() {
                    override fun receive(data: Int) {
                        LogUtils.i(TAG, "${this@MyFirebaseMessagingService.anchor("rxbus")}登录成功,更新FCM Token.")
                        PushToken.updatePushToken(PushToken.From.login_in)
                    }
                })

        RxBus.getDefault<Int>().receive(Constants.RxBusTag.TAG_LOGIN_EVENT_LOGIN_OUT,
                object : RxBusReceiver<Int>() {
                    override fun receive(data: Int) {
                        LogUtils.i(TAG, "${this@MyFirebaseMessagingService.anchor("rxbus")}退出登录,更新FCM Token.")
                        PushToken.updatePushToken(PushToken.From.login_out)
                    }
                })
    }

    /**
     * @param remoteMessage 表示从Firebase Cloud Messaging收到的消息的对象,它包含了接收到的推送的所有内容
     */
    override fun onMessageReceived(remoteMessage: RemoteMessage?) {
        super.onMessageReceived(remoteMessage)

        if (remoteMessage == null) {
            return
        }
        LogUtils.d(TAG, "收到推送 From: " + remoteMessage.from)

        // Check if message contains a data payload.
        if (remoteMessage.data.isNotEmpty()) {
            LogUtils.d(TAG, "收到推送 Message data payload: " + remoteMessage.data)
        }

        // Check if message contains a notification payload.
        T.logAndToast(TAG, "收到通知 Message Notification Body: $remoteMessage")
        sendNotification(remoteMessage)
    }

    private fun sendNotification(message: RemoteMessage) {
        val notification = message.notification ?: return

        // val from = message.from
        val title = notification.title
        val body = notification.body
        val icon = notification.icon
        val imageUrl = notification.imageUrl
        val link = notification.link
        val channelId = notification.channelId

        LogUtils.d(TAG, "${anchor("sendNotification")}title=$title\tbody=$body\ticon=$icon"
                + "\timageUrl=$imageUrl	link=$link\tchannelId=$channelId\tdata=${message.data}")

        val url = if (!icon.isNullOrBlank()) icon else imageUrl?.toString()
        Phoenix.with(applicationContext)
                .setUrl(url)
                .setResult {
                    val notificationUtils = NotificationUtils(applicationContext)
                            .setContentIntent(buildPendingIntent(message))
                    if (it != null) {
                        LogUtils.i(TAG, "${this@MyFirebaseMessagingService.anchor("loadBitmap")}有大图,设置Notification大图")
                        notificationUtils.setLarge(it)
                    }
                    var d = R.drawable.ic_notitify_black
                    if (Build.VERSION.SDK_INT >= Build.VERSION_CODES.LOLLIPOP) {
                        d = R.drawable.ic_notitify_white
                    }
                    notificationUtils.sendNotification(NOTIFICATION_ID, title, body, d)
                }
                .load()
    }

    private fun buildPendingIntent(message: RemoteMessage): PendingIntent {
        val data = message.data
        val intent = Intent(applicationContext, SchemeFilterActivity::class.java)
        val deepLink = data[PushResModel.KEY_DEEPLINK]
        // val pushId = data[PushResModel.KEY_PUSH_ID]
        if (deepLink.isNullOrBlank().not()) {
            intent.data = Uri.parse(deepLink)
        }
        LogUtils.d(TAG, "${anchor("buildPendingIntent")}data=$data")
        return PendingIntent.getActivity(applicationContext, 0,
                intent, PendingIntent.FLAG_UPDATE_CURRENT)
    }

    /**
     * 如果更新了InstanceID令牌,则调用此方法。 当先前令牌的安全性受到损害,则可能更新令牌。 最初生成InstanceID令牌时也会调用此方法,因此您可以在此处检索令牌。
     *
     * 该回调方法可以代替Demo工程中的的MyFirebaseInstanceIDService。 Demo工程中FirebaseInstanceIdService这个类也已经被废弃了。
     */
    override fun onNewToken(newToken: String?) {
        if (newToken.isNullOrBlank()) {
            return
        }
        LogUtils.w(TAG, "Refreshed newToken\t$newToken")
        if (GlobalContext.isDebugMode()) {
            CompatUtil.copyToClipboard(newToken)
            T.showShortDebug(newToken + "已拷贝")
        }
        // 可以在这里将用户的FCM InstanceID令牌与应用程序维护的任何服务器端帐户关联起来。
        PushToken.sendRegistrationToServer(PushToken.From.refresh_token, newToken)
    }

}
Notification message 和 Data message
使用 FCM,您可以向客户端发送两种类型的消息:
- notification messages, 通知消息,有时被视为 " 显示消息 ";FCM SDK 内部处理,消息中将包含一个 "
notification" 字段
{
  "message":{
    "token":"bk3RNwTe3H0:CI2k_HHwgIpoDKCIZvvDMExUdFQ3P1...",
    "notification":{
      "title":"标题",
      "body":"我是内容!"
    }
  }
}
- data messages,数据消息;而数据消息所谓的由客户端自行处理,也仍然经过 Fcm SDK,只不过 Fcm SDK 并不会对其进行任何处理,只是直接投递到客户端罢了。对应的,数据消息的识别字段是 "data"。
{
  "message":{
    "token":"bk3RNwTe3H0:CI2k_HHwgIpoDKCIZvvDMExUdFQ3P1...",
    "data":{
      "Nick" : "Mario",
      "body" : "内容",
    }
  }
}
| 使用场景 | 如何使用 | |
|---|---|---|
| Notification message | - APP 在后台,FCM SDK 自动处理 notificaation 节点数据展示通知,忽略 data 节点的数据 - APP 在前台,APP 自己处理该行为,可处理 notification 和 data 节点的数据,会回调 FirebaseMessagingService |
- HTTP v1 带上 notification 节点,可选带 data 节点,总是可 collapsible 的,会忽略 collapsed_key 的设置- 用 Notifications composer |
| Data message | - APP 负责处理 data message,只有自定义的 key-value,没有预定义的 key-value - APP 在前台还是后台都会回调 FirebaseMessagingService |
- 用 HTTP v1 带上 data 节点,不能有 notification 节点 |
抉择:
- 如果你想让 FCM SDK 自动处理 APP 在后台时展示 notification,用 Notification message
- 如果 APP 想自己处理消息的话,用 data message
Fcm SDK 是通过识别关键字段来进行消息的分类处理,所以上述的 "notification","data" 都是 fcm 识别的关键字之一,定义数据消息时就需要特别注意,按需设置关键字段。同时如果要明确发送数据消息(非通知消息)还需要避开 "from"、"message_type" 或以 "google" 或 "gcm" 开头的任何字词。
无论是通知消息还是数据消息都包含了一个 token 字段,这个字段是由 Fcm SDK 生成用于标识当前客户端的,客户端可以将这个值保存下来并上报给服务端,这样后续服务端就可以通过指定 token 字段的值,定向向指定客户端发送消息了,做到精准营销用户。
Collapsed message 和 Group Notification
collapsed message 离线消息缓存策略
non-collapsible message
不可折叠消息(non-collapsible) 表示每条消息都会单独的传递到设备。
不可折叠消息的一些典型用例是聊天消息或关键消息,例如,在 IM 应用程序中,您可能希望传递每条消息,因为每条消息都有不同的内容。
对于 Android,在不折叠的情况下最多可以存储 100 条消息,如果达到限制,则丢弃所有存储的消息。当设备重新上线时,它会收到一条特殊消息,表明已达到限制。
collapsible message
可折叠消息(collapsible) 是如果尚未传送到设备则可以被新消息替换的消息。
折叠消息的典型用例是用来告知 App 同步服务器的数据,例如体育 App,只需要更新最新的得分,只有最新的消息有用。
FCM 服务对一个设备能同时存储 4 个不同 collapse_key,超过 4 个的话,FCM 只保留 4 个 key,不保证哪些 key 会被保存。
- notification message 默认是可折叠的消息并且会忽略
collapse_key参数,notification message payload 隐式的使用了 collapse_key,为应用的包名;其他的都是不可折叠的 - 从 Notifications Composer(Web 控制台)发送的所有消息都是可折叠的;有一个隐含的 collapse_key
- collapse_key 只作用于 data message(即推送的 json 中没有 notification 节点,只有 data 节点)
group notification 和 collapsible notifications 区别
- group notification 表示同一个 group 消息,称为分组消息;Android7.0 及以上会分组折叠成一条消息,也可以展开展示所有消息;分组消息达到 4 条自动分组折叠起来
- FCM 定义的,FCM collapse messages 指的是如果消息还未到达设备,还在 FMC Server,那么这些相同
collapse_key的消息会被新的消息替换掉,只有新的消息会到达设备;FCM 服务对一个设备能同时存储 4 个不同collapse_key,超过 4 个的话,FCM 只保留 4 个 key,不保证哪些 key 会被保存
Ref
默认 group
APP 不在线,推送了 6 条消息,设备再次连接后,收到了 6 条消息
collapsed 消息实现
FCM 在不同平台通过不同方式实现折叠消息:
- Android 通过
collapse_key - iOS 通过
apns_collapse_id - Web/JS 通过
Topic实现
REST Resource: projects.messages json文件
{
  "name": string,
  "data": {
    string: string
  },
  "notification": {
    object (Notification)
  },
  "android": {
    object (AndroidConfig)
  },
  "webpush": {
    object (WebpushConfig)
  },
  "apns": {
    object (ApnsConfig)
  },
  "fcm_options": {
    object (FcmOptions)
  },

  // Union field target can be only one of the following:
  "token": string,
  "topic": string,
  "condition": string
  // End of list of possible types for union field target.
}
- name string,output only。发送消息标识符,格式:
projects/*/message/{message_id} - data input only。任意的 key/value,必须 UTF-8 编码;key 不能是保留字(from,message_type 或其他任意以 google/gcm 开头的字符)
- notification input only,object(Notification)。基本的消息模板(跨平台)
- Android input only,object(AndroidConfig)。Android 平台特有的消息配置
- webpush input only,object(WebpushConfig)。Web 平台特有的消息配置
- apns input only,object(ApnsConfig)。Apple 平台特有的消息配置
- fcm_options input only,FcmOptions。FCM SDK 可选的跨平台 feature
下面 3 个是 required,input only,推送消息的 target,只能是这三个中的一个:
- token 注册的 token,可通过
FirebaseMessaging.getInstance().token获取到 - topic 发送消息的主题,如 weather,但
/topics/前缀不能提供 - condition 发送消息的条件,如
foo' in topics && 'bar' in topics
notification 通用的
{
  "title": string,
  "body": string,
  "image": string
}
data 通用的
自定义 key-value,key 不要是保留的字符
android
android 可配置的字段
{
  "collapse_key": string,
  "priority": enum (AndroidMessagePriority),
  "ttl": string,
  "restricted_package_name": string,
  "data": {
    string: string,
  },
  "notification": {
    object (AndroidNotification)
  },
  "fcm_options": {
    object (AndroidFcmOptions)
  },
  "direct_boot_ok": boolean
}
- collapse_key 标识一组消息可以被折叠,只有最新的消息会被发送给终端;最多 4 个不同的 collapse_key;只能用于 data message
- priority 消息的优先级
- ttl 如果设备离线了消息保存在 FCM 服务器多少秒丢弃,最大支持 4 周,未设置默认是 4 周;设置为 0 如果你想要立即发送消息。如 3.5s 表示 3.5 秒
- restricted_package_name 注册 token 需要匹配的应用包名才能接收消息
- data 自定义的 key/value,会覆盖通用的 data 配置
- notification AndroidNotification 发送给设备的 notification,会覆盖通用的 notification 配置
- fcm_options AndroidFcmOptions 可 FCM SDK 可选的 feature
- direct_boot_ok boolean 如果设置为 true,当设备 boot 时,消息会被发送给 App
AndroidNotification
{
  "title": string,
  "body": string,
  "icon": string,
  "color": string,
  "sound": string,
  "tag": string,
  "click_action": string,
  "body_loc_key": string,
  "body_loc_args": [
    string
  ],
  "title_loc_key": string,
  "title_loc_args": [
    string
  ],
  "channel_id": string,
  "ticker": string,
  "sticky": boolean,
  "event_time": string,
  "local_only": boolean,
  "notification_priority": enum (NotificationPriority),
  "default_sound": boolean,
  "default_vibrate_timings": boolean,
  "default_light_settings": boolean,
  "vibrate_timings": [
    string
  ],
  "visibility": enum (Visibility),
  "notification_count": integer,
  "light_settings": {
    object (LightSettings)
  },
  "image": string,
}
- tag 设置了 tag 后新消息会替换掉旧消息,其实就相当于本地通知的 notification_id
- channel_id 渠道 id,需要创建好渠道
- image 图片 url
设置消息的优先级
ttl
tl 表示离线用户消息缓存在 FCM 服务器的时间,此时用户设备不在线
- 未设置默认是 4 周(28 天);此值必须是介于 0 至 2,419,200 秒(28 天)之间的一段持续时间,其对应于 FCM 存储并尝试传递消息的最长时间期限。不含此字段的请求默认为最长期限(四周)。
- 超过 ttl 这个时间的消息会被 FCM 丢弃
ttl 参数可能用途:
- 视频聊天来电
- 即将到期的邀请事件
- 日历活动
{
  "message": {
    "android": {
      "ttl": "30s",
      "notification": {
        "title": "title test1",
        "body": "body test1"
      }
    }
  }
}
参考 1:FCM ttl
参考 1: 华为推送:离线用户消息缓存时间
FCM 数据
消息传送报告
在 Firebase 控制台中的 报告 标签页中,对于向 Android 或 Apple 平台 FCM SDK 发送的消息,包括通过 Notifications Composer 和 FCM API 发送的消息,您可以查看以下数据:
- 发送次数 数据消息或通知消息已加入队列或已成功传递到第三方服务(例如 APNs)以进行传送。如需了解详情,请参阅 消息的生命周期。
- 已收到(仅在 Android 设备上提供) 应用已收到数据消息或通知消息。当接收 Android 设备安装了 FCM SDK 18.0.1 或更高版本时,才可以获得此数据。
- 展示次数(仅针对 Android 设备上的通知消息提供) 当应用在后台运行时,显示通知 (display notification) 已在设备上显示。
- 打开次数 用户打开通知消息。仅针对应用在后台运行时收到的通知报告此数据。
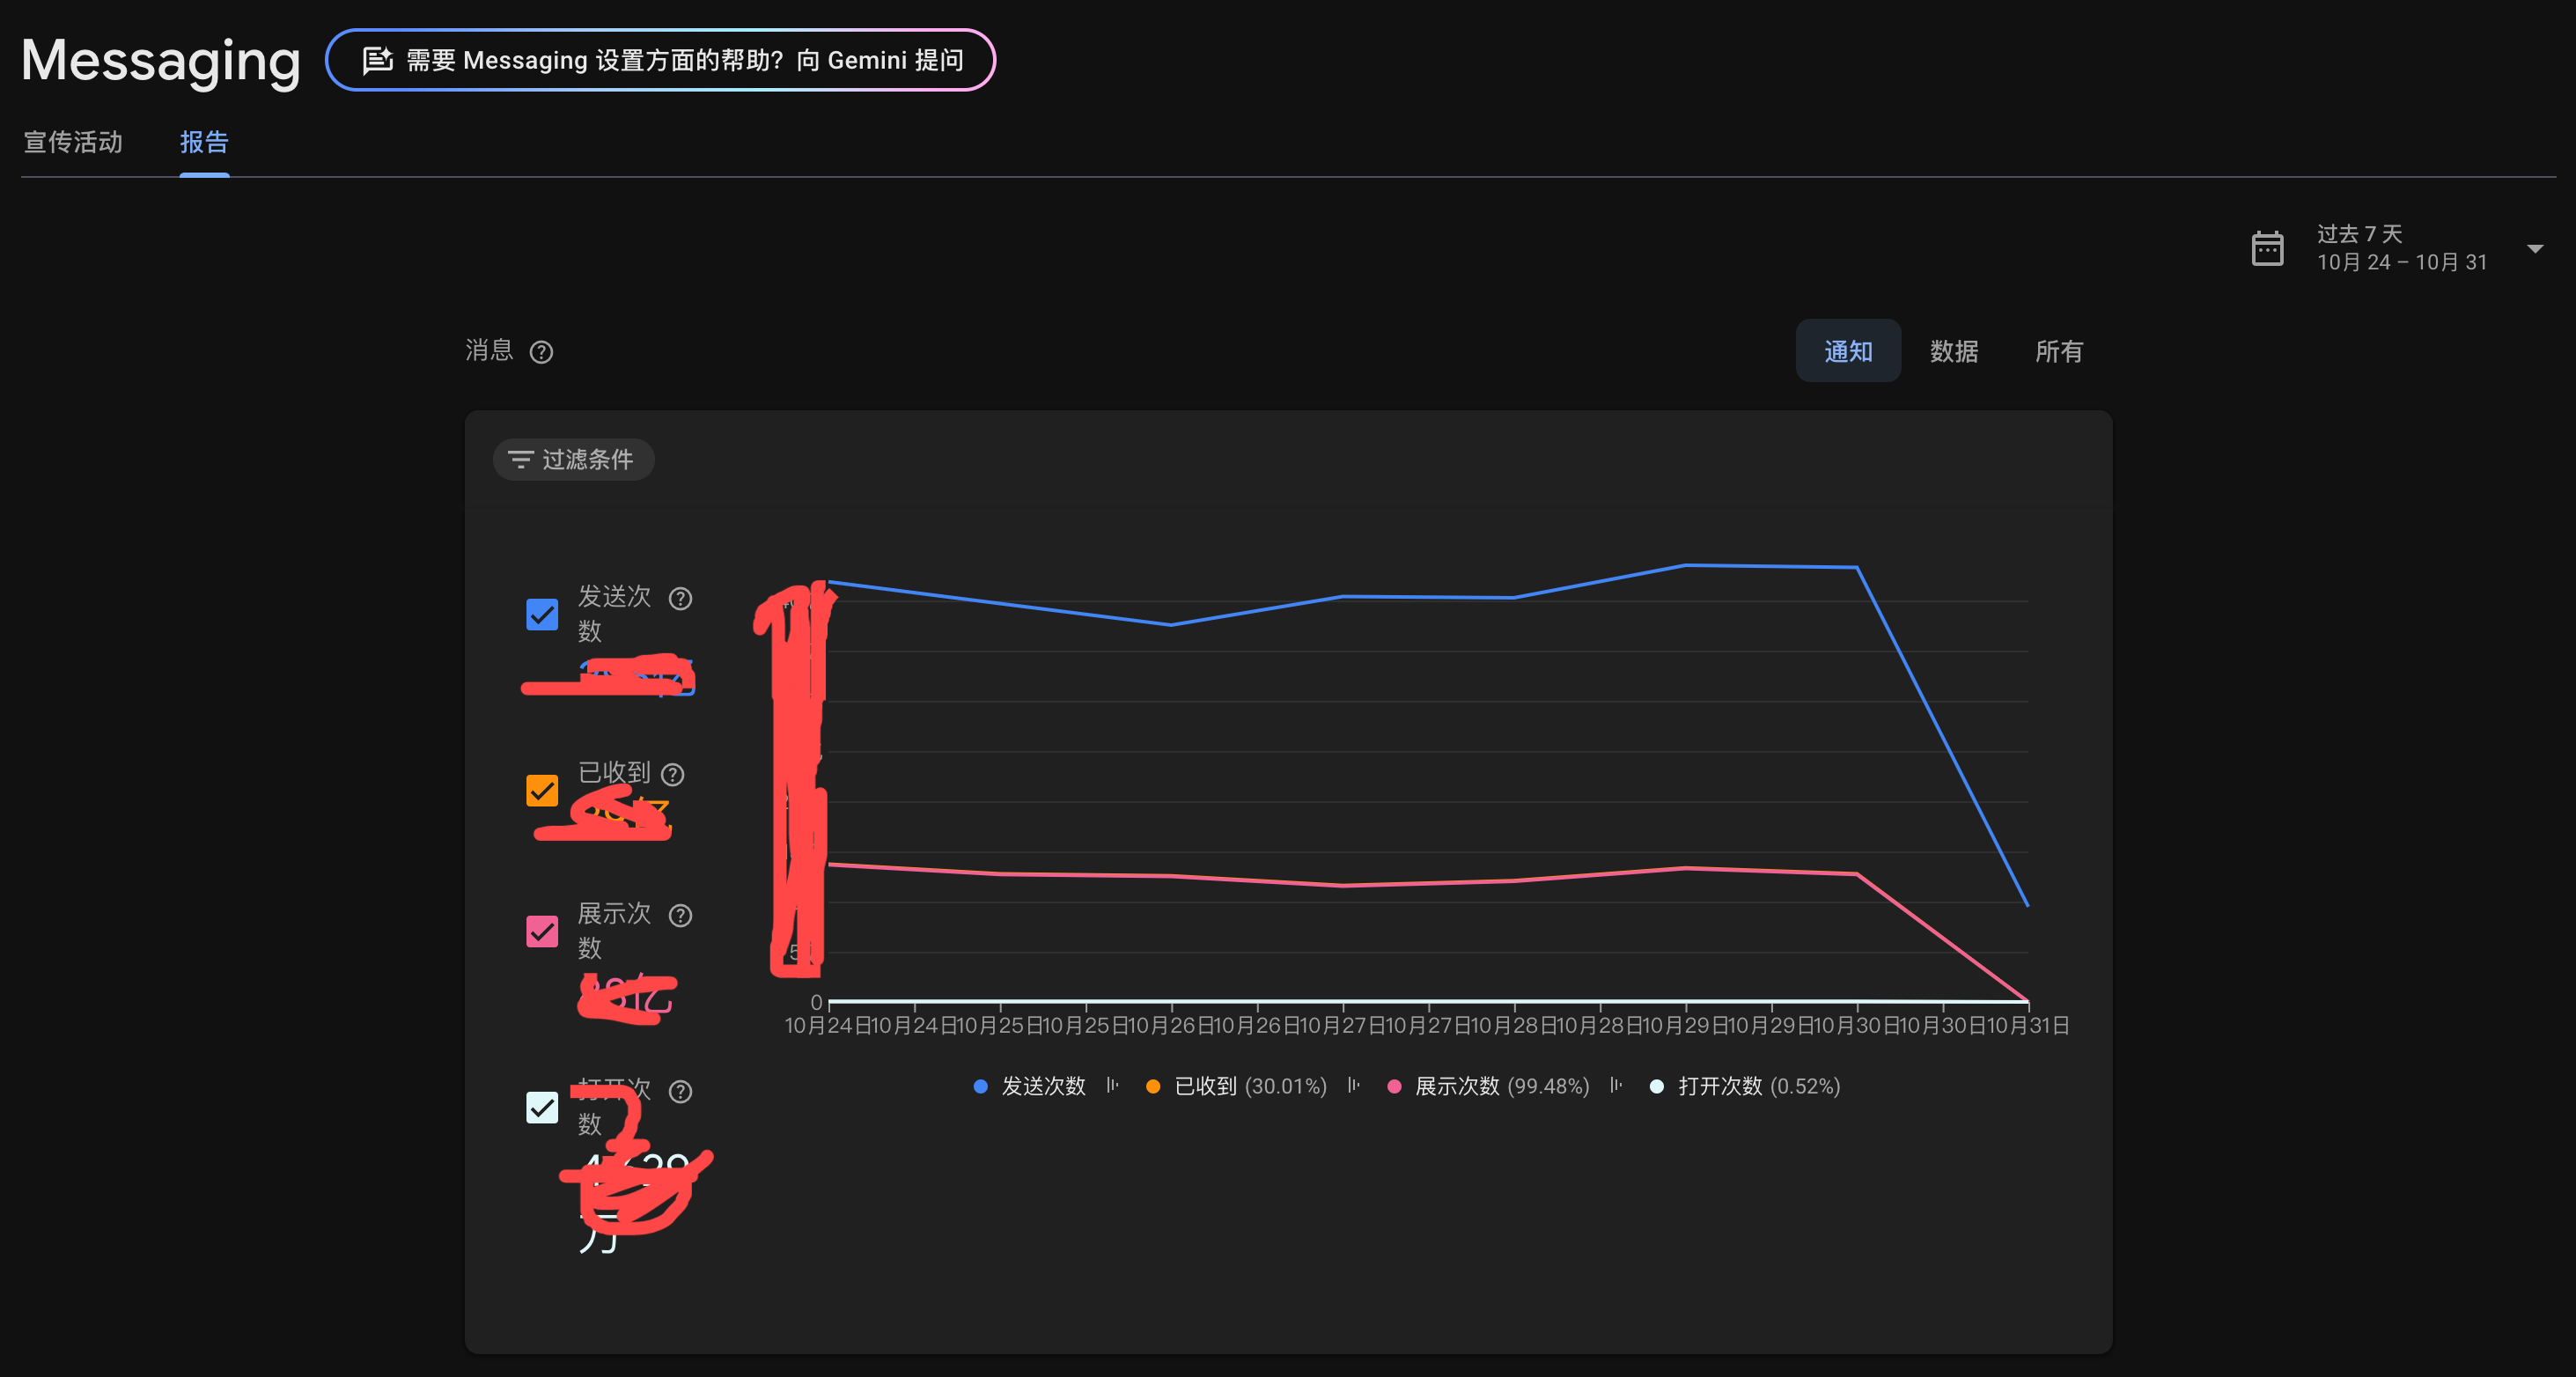
- 通知,带 notification 数据载荷的数据
- 数据,带 data 数据载荷的数据
FAQ
Ref
- 设置 Firebase Cloud Messaging 客户端应用 (Android)
- Google FireBase - fcm 推送 (Cloud Messaging)
https://www.cnblogs.com/CharlesGrant/p/9081351.html - Android FCM 推送详解,出海应用必备