04 .WorkManager原理
WorkManager 核心组件
- Worker:Worker 是后台任务执行的主体,继承自 Worker 类并重写 doWork() 方法来实现具体的后台逻辑。
- WorkRequest:它定义了要执行的任务,包括具体的 Worker 类、执行约束、初始延迟等。
- WorkInfo:提供了对工作状态的查询,可以知道任务是否成功执行、是否失败等。
- WorkManager:是整个后台任务调度系统的管理者,负责将 WorkRequest 转换成内部的 WorkSpec 并加入到工作队列中。
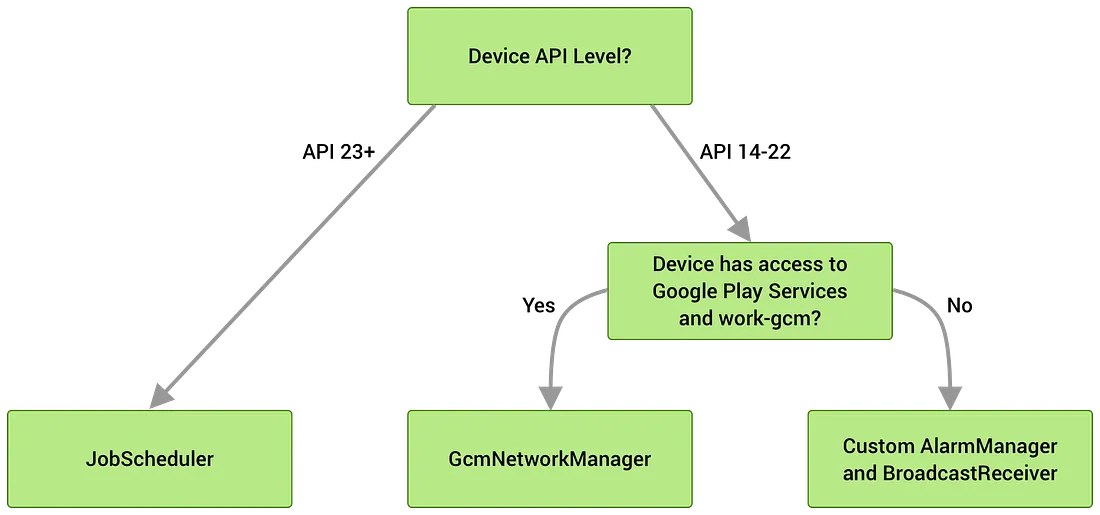
- if
API level > 23, Work Manager executes theJob Scheduler - if
API level < 23, Work Manager checks the availability of Google Play Services (because some Chinese devices cannot access Google Play Services) if NO, it executes Custom Class that is a mix ofAlarm ManagerandBroadcastReceiver
WorkManager 工作原理解析
- 创建
- WorkManager 的初始化
- WorkRequest 的创建
- 非约束条件任务的执行
- 带约束条件任务的执行
测试源码:
val work1Request = OneTimeWorkRequestBuilder<Worker1>().build()
WorkManager.getInstance(this).enqueue(work1Request)

class Worker1(appContext: Context, workerParams: WorkerParameters) :
    Worker(appContext, workerParams) {

    override fun doWork(): Result {
        Thread.sleep(5000)
        return Result.success()
    }
}
创建
WorkManager 的初始化
在默认的情况下,WorkManager 并不是在我们调用 WorkManager.getInstance() 时创建的。通过反编译一下 apk,会发现在 AndroidManifest.xml 文件中注册了名为 WorkManagerInitializer 的 ContentProvider。因此 WorkManager 在 app 冷启动的时候已经被创建。
<!--AndroidManifest.xml-->
<provider
	android:name="androidx.work.impl.WorkManagerInitializer"
	android:exported="false"
	android:multiprocess="true"
	android:authorities="com.jandroid.multivideo.workmanager-init"
	android:directBootAware="false" />
WorkManagerInitializer 类:
public final class WorkManagerInitializer implements Initializer<WorkManager> {
    private static final String TAG = Logger.tagWithPrefix("WrkMgrInitializer");
    @NonNull
    @Override
    public WorkManager create(@NonNull Context context) {
        // Initialize WorkManager with the default configuration.
        Logger.get().debug(TAG, "Initializing WorkManager with default configuration.");
        WorkManager.initialize(context, new Configuration.Builder().build());
        return WorkManager.getInstance(context);
    }
    @NonNull
    @Override
    public List<Class<? extends androidx.startup.Initializer<?>>> dependencies() {
        return Collections.emptyList();
    }
}
// class WorkManager
public static void initialize(@NonNull Context context, @NonNull Configuration configuration) {
    WorkManagerImpl.initialize(context, configuration);
}
由于 WorkManager 是个单例,在此时 WorkManager 就已经被初始化了。在 initialize() 之前,会创建一个默认的 Configuration。Configuration 设置了许多属性,用来管理和调度工作的方式。通常我们使用 WorkManager 默认创建的 Configuration 即可。如需使用自己的 Configuration,可参考官方文档,有明确的使用说明。
继续看 initialize() 的实现:
// class WorkManager
public static void initialize(@NonNull Context context, @NonNull Configuration configuration) {
    WorkManagerImpl.initialize(context, configuration);
}
// class WorkManagerImpl
private static WorkManagerImpl sDelegatedInstance = null;
private static WorkManagerImpl sDefaultInstance = null;
@RestrictTo(RestrictTo.Scope.LIBRARY_GROUP)
public static void initialize(@NonNull Context context, @NonNull Configuration configuration) {
	synchronized (sLock) {
		if (sDelegatedInstance != null && sDefaultInstance != null) {
			throw new IllegalStateException("WorkManager is already initialized.  Did you "
					+ "try to initialize it manually without disabling "
					+ "WorkManagerInitializer? See "
					+ "WorkManager#initialize(Context, Configuration) or the class level "
					+ "Javadoc for more information.");
		}

		if (sDelegatedInstance == null) {
			context = context.getApplicationContext();
			if (sDefaultInstance == null) {
				sDefaultInstance = new WorkManagerImpl(
						context,
						configuration,
						new WorkManagerTaskExecutor(configuration.getTaskExecutor()));
			}
			sDelegatedInstance = sDefaultInstance;
		}
	}
}
此时 sDelegatedInstance 为 null,WorkManager 会先创建一个默认的 WorkManagerTaskExecutor 对象,用来执行 WorkManager 的任务。之后创建一个 WorkManagerImpl 对象:
public WorkManagerImpl(
	@NonNull Context context,
	@NonNull Configuration configuration,
	@NonNull TaskExecutor workTaskExecutor) {
this(context,
	configuration,
	workTaskExecutor,
	context.getResources().getBoolean(R.bool.workmanager_test_configuration));
}
public WorkManagerImpl(
		@NonNull Context context,
		@NonNull Configuration configuration,
		@NonNull TaskExecutor workTaskExecutor,
		boolean useTestDatabase) {
	this(context,
			configuration,
			workTaskExecutor,
			WorkDatabase.create(
					context.getApplicationContext(),
					workTaskExecutor.getBackgroundExecutor(),
					useTestDatabase)
	);
}
WorkManager 在此时创建了数据库。WorkDatabase.create() 将任务列表序列化到本地,记录每一个任务的属性,执行条件,执行顺序及执行状态等。从而保证任务在冷启动或硬件重启后,可以根据条件继续执行。
接着看 this() 的实现:
public WorkManagerImpl(
		@NonNull Context context,
		@NonNull Configuration configuration,
		@NonNull TaskExecutor workTaskExecutor,
		@NonNull WorkDatabase database) {
	Context applicationContext = context.getApplicationContext();
	Logger.setLogger(new Logger.LogcatLogger(configuration.getMinimumLoggingLevel()));
	List<Scheduler> schedulers =
			createSchedulers(applicationContext, configuration, workTaskExecutor);
	Processor processor = new Processor(
			context,
			configuration,
			workTaskExecutor,
			database,
			schedulers);
	internalInit(context, configuration, workTaskExecutor, database, schedulers, processor);
}
createSchedulers()来根据 Build Version 创建不同的Schedulers进行任务调度Processor()用来管理Schedulers的执行internalInit()真正的初始化
Scheduler 初始化
先看 WorkManagerImpl.createSchedulers(),返回一个 Scheduler 的 List
public List<Scheduler> createSchedulers(
		@NonNull Context context,
		@NonNull Configuration configuration,
		@NonNull TaskExecutor taskExecutor) {

	return Arrays.asList(
			Schedulers.createBestAvailableBackgroundScheduler(context, this),
			// Specify the task executor directly here as this happens before internalInit.
			// GreedyScheduler creates ConstraintTrackers and controllers eagerly.
			new GreedyScheduler(context, configuration, taskExecutor, this));
}
由此可见,WorkManager 创建了两个 Scheduler:
- 分别为执行非约束非周期性任务的
GreedyScheduler - 和执行约束性周期性任务的
SystemJobScheduler/GcmBasedScheduler/SystemAlarmScheduler。
GreedyScheduler
GreedyScheduler() 是常驻的,用来执行没有任何约束的非周期性的任务。
createBestAvailableBackgroundScheduler
接下来看 createBestAvailableBackgroundScheduler() 的实现。
// Schedulers.java v2.7.1
static Scheduler createBestAvailableBackgroundScheduler(
		@NonNull Context context,
		@NonNull WorkManagerImpl workManager) {

	Scheduler scheduler;

	if (Build.VERSION.SDK_INT >= WorkManagerImpl.MIN_JOB_SCHEDULER_API_LEVEL) { // API23
		scheduler = new SystemJobScheduler(context, workManager);
		setComponentEnabled(context, SystemJobService.class, true);
		Logger.get().debug(TAG, "Created SystemJobScheduler and enabled SystemJobService");
	} else {
		scheduler = tryCreateGcmBasedScheduler(context);
		if (scheduler == null) {
			scheduler = new SystemAlarmScheduler(context);
			setComponentEnabled(context, SystemAlarmService.class, true);
			Logger.get().debug(TAG, "Created SystemAlarmScheduler");
		}
	}
	return scheduler;
}
public static final String GCM_SCHEDULER = "androidx.work.impl.background.gcm.GcmScheduler";
@Nullable
private static Scheduler tryCreateGcmBasedScheduler(@NonNull Context context) {
    try {
        Class<?> klass = Class.forName(GCM_SCHEDULER);
        Scheduler scheduler =
                (Scheduler) klass.getConstructor(Context.class).newInstance(context);
        Logger.get().debug(TAG, String.format("Created %s", GCM_SCHEDULER));
        return scheduler;
    } catch (Throwable throwable) {
        Logger.get().debug(TAG, "Unable to create GCM Scheduler", throwable);
        return null;    }
}
这段代码对 build version 进行了判断。
>=23,则返回SystemJobScheduler(),即利用JobScheduler进行任务管理。<23的时候先尝试使用GcmScheduler进行管理。若无法创建GcmScheduler则返回SystemAlarmScheduler()使用AlamManager进行任务管理。返回的这个Scheduler是用来执行周期性,或者有约束性的任务。
Processor
public WorkManagerImpl(
		@NonNull Context context,
		@NonNull Configuration configuration,
		@NonNull TaskExecutor workTaskExecutor,
		@NonNull WorkDatabase database) {
	Context applicationContext = context.getApplicationContext();
	Logger.setLogger(new Logger.LogcatLogger(configuration.getMinimumLoggingLevel()));
	List<Scheduler> schedulers =
			createSchedulers(applicationContext, configuration, workTaskExecutor);
	Processor processor = new Processor(
			context,
			configuration,
			workTaskExecutor,
			database,
			schedulers);
	internalInit(context, configuration, workTaskExecutor, database, schedulers, processor);
}
Processor 存储了 Configuration,TaskExecutor,WorkDatabase,schedulers 等,用来在适当的时机进行任务调度。再来看 internalInit():
private void internalInit(@NonNull Context context,
		@NonNull Configuration configuration,
		@NonNull TaskExecutor workTaskExecutor,
		@NonNull WorkDatabase workDatabase,
		@NonNull List<Scheduler> schedulers,
		@NonNull Processor processor) {

	context = context.getApplicationContext();
	mContext = context;
	mConfiguration = configuration;
	mWorkTaskExecutor = workTaskExecutor;
	mWorkDatabase = workDatabase;
	mSchedulers = schedulers;
	mProcessor = processor;
	mPreferenceUtils = new PreferenceUtils(workDatabase);
	mForceStopRunnableCompleted = false;

	// Check for direct boot mode
	if (Build.VERSION.SDK_INT >= Build.VERSION_CODES.N && context.isDeviceProtectedStorage()) {
		throw new IllegalStateException("Cannot initialize WorkManager in direct boot mode");
	}

	// Checks for app force stops.
	mWorkTaskExecutor.executeOnBackgroundThread(new ForceStopRunnable(context, this));
}
记录了 Configuration,TaskExecutor,WorkDatabase,schedulers,Processor 等。
然后我们看最后一行执行语句,启动了一个 ForceStopRunnable,这个 Runnable 是干什么用的呢?直接看 run() 的实现:
@Override
public void run() {
	try {
		if (!multiProcessChecks()) {
			return;
		}
		while (true) {
			// Migrate the database to the no-backup directory if necessary.
			WorkDatabasePathHelper.migrateDatabase(mContext);
			// Clean invalid jobs attributed to WorkManager, and Workers that might have been
			// interrupted because the application crashed (RUNNING state).
			Logger.get().debug(TAG, "Performing cleanup operations.");
			try {
				forceStopRunnable();
				break;
			} catch (SQLiteCantOpenDatabaseException
					| SQLiteDatabaseCorruptException
					| SQLiteDatabaseLockedException
					| SQLiteTableLockedException
					| SQLiteConstraintException
					| SQLiteAccessPermException exception) {
				mRetryCount++;
				if (mRetryCount >= MAX_ATTEMPTS) {
					// ForceStopRunnable is usually the first thing that accesses a database
					// (or an app's internal data directory). This means that weird
					// PackageManager bugs are attributed to ForceStopRunnable, which is
					// unfortunate. This gives the developer a better error
					// message.
					String message = "The file system on the device is in a bad state. "
							+ "WorkManager cannot access the app's internal data store.";
					Logger.get().error(TAG, message, exception);
					IllegalStateException throwable = new IllegalStateException(message,
							exception);
					InitializationExceptionHandler exceptionHandler =
							mWorkManager.getConfiguration().getExceptionHandler();
					if (exceptionHandler != null) {
						Logger.get().debug(TAG,
								"Routing exception to the specified exception handler",
								throwable);
						exceptionHandler.handleException(throwable);
						break;
					} else {
						throw throwable;
					}
				} else {
					long duration = mRetryCount * BACKOFF_DURATION_MS;
					Logger.get()
							.debug(TAG, String.format("Retrying after %s", duration),
									exception);
					sleep(mRetryCount * BACKOFF_DURATION_MS);
				}
			}
		}
	} finally {
		mWorkManager.onForceStopRunnableCompleted();
	}
}
- 升级数据库
这个 Runnable 的作用就是在 WorkManager 初始化过程中,发现了未完成的,需要重新执行的任务,或者 app 被强制 kill 的情况下,直接对 Scheduler 进行调度。到此,一个 WorkManager 的初始化流程就完成了。
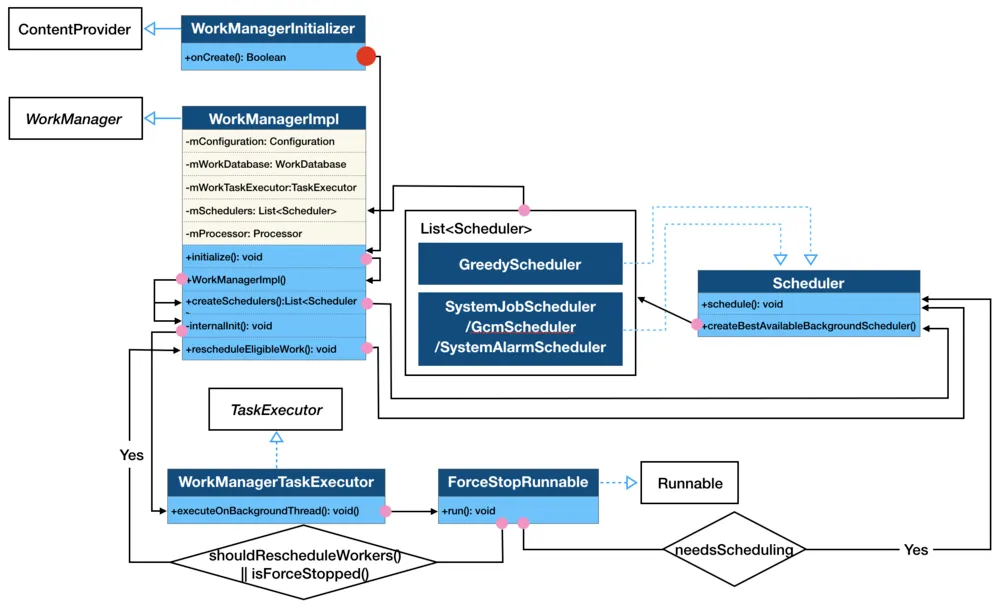
初始化小结
WorkManager的初始化是在 app 冷启动后,由WorkManagerInitializer这个ContentProvider执行的。- 初始化过程包含了
Configuration,WorkManagerTaskExecutor,WorkDatabase,Schedulers,Processor等的初始化过程。 - Schedulers 有两个。
- (1)
GreedyScheduler: 执行没有任何约束的非周期性的任务。 - (2)
SystemJobScheduler/GcmBasedScheduler/SystemAlarmScheduler: 执行周期性或者有约束性的任务。优先返回 SystemJobScheduler,在 build version 小于 23 的情况下先尝试返回 GcmBasedScheduler,若返回为空再返回 SystemAlarmScheduler。
- (1)
- 初始化的最后,会根据情况找到需要被执行的任务进行调度执行。
- WorkManager 初始化流程图
WorkRequest 的创建
以 OneTimeWorkRequest 为例:val work1Request = OneTimeWorkRequestBuilder<Worker1>().build()
// OneTimeWorkRequest.Builder
public Builder(@NonNull Class<? extends ListenableWorker> workerClass) {
	super(workerClass);
	mWorkSpec.inputMergerClassName = OverwritingInputMerger.class.getName();
}
// WorkRequest.Builder
UUID mId;
WorkSpec mWorkSpec;
Set<String> mTags = new HashSet<>();
Builder(@NonNull Class<? extends ListenableWorker> workerClass) {
    mId = UUID.randomUUID();
    mWorkerClass = workerClass;
    mWorkSpec = new WorkSpec(mId.toString(), workerClass.getName());
    addTag(workerClass.getName());
}
OneTimeWorkRequest为builder对象创建了WorkSpec对象用来保存任务 id 和类名- 其中
id是通过UUID自动生成的。 request的tag默认是通过类名生成的,外部也可调用addTag()方法设置标签。另外为WorkSpec设置了默认的任务输入流的合并规则:OverwritingInputMerger。
接着看 build() 方法:
public final @NonNull W build() {
	W returnValue = buildInternal();
	Constraints constraints = mWorkSpec.constraints;
	// Check for unsupported constraints.
	boolean hasUnsupportedConstraints =
			(Build.VERSION.SDK_INT >= 24 && constraints.hasContentUriTriggers())
					|| constraints.requiresBatteryNotLow()
					|| constraints.requiresCharging()
					|| (Build.VERSION.SDK_INT >= 23 && constraints.requiresDeviceIdle());
	if (mWorkSpec.expedited) {
		if (hasUnsupportedConstraints) {
			throw new IllegalArgumentException(
					"Expedited jobs only support network and storage constraints");
		}
		if (mWorkSpec.initialDelay > 0) {
			throw new IllegalArgumentException("Expedited jobs cannot be delayed");
		}
	}
	// Create a new id and WorkSpec so this WorkRequest.Builder can be used multiple times.
	mId = UUID.randomUUID();
	mWorkSpec = new WorkSpec(mWorkSpec);
	mWorkSpec.id = mId.toString();
	return returnValue;
}
abstract @NonNull W buildInternal();
在 buildInternal() 拿到 OneTimeWorkRequest 对象之后,为 Builder 创建了一个新的 WorkSpec 对象,并赋予了新的 UUID。虽然与原先的 WorkSpec 对象中每个属性的值是一致的,但指向了不同的内存地址。这么做的目的是为了这个 Builder 对象可被重复利用。好了,现在我们一个任务的 WorkRequest 创建就完成了。
buildInternal() 方法返回了一个 WorkRequest 对象,这是个抽象方法,在子类 OneTimeWorkRequest.Builder 中的实现如下:
// OneTimeWorkRequest
@Override
@NonNull OneTimeWorkRequest buildInternal() {
	if (mBackoffCriteriaSet && Build.VERSION.SDK_INT >= 23
		&& mWorkSpec.constraints.requiresDeviceIdle()) {
		throw new IllegalArgumentException("Cannot set backoff criteria on an idle mode job");
	}
	return new OneTimeWorkRequest(this);
}
OneTimeWorkRequest(Builder builder) {
    super(builder.mId, builder.mWorkSpec, builder.mTags);
}
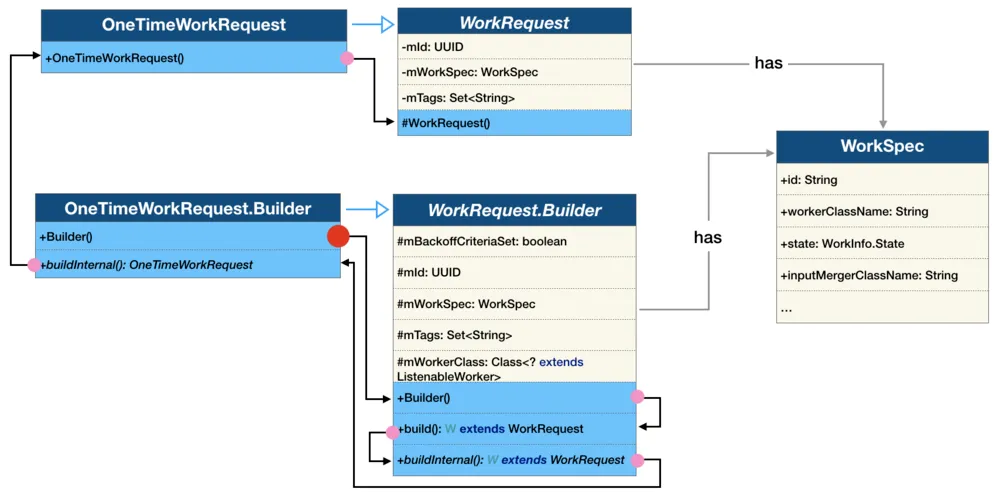
小结
总结:
WorkRequest 的创建是为了持有三个重要的成员变量。分别是:
- mId: 由 UUID 生成的任务 id。
- mWorkSpec: 每个任务的属性。
- mTags: 每个任务的标签。
流程图:
非约束条件任务的执行过程
OneTime 一次性任务
以 OneTimeWorkRequest 为例:
WorkManager.getInstance(this).enqueue(work1Request)
WorkManager.getInstance() 获取到的是 WorkManagerImpl
// WorkManagerImpl.java
@Override
@NonNull
public Operation enqueue(@NonNull List<? extends WorkRequest> requests) {
	// ...
	return new WorkContinuationImpl(this, requests).enqueue();
}
创建一个 WorkContinuationImpl() 对象,再执行 enqueue() 方法。WorkContinuationImpl 是 WorkContinuation 的子类。用来把多个 OneTimeWorkRequest 根据需求串行,并行或合并处理。我们熟悉的 then(),combine(),enqueue() 等都是这个类的方法。
// WorkContinuationImpl.java
public WorkContinuationImpl(@NonNull WorkManagerImpl workManagerImpl,
		@Nullable String name,
		@NonNull ExistingWorkPolicy existingWorkPolicy,
		@NonNull List<? extends WorkRequest> work,
		@Nullable List<WorkContinuationImpl> parents) {
	mWorkManagerImpl = workManagerImpl;
	mName = name;
	mExistingWorkPolicy = existingWorkPolicy;
	mWork = work;
	mParents = parents;
	mIds = new ArrayList<>(mWork.size());
	mAllIds = new ArrayList<>();
	if (parents != null) {
		for (WorkContinuationImpl parent : parents) {
			mAllIds.addAll(parent.mAllIds);
		}
	}
	for (int i = 0; i < work.size(); i++) {
		String id = work.get(i).getStringId();
		mIds.add(id);
		mAllIds.add(id);
	}
}
WorkContinuation 保存了任务相关的所有信息,如 WorkManager,WorkRequest,父 WorkContinuation 等。
继续看 WorkContinuationImpl 的 enqueue() 方法的实现:
// WorkContinuationImpl.java
@Override
public @NonNull Operation enqueue() {
	// Only enqueue if not already enqueued.
	if (!mEnqueued) {
		// The runnable walks the hierarchy of the continuations
		// and marks them enqueued using the markEnqueued() method, parent first.
		EnqueueRunnable runnable = new EnqueueRunnable(this);
		mWorkManagerImpl.getWorkTaskExecutor().executeOnBackgroundThread(runnable);
		mOperation = runnable.getOperation();
	} else {
		Logger.get().warning(TAG,
				String.format("Already enqueued work ids (%s)", TextUtils.join(", ", mIds)));
	}
	return mOperation;
}
WorkManager 的 TaskExecutor 执行了 EnqueueRunnable。EnqueueRunnable 中 run() 的实现:
// EnqueueRunnable.java
@Override
public void run() {
	try {
		// ...
		boolean needsScheduling = addToDatabase();
		if (needsScheduling) {
			// Enable RescheduleReceiver, only when there are Worker's that need scheduling.
			final Context context =
					mWorkContinuation.getWorkManagerImpl().getApplicationContext();
			PackageManagerHelper.setComponentEnabled(context, RescheduleReceiver.class, true);
			scheduleWorkInBackground();
		}
		mOperation.setState(Operation.SUCCESS);
	} catch (Throwable exception) {
		mOperation.setState(new Operation.State.FAILURE(exception));
	}
}
addToDatabase()的作用是把WorkSpec存入到数据库,并对任务的状态进行校验。成功返回 true。PackageManagerHelper.setComponentEnabled()开启了RescheduleReceiver。通过反编译我们得知这个Receiver是在AndroidManifest中注册的,默认是 disable 的。监听了开机 (BOOT_COMPLETED),时间变化 (TIME_SET),时区变化 (TIMEZONE_CHANGED) 这三个广播。
<receiver
	android:name="androidx.work.impl.background.systemalarm.RescheduleReceiver"
	android:directBootAware="false"
	android:enabled="false"
	android:exported="false"
	android:process=":worker1"
	tools:targetApi="n">
	<intent-filter>
		<action android:name="android.intent.action.BOOT_COMPLETED" />
		<action android:name="android.intent.action.TIME_SET" />
		<action android:name="android.intent.action.TIMEZONE_CHANGED" />
	</intent-filter>
</receiver>
scheduleWorkInBackground()实现
@VisibleForTesting
public void scheduleWorkInBackground() {
	WorkManagerImpl workManager = mWorkContinuation.getWorkManagerImpl();
	Schedulers.schedule(
			workManager.getConfiguration(),
			workManager.getWorkDatabase(),
			workManager.getSchedulers());
}
这部分就是任务调度的实现。拿到 WorkManager 对象后调用了 Schedulers.schedule() 方法,传入了 Configuration, WorkDatabase, Scheduler 这三个对象。执行 schedule() 方法:
// Schedulers.java
public class Schedulers {

    public static final String GCM_SCHEDULER = "androidx.work.impl.background.gcm.GcmScheduler";
    private static final String TAG = Logger.tagWithPrefix("Schedulers");

    /**
     * Schedules {@link WorkSpec}s while honoring the {@link Scheduler#MAX_SCHEDULER_LIMIT}.
     *
     * @param workDatabase The {@link WorkDatabase}.
     * @param schedulers   The {@link List} of {@link Scheduler}s to delegate to.
     */
    public static void schedule(
            @NonNull Configuration configuration,
            @NonNull WorkDatabase workDatabase,
            List<Scheduler> schedulers) {
        if (schedulers == null || schedulers.size() == 0) {
            return;
        }

        WorkSpecDao workSpecDao = workDatabase.workSpecDao();
        List<WorkSpec> eligibleWorkSpecsForLimitedSlots;
        List<WorkSpec> allEligibleWorkSpecs;

        workDatabase.beginTransaction();
        try {
            // Enqueued workSpecs when scheduling limits are applicable.
            eligibleWorkSpecsForLimitedSlots = workSpecDao.getEligibleWorkForScheduling(
                    configuration.getMaxSchedulerLimit());

            // Enqueued workSpecs when scheduling limits are NOT applicable.
            allEligibleWorkSpecs = workSpecDao.getAllEligibleWorkSpecsForScheduling(
                    MAX_GREEDY_SCHEDULER_LIMIT);

            if (eligibleWorkSpecsForLimitedSlots != null
                    && eligibleWorkSpecsForLimitedSlots.size() > 0) {
                long now = System.currentTimeMillis();

                // Mark all the WorkSpecs as scheduled.
                // Calls to Scheduler#schedule() could potentially result in more schedules
                // on a separate thread. Therefore, this needs to be done first.
                for (WorkSpec workSpec : eligibleWorkSpecsForLimitedSlots) {
                    workSpecDao.markWorkSpecScheduled(workSpec.id, now);
                }
            }
            workDatabase.setTransactionSuccessful();
        } finally {
            workDatabase.endTransaction();
        }

        if (eligibleWorkSpecsForLimitedSlots != null
                && eligibleWorkSpecsForLimitedSlots.size() > 0) {

            WorkSpec[] eligibleWorkSpecsArray =
                    new WorkSpec[eligibleWorkSpecsForLimitedSlots.size()];
            eligibleWorkSpecsArray =
                    eligibleWorkSpecsForLimitedSlots.toArray(eligibleWorkSpecsArray);

            // Delegate to the underlying schedulers.
            for (Scheduler scheduler : schedulers) {
                if (scheduler.hasLimitedSchedulingSlots()) {
                    scheduler.schedule(eligibleWorkSpecsArray);
                }
            }
        }

        if (allEligibleWorkSpecs != null && allEligibleWorkSpecs.size() > 0) {
            WorkSpec[] enqueuedWorkSpecsArray = new WorkSpec[allEligibleWorkSpecs.size()];
            enqueuedWorkSpecsArray = allEligibleWorkSpecs.toArray(enqueuedWorkSpecsArray);
            // Delegate to the underlying schedulers.
            for (Scheduler scheduler : schedulers) {
                if (!scheduler.hasLimitedSchedulingSlots()) {
                    scheduler.schedule(enqueuedWorkSpecsArray);
                }
            }
        }
    }
    // ...
}
- 先进行了一系列的数据库操作,然后开始根据条件每个任务进行调度。其中
eligibleWorkSpecs返回的是在ENQUEUED状态下,未被执行且未被取消的WorkSpec列表,然后更新这些任务的request状态到数据库。 - 最后遍历
schedulers调用scheduler.schedule()对每个任务进行调度处理。由于示例代码创建的是没有约束的一次性任务,所以看一下GreedyScheduler对于schedule()方法的实现:
// GreedyScheduler.java
@Override
public void schedule(@NonNull WorkSpec... workSpecs) {
	if (mInDefaultProcess == null) {
		checkDefaultProcess();
	}

	if (!mInDefaultProcess) {
		Logger.get().info(TAG, "Ignoring schedule request in a secondary process");
		return;
	}

	registerExecutionListenerIfNeeded();

	// Keep track of the list of new WorkSpecs whose constraints need to be tracked.
	// Add them to the known list of constrained WorkSpecs and call replace() on
	// WorkConstraintsTracker. That way we only need to synchronize on the part where we
	// are updating mConstrainedWorkSpecs.
	Set<WorkSpec> constrainedWorkSpecs = new HashSet<>();
	Set<String> constrainedWorkSpecIds = new HashSet<>();

	for (WorkSpec workSpec : workSpecs) {
		long nextRunTime = workSpec.calculateNextRunTime();
		long now = System.currentTimeMillis();
		if (workSpec.state == WorkInfo.State.ENQUEUED) {
			if (now < nextRunTime) {
				// Future work
				if (mDelayedWorkTracker != null) {
					mDelayedWorkTracker.schedule(workSpec);
				}
			} else if (workSpec.hasConstraints()) {
				if (SDK_INT >= 23 && workSpec.constraints.requiresDeviceIdle()) {
					// Ignore requests that have an idle mode constraint.
					Logger.get().debug(TAG,
							String.format("Ignoring WorkSpec %s, Requires device idle.",
									workSpec));
				} else if (SDK_INT >= 24 && workSpec.constraints.hasContentUriTriggers()) {
					// Ignore requests that have content uri triggers.
					Logger.get().debug(TAG,
							String.format("Ignoring WorkSpec %s, Requires ContentUri triggers.",
									workSpec));
				} else {
					constrainedWorkSpecs.add(workSpec);
					constrainedWorkSpecIds.add(workSpec.id);
				}
			} else {
				Logger.get().debug(TAG, String.format("Starting work for %s", workSpec.id));
				mWorkManagerImpl.startWork(workSpec.id);
			}
		}
	}

	// onExecuted() which is called on the main thread also modifies the list of mConstrained
	// WorkSpecs. Therefore we need to lock here.
	synchronized (mLock) {
		if (!constrainedWorkSpecs.isEmpty()) {
			Logger.get().debug(TAG, String.format("Starting tracking for [%s]",
					TextUtils.join(",", constrainedWorkSpecIds)));
			mConstrainedWorkSpecs.addAll(constrainedWorkSpecs);
			mWorkConstraintsTracker.replace(mConstrainedWorkSpecs);
		}
	}
}
WorkSpec 是 ENQUEUED 的状态;非周期性任务;非延迟任务;非撤销的任务;没有其它约束的任务 满足这五个条件后,直接调用:
// GreedyScheduler
mWorkManagerImpl.startWork(workSpec.id);

// WorkManagerImpl.java
public void startWork(String workSpecId, WorkerParameters.RuntimeExtras runtimeExtras) {
    mWorkTaskExecutor
		.executeOnBackgroundThread(
			new StartWorkRunnable(this, workSpecId, runtimeExtras));
}
WorkTaskExecutor 对任务进行了调度。StartWorkRunnable 的 run() 的实现:
// StartWorkRunnable.java
@Override
public void run() {
	mWorkManagerImpl.getProcessor().startWork(mWorkSpecId, mRuntimeExtras);
}
StartWorkRunnable 会将任务的信息交给 Processor,由 Processor 调用 startWork() 去执行任务:
// Processor.java
public boolean startWork(
		@NonNull String id,
		@Nullable WorkerParameters.RuntimeExtras runtimeExtras) {

	WorkerWrapper workWrapper;
	synchronized (mLock) {
		// Work may get triggered multiple times if they have passing constraints
		// and new work with those constraints are added.
		if (isEnqueued(id)) {
			Logger.get().debug(
					TAG,
					String.format("Work %s is already enqueued for processing", id));
			return false;
		}

		workWrapper =
				new WorkerWrapper.Builder(
						mAppContext,
						mConfiguration,
						mWorkTaskExecutor,
						this,
						mWorkDatabase,
						id)
						.withSchedulers(mSchedulers)
						.withRuntimeExtras(runtimeExtras)
						.build();
		ListenableFuture<Boolean> future = workWrapper.getFuture();
		future.addListener(
				new FutureListener(this, id, future),
				mWorkTaskExecutor.getMainThreadExecutor());
		mEnqueuedWorkMap.put(id, workWrapper);
	}
	mWorkTaskExecutor.getBackgroundExecutor().execute(workWrapper);
	Logger.get().debug(TAG, String.format("%s: processing %s", getClass().getSimpleName(), id));
	return true;
}
startWork() 方法中创建了一个 WorkerWrapper 的 Runnable 对象,交由 WorkTaskExecutor 调度处理。WorkerWrapper 的 run() 方法的实现:
// WorkerWrapper.java
public void run() {
	mTags = mWorkTagDao.getTagsForWorkSpecId(mWorkSpecId);
	mWorkDescription = createWorkDescription(mTags);
	runWorker();
}
private void runWorker() {
    if (tryCheckForInterruptionAndResolve()) {
        return;
    }

    mWorkDatabase.beginTransaction();
    try {
        mWorkSpec = mWorkSpecDao.getWorkSpec(mWorkSpecId);
        if (mWorkSpec == null) {
            Logger.get().error(
                    TAG,
                    String.format("Didn't find WorkSpec for id %s", mWorkSpecId));
            resolve(false);
            mWorkDatabase.setTransactionSuccessful();
            return;        }

        // Do a quick check to make sure we don't need to bail out in case this work is already
        // running, finished, or is blocked.        if (mWorkSpec.state != ENQUEUED) {
            resolveIncorrectStatus();
            mWorkDatabase.setTransactionSuccessful();
            Logger.get().debug(TAG,
                    String.format("%s is not in ENQUEUED state. Nothing more to do.",
                            mWorkSpec.workerClassName));
            return;        }

        // Case 1:
        // Ensure that Workers that are backed off are only executed when they are supposed to.        // GreedyScheduler can schedule WorkSpecs that have already been backed off because        // it is holding on to snapshots of WorkSpecs. So WorkerWrapper needs to determine        // if the ListenableWorker is actually eligible to execute at this point in time.
        // Case 2:        // On API 23, we double scheduler Workers because JobScheduler prefers batching.        // So is the Work is periodic, we only need to execute it once per interval.        // Also potential bugs in the platform may cause a Job to run more than once.
        if (mWorkSpec.isPeriodic() || mWorkSpec.isBackedOff()) {
            long now = System.currentTimeMillis();
            // Allow first run of a PeriodicWorkRequest
            // to go through. This is because when periodStartTime=0;            // calculateNextRunTime() always > now.            // For more information refer to b/124274584            boolean isFirstRun = mWorkSpec.periodStartTime == 0;
            if (!isFirstRun && now < mWorkSpec.calculateNextRunTime()) {
                Logger.get().debug(TAG,
                        String.format(
                                "Delaying execution for %s because it is being executed "
                                        + "before schedule.",
                                mWorkSpec.workerClassName));
                // For AlarmManager implementation we need to reschedule this kind  of Work.
                // This is not a problem for JobScheduler because we will only reschedule                // work if JobScheduler is unaware of a jobId.                resolve(true);
                mWorkDatabase.setTransactionSuccessful();
                return;            }
        }

        // Needed for nested transactions, such as when we're in a dependent work request when
        // using a SynchronousExecutor.        mWorkDatabase.setTransactionSuccessful();
    } finally {
        mWorkDatabase.endTransaction();
    }

    // Merge inputs.  This can be potentially expensive code, so this should not be done inside
    // a database transaction.    Data input;
    if (mWorkSpec.isPeriodic()) {
        input = mWorkSpec.input;
    } else {
        InputMergerFactory inputMergerFactory = mConfiguration.getInputMergerFactory();
        String inputMergerClassName = mWorkSpec.inputMergerClassName;
        InputMerger inputMerger =
                inputMergerFactory.createInputMergerWithDefaultFallback(inputMergerClassName);
        if (inputMerger == null) {
            Logger.get().error(TAG, String.format("Could not create Input Merger %s",
                    mWorkSpec.inputMergerClassName));
            setFailedAndResolve();
            return;        }
        List<Data> inputs = new ArrayList<>();
        inputs.add(mWorkSpec.input);
        inputs.addAll(mWorkSpecDao.getInputsFromPrerequisites(mWorkSpecId));
        input = inputMerger.merge(inputs);
    }

    final WorkerParameters params = new WorkerParameters(
            UUID.fromString(mWorkSpecId),
            input,
            mTags,
            mRuntimeExtras,
            mWorkSpec.runAttemptCount,
            mConfiguration.getExecutor(),
            mWorkTaskExecutor,
            mConfiguration.getWorkerFactory(),
            new WorkProgressUpdater(mWorkDatabase, mWorkTaskExecutor),
            new WorkForegroundUpdater(mWorkDatabase, mForegroundProcessor, mWorkTaskExecutor));

    // Not always creating a worker here, as the WorkerWrapper.Builder can set a worker override
    // in test mode.    if (mWorker == null) {
        mWorker = mConfiguration.getWorkerFactory().createWorkerWithDefaultFallback(
                mAppContext,
                mWorkSpec.workerClassName,
                params);
    }

    if (mWorker == null) {
        Logger.get().error(TAG,
                String.format("Could not create Worker %s", mWorkSpec.workerClassName));
        setFailedAndResolve();
        return;    }

    if (mWorker.isUsed()) {
        Logger.get().error(TAG,
                String.format("Received an already-used Worker %s; WorkerFactory should return "
                        + "new instances",
                        mWorkSpec.workerClassName));
        setFailedAndResolve();
        return;    }
    mWorker.setUsed();

    // Try to set the work to the running state.  Note that this may fail because another thread
    // may have modified the DB since we checked last at the top of this function.    if (trySetRunning()) {
        if (tryCheckForInterruptionAndResolve()) {
            return;
        }

        final SettableFuture<ListenableWorker.Result> future = SettableFuture.create();
        final WorkForegroundRunnable foregroundRunnable =
                new WorkForegroundRunnable(
                        mAppContext,
                        mWorkSpec,
                        mWorker,
                        params.getForegroundUpdater(),
                        mWorkTaskExecutor
                );
        mWorkTaskExecutor.getMainThreadExecutor().execute(foregroundRunnable);

        final ListenableFuture<Void> runExpedited = foregroundRunnable.getFuture();
        runExpedited.addListener(new Runnable() {
            @Override
            public void run() {
                try {
                    runExpedited.get();
                    Logger.get().debug(TAG,
                            String.format("Starting work for %s", mWorkSpec.workerClassName));
                    // Call mWorker.startWork() on the main thread.
                    mInnerFuture = mWorker.startWork();
                    future.setFuture(mInnerFuture);
                } catch (Throwable e) {
                    future.setException(e);
                }
            }
        }, mWorkTaskExecutor.getMainThreadExecutor());

        // Avoid synthetic accessors.
        final String workDescription = mWorkDescription;
        future.addListener(new Runnable() {
            @Override
            @SuppressLint("SyntheticAccessor")
            public void run() {
                try {
                    // If the ListenableWorker returns a null result treat it as a failure.
                    ListenableWorker.Result result = future.get();
                    if (result == null) {
                        Logger.get().error(TAG, String.format(
                                "%s returned a null result. Treating it as a failure.",
                                mWorkSpec.workerClassName));
                    } else {
                        Logger.get().debug(TAG, String.format("%s returned a %s result.",
                                mWorkSpec.workerClassName, result));
                        mResult = result;
                    }
                } catch (CancellationException exception) {
                    // Cancellations need to be treated with care here because innerFuture
                    // cancellations will bubble up, and we need to gracefully handle that.                    Logger.get().info(TAG, String.format("%s was cancelled", workDescription),
                            exception);
                } catch (InterruptedException | ExecutionException exception) {
                    Logger.get().error(TAG,
                            String.format("%s failed because it threw an exception/error",
                                    workDescription), exception);
                } finally {
                    onWorkFinished();
                }
            }
        }, mWorkTaskExecutor.getBackgroundExecutor());
    } else {
        resolveIncorrectStatus();
    }
}
- 先创建一个
WorkerParameters对象。 - 然后调用
mConfiguration.getWorkerFactory().createWorkerWithDefaultFallback()方法创建Worker对象,返回的就是我们自己的Woker对象,即Worker1的实例。之后交由WorkTaskExecutor调度处理。在run()方法的实现,我们看到调用了mWorker.startWork()方法: ListenableWorker是个抽象类,是所有Worker的父类。Worker1也继承Worker类,startWork()在Worker中的实现:
// Worker
@Override
public final @NonNull ListenableFuture<Result> startWork() {
	mFuture = SettableFuture.create();
	getBackgroundExecutor().execute(new Runnable() {
		@Override
		public void run() {
			try {
				Result result = doWork();
				mFuture.set(result);
			} catch (Throwable throwable) {
				mFuture.setException(throwable);
			}

		}
	});
	return mFuture;
}
在 run() 的实现执行了 doWork() 方法,即执行了我们 Worker1 的 doWork() 方法。
// Worker1
class Worker1(appContext: Context, workerParams: WorkerParameters) :
    Worker(appContext, workerParams) {

    override fun doWork(): Result {
        Thread.sleep(5000)
        return Result.success()
    }
}
startWork() 返回了一个 Future 对象 mInnerFuture,调用 future.setFuture(mInnerFuture) 去处理 doWork() 返回的 result。再经过一系列判断后,最终执行了 onWorkFinished() 方法:
// WorkerWrapper.java
void onWorkFinished() {
	if (!tryCheckForInterruptionAndResolve()) {
		mWorkDatabase.beginTransaction();
		try {
			WorkInfo.State state = mWorkSpecDao.getState(mWorkSpecId);
			mWorkDatabase.workProgressDao().delete(mWorkSpecId);
			if (state == null) {
				// state can be null here with a REPLACE on beginUniqueWork().
				// Treat it as a failure, and rescheduleAndResolve() will
				// turn into a no-op. We still need to notify potential observers
				// holding on to wake locks on our behalf.
				resolve(false);
			} else if (state == RUNNING) {
				handleResult(mResult);
			} else if (!state.isFinished()) {
				rescheduleAndResolve();
			}
			mWorkDatabase.setTransactionSuccessful();
		} finally {
			mWorkDatabase.endTransaction();
		}
	}

	// Try to schedule any newly-unblocked workers, and workers requiring rescheduling (such as
	// periodic work using AlarmManager).  This code runs after runWorker() because it should
	// happen in its own transaction.

	// Cancel this work in other schedulers.  For example, if this work was
	// handled by GreedyScheduler, we should make sure JobScheduler is informed
	// that it should remove this job and AlarmManager should remove all related alarms.
	if (mSchedulers != null) {
		for (Scheduler scheduler : mSchedulers) {
			scheduler.cancel(mWorkSpecId);
		}
		Schedulers.schedule(mConfiguration, mWorkDatabase, mSchedulers);
	}
}
在 onWorkFinished() 会对刚刚执行完毕的任务作进一步处理。首先获取任务的当前状态 state,然后从 db 中删除这个任务,再根据 state 作进一步处理。我们看一下 handleResult(mResult) 的实现:
private void handleResult(ListenableWorker.Result result) {
	if (result instanceof ListenableWorker.Result.Success) {
		Logger.get().info(
				TAG,
				String.format("Worker result SUCCESS for %s", mWorkDescription));
		if (mWorkSpec.isPeriodic()) {
			resetPeriodicAndResolve();
		} else {
			setSucceededAndResolve();
		}

	} else if (result instanceof ListenableWorker.Result.Retry) {
		Logger.get().info(
				TAG,
				String.format("Worker result RETRY for %s", mWorkDescription));
		rescheduleAndResolve();
	} else {
		Logger.get().info(
				TAG,
				String.format("Worker result FAILURE for %s", mWorkDescription));
		if (mWorkSpec.isPeriodic()) {
			resetPeriodicAndResolve();
		} else {
			setFailedAndResolve();
		}
	}
}
- 在
handleResult()方法中会根据任务类型和 result 结果进行不同的处理。例如周期性的任务会重新将这个任务的状态设置为ENQUEUED,更新其他相关参数,并更新数据库。 - 已经完成的一次性任务将会被更新成
SUCCEEDED的状态 handleResult()执行完毕后更新isWorkFinished。如果isWorkFinished为 true,由于我们在GreedyScheduler已经处理了这个任务,为了避免这个任务被其他 schedulers 处理,WorkManager遍历了mSchedulers列表,并将这个任务从其他schedulers中移除。最后再次执行Schedulers.schedule()方法,schedule下一个任务。
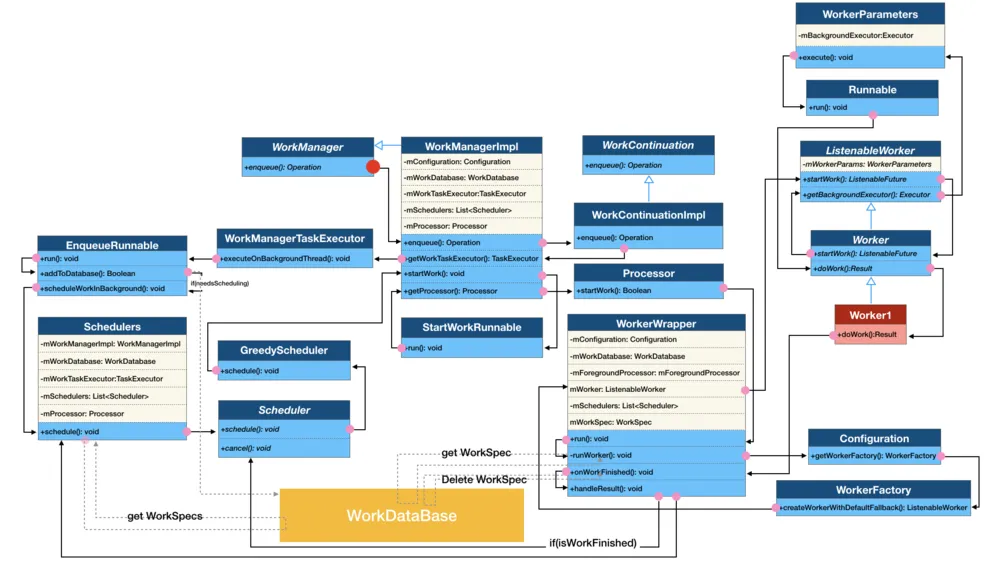
小结
- 在 WorkManager 执行了 enqueue() 后,创建 WorkContinuationImpl 对象执行 enqueue() 方法。
- WorkContinuationImpl 持有的 EnqueueRunnable 对象将任务添加到 db,并交给 Schedulers 去调度。
- Schedulers 将任务交给每一个 Scheduler 去处理。没有约束的一次性任务,GreedyScheduler 会先处理这个任务。
- GreedyScheduler 经过一系列判断后,调用 WorkManager 的 startWork() 方法执行这种一次性,非延迟,无约束的任务。
- WorkManager 持有的 StartWorkRunnable 对象会将任务交给 Processor 去处理,执行 startWork() 方法。
- Processor 创建一个 WorkerWrapper 对象,由它去调用 Worker 的 startWork() 方法,执行我们自定义 worker 的任务,并返回相应的 result。
- 任务完成后,WorkerWrapper 会根据 result 对任务状态,db 等进行更新,然后 schedule 下一个任务。
流程图:
Periodic 周期任务
使用:
WorkManager.getInstance(context)
    .enqueueUniquePeriodicWork(
        workerName,
        ExistingPeriodicWorkPolicy.REPLACE,
        workRequest
    )
进入到 WorkManagerImpl.enqueueUniquePeriodicWork
// v2.7.1 WorkManagerImpl.java
public Operation enqueueUniquePeriodicWork(
	@NonNull String uniqueWorkName,
	@NonNull ExistingPeriodicWorkPolicy existingPeriodicWorkPolicy,
	@NonNull PeriodicWorkRequest periodicWork) {

    return createWorkContinuationForUniquePeriodicWork(
            uniqueWorkName,
            existingPeriodicWorkPolicy,
            periodicWork)
            .enqueue();
}
// 创建了WorkContinuationImpl,
public WorkContinuationImpl createWorkContinuationForUniquePeriodicWork(
        @NonNull String uniqueWorkName,
        @NonNull ExistingPeriodicWorkPolicy existingPeriodicWorkPolicy,
        @NonNull PeriodicWorkRequest periodicWork) {
    ExistingWorkPolicy existingWorkPolicy;
    if (existingPeriodicWorkPolicy == ExistingPeriodicWorkPolicy.KEEP) {
        existingWorkPolicy = ExistingWorkPolicy.KEEP;
    } else {
        existingWorkPolicy = ExistingWorkPolicy.REPLACE;
    }
    return new WorkContinuationImpl(
            this,
            uniqueWorkName,
            existingWorkPolicy,
            Collections.singletonList(periodicWork));
}
然后调用了 WorkManagerImpl.enqueue():
// v2.7.1 WorkManagerImpl.java
@Override
public @NonNull Operation enqueue() {
    if (!mEnqueued) {
	    // 创建一个EnqueueRunnable
	    EnqueueRunnable runnable = new EnqueueRunnable(this);
        mWorkManagerImpl.getWorkTaskExecutor().executeOnBackgroundThread(runnable);
        mOperation = runnable.getOperation();
    } else {
        Logger.get().warning(TAG,
                String.format("Already enqueued work ids (%s)", TextUtils.join(", ", mIds)));
    }
    return mOperation;
}
在 TaskExecutor 中执行 EnqueueRunnable,看 run() 方法
// EnqueueRunnable.java
@Override
public void run() {
    try {
        // ...
        boolean needsScheduling = addToDatabase();  // 将Worker信息存储到数据库中去
        if (needsScheduling) {
            // Enable RescheduleReceiver, only when there are Worker's that need scheduling.
            final Context context = mWorkContinuation.getWorkManagerImpl().getApplicationContext();
            PackageManagerHelper.setComponentEnabled(context, RescheduleReceiver.class, true);
            scheduleWorkInBackground();
        }
        mOperation.setState(Operation.SUCCESS);
    } catch (Throwable exception) {
        mOperation.setState(new Operation.State.FAILURE(exception));
    }
}
// 安排执行
public void scheduleWorkInBackground() {
    WorkManagerImpl workManager = mWorkContinuation.getWorkManagerImpl();
    Schedulers.schedule(
            workManager.getConfiguration(),
            workManager.getWorkDatabase(),
            workManager.getSchedulers());
}
看 Schedulers.schedule()
// Schedulers.java
public static void schedule(Configuration configuration, WorkDatabase workDatabase, List<Scheduler> schedulers) {
    // ...

    WorkSpecDao workSpecDao = workDatabase.workSpecDao();
    List<WorkSpec> eligibleWorkSpecsForLimitedSlots;
    List<WorkSpec> allEligibleWorkSpecs;

    workDatabase.beginTransaction();
    try {
        // Enqueued workSpecs when scheduling limits are applicable.
        eligibleWorkSpecsForLimitedSlots = workSpecDao.getEligibleWorkForScheduling(
                configuration.getMaxSchedulerLimit());

        // Enqueued workSpecs when scheduling limits are NOT applicable.
        allEligibleWorkSpecs = workSpecDao.getAllEligibleWorkSpecsForScheduling(
                MAX_GREEDY_SCHEDULER_LIMIT);

        if (eligibleWorkSpecsForLimitedSlots != null
                && eligibleWorkSpecsForLimitedSlots.size() > 0) {
            long now = System.currentTimeMillis();

            // Mark all the WorkSpecs as scheduled.
            // Calls to Scheduler#schedule() could potentially result in more schedules            // on a separate thread. Therefore, this needs to be done first.            for (WorkSpec workSpec : eligibleWorkSpecsForLimitedSlots) {
                workSpecDao.markWorkSpecScheduled(workSpec.id, now);
            }
        }
        workDatabase.setTransactionSuccessful();
    } finally {
        workDatabase.endTransaction();
    }

    if (eligibleWorkSpecsForLimitedSlots != null
            && eligibleWorkSpecsForLimitedSlots.size() > 0) {

        WorkSpec[] eligibleWorkSpecsArray =
                new WorkSpec[eligibleWorkSpecsForLimitedSlots.size()];
        eligibleWorkSpecsArray =
                eligibleWorkSpecsForLimitedSlots.toArray(eligibleWorkSpecsArray);

        // Delegate to the underlying schedulers.
        for (Scheduler scheduler : schedulers) {
            if (scheduler.hasLimitedSchedulingSlots()) {
                scheduler.schedule(eligibleWorkSpecsArray);
            }
        }
    }

    if (allEligibleWorkSpecs != null && allEligibleWorkSpecs.size() > 0) {
        WorkSpec[] enqueuedWorkSpecsArray = new WorkSpec[allEligibleWorkSpecs.size()];
        enqueuedWorkSpecsArray = allEligibleWorkSpecs.toArray(enqueuedWorkSpecsArray);
        // Delegate to the underlying schedulers.
        for (Scheduler scheduler : schedulers) {
            if (!scheduler.hasLimitedSchedulingSlots()) {
                scheduler.schedule(enqueuedWorkSpecsArray);
            }
        }
    }
}
Schedulers.schedule() 查询状态是 ENQUEUED = 0 的任务执行
约束条件任务的执行过程
带约束条件使用示例:
val constraints = Constraints.Builder()
	.setRequiresBatteryNotLow(true)
	.build()
val work2Request = OneTimeWorkRequestBuilder<Worker2>()
	.setConstraints(constraints)
	.build()
WorkManager.getInstance(this).enqueue(work2Request)
任务的创建过程中,会为 WorkSpec 添加 Constraints 属性。
public final @NonNull B setConstraints(@NonNull Constraints constraints) {
	mWorkSpec.constraints = constraints;
	return getThis();
}
在任务执行的过程中,由于增加了约束条件,根据之前章节的分析,常驻的 GreedyScheduler 的 schedule() 方法将不会 startWork(),而是根据 build version 交由 SystemJobScheduler 或 SystemAlarmScheduler 进行处理。先来看使用 SystemJobScheduler 的情况:
SystemJobScheduler (Build Version 大于等于 23)
SystemJobScheduler 使用的是 JobScheduler 来调度执行任务。通常 JobScheduler 的使用步骤如下:
- 创建
JobService - 配置
JobInfo - 执行
SystemJobService
SystemJobService 是执行任务的服务类,在 onStartJob() 中,会调用 WorkManagerImpl 的 startWork() 执行任务。
// SystemJobService
@Override
public boolean onStartJob(@NonNull JobParameters params) {
	// ... ...
	String workSpecId = getWorkSpecIdFromJobParameters(params);
	// ... ...
	synchronized (mJobParameters) {
	  // ... ...
		mJobParameters.put(workSpecId, params);
	}
	// ... ...
	mWorkManagerImpl.startWork(workSpecId, runtimeExtras);
	return true;
}
在初始化 SystemJobScheduler 的时候会获取 JobScheduler 对象:
// SystemJobScheduler
public SystemJobScheduler(@NonNull Context context, @NonNull WorkManagerImpl workManager) {
	this(context,
		workManager,
		(JobScheduler) context.getSystemService(JOB_SCHEDULER_SERVICE),
		new SystemJobInfoConverter(context));
}
SystemJobScheduler 的 schedule() 方法执行了 scheduleInternal():
// SystemJobScheduler
public void scheduleInternal(WorkSpec workSpec, int jobId) {
	JobInfo jobInfo = mSystemJobInfoConverter.convert(workSpec, jobId);
	Logger.get().debug(
			TAG,
			String.format("Scheduling work ID %s Job ID %s", workSpec.id, jobId));
	try {
		mJobScheduler.schedule(jobInfo);
	} catch (IllegalStateException e) {
		... ...
		throw new IllegalStateException(message, e);
	} catch (Throwable throwable) {
		// OEM implementation bugs in JobScheduler cause the app to crash. Avoid crashing.
		Logger.get().error(TAG, String.format("Unable to schedule %s", workSpec), throwable);
	}
}
SystemJobInfoConverter.convert() 方法就是创建了一个 JobInfo,并将 Constraints 里的约束条件赋予 JobInfo 对象,之后便执行了 JobScheduler.schedule(),根据约束条件对任务进行调度。
SystemAlarmScheduler (Build Version 小于 23)
SystemAlarmScheduler 使用的是 AlarmManager 来调度执行任务。在 AndroidManifest 里有如下 receiver 注册:
<receiver android:directBootAware="false" android:enabled="false" android:exported="false" android:name="androidx.work.impl.background.systemalarm.ConstraintProxy$BatteryNotLowProxy">
    <intent-filter>
          <action android:name="android.intent.action.BATTERY_OKAY"/>
          <action android:name="android.intent.action.BATTERY_LOW"/>
    </intent-filter>
</receiver>
在电量变化时,收到 BATTERY_LOW 的广播。在 BatteryNotLowProxy 的 onReceive() 进行处理:
// ConstraintProxy
public static class BatteryNotLowProxy extends ConstraintProxy {
}

@Override
public void onReceive(Context context, Intent intent) {
	Logger.get().debug(TAG, String.format("onReceive : %s", intent));
	Intent constraintChangedIntent = CommandHandler.createConstraintsChangedIntent(context);
	context.startService(constraintChangedIntent);
}
createConstraintsChangedIntent() 的执行如下:
// ConstraintProxy
static Intent createConstraintsChangedIntent(@NonNull Context context) {
	Intent intent = new Intent(context, SystemAlarmService.class);
	intent.setAction(ACTION_CONSTRAINTS_CHANGED);
	return intent;
}
SystemAlarmService 的 onStartCommand() 处理如下:
@Override
public int onStartCommand(Intent intent, int flags, int startId) {
	super.onStartCommand(intent, flags, startId);
	// ... ...
	if (intent != null) {
		mDispatcher.add(intent, startId);
	}
	// If the service were to crash, we want all unacknowledged Intents to get redelivered.
	return Service.START_REDELIVER_INTENT;
}
调用了 SystemAlarmDispatcher.add() 方法。
// SystemAlarmDispatcher
@MainThread
public boolean add(@NonNull final Intent intent, final int startId) {
	// ... ...
	if (CommandHandler.ACTION_CONSTRAINTS_CHANGED.equals(action)
			&& hasIntentWithAction(CommandHandler.ACTION_CONSTRAINTS_CHANGED)) {
		return false;
	}
	intent.putExtra(KEY_START_ID, startId);
	synchronized (mIntents) {
		boolean hasCommands = !mIntents.isEmpty();
		mIntents.add(intent);
		if (!hasCommands) {
			// Only call processCommand if this is the first command.
			// The call to dequeueAndCheckForCompletion will process the remaining commands
			// in the order that they were added.
			processCommand();
		}
	}
	return true;
}
add() 方法中执行了 processCommand(),这段代码的核心执行语句是:
// SystemAlarmDispatcher
mCommandHandler.onHandleIntent(mCurrentIntent, startId, SystemAlarmDispatcher.this);
在 CommandHandler 的 onHandleIntent() 方法中,action 为 ACTION_CONSTRAINTS_CHANGED 的执行是:
// CommandHandler
if (ACTION_CONSTRAINTS_CHANGED.equals(action)) {
	handleConstraintsChanged(intent, startId, dispatcher);
}
private void handleConstraintsChanged(
		@NonNull Intent intent, int startId,
		@NonNull SystemAlarmDispatcher dispatcher) {

	Logger.get().debug(TAG, String.format("Handling constraints changed %s", intent));
	// Constraints changed command handler is synchronous. No cleanup
	// is necessary.
	ConstraintsCommandHandler changedCommandHandler =
			new ConstraintsCommandHandler(mContext, startId, dispatcher);
	changedCommandHandler.handleConstraintsChanged();
}
在 handleConstraintsChanged() 方法的执行中,会创建一个 action 为 ACTION_DELAY_MET 的 Intent 然后由 SystemAlarmDispatcher 发送出去,实际上也是调用了 SystemAlarmDispatcher.add() 方法。回到 SystemAlarmDispatcher 的 add() 流程。
// ConstraintsCommandHandler
Intent intent = CommandHandler.createDelayMetIntent(mContext, workSpecId);
Logger.get().debug(TAG, String.format("Creating a delay_met command for workSpec with id (%s)", workSpecId));
mDispatcher.postOnMainThread(new SystemAlarmDispatcher.AddRunnable(mDispatcher, intent, mStartId));
回到 onHandleIntent() 方法,在 CommandHandler 的 onHandleIntent() 方法中,action 为 ACTION_DELAY_MET 的执行是:
// CommandHandler
else if (ACTION_DELAY_MET.equals(action)) {
	handleDelayMet(intent, startId, dispatcher);
}
handleDelayMet() 的执行过程,会调用 DelayMetCommandHandler 的 handleProcessWork() 方法,接着执行 onAllConstraintsMet():
@Override
public void onAllConstraintsMet(@NonNull List<String> workSpecIds) {
	// ... ...
	synchronized (mLock) {
		if (mCurrentState == STATE_INITIAL) {
			// ... ...
			boolean isEnqueued = mDispatcher.getProcessor().startWork(mWorkSpecId);
			// ... ...
		} else {
			Logger.get().debug(TAG, String.format("Already started work for %s", mWorkSpecId));
		}
	}
}
SystemAlarmDispatcher 调用了 Processor 的 startWork() 方法