SVG
SVG 介绍
http://www.w3school.com.cn/svg/index.asp
SVG 的全称是 Scalable Vector Graphics,叫可缩放矢量图形。它和位图(Bitmap)相对,SVG 不会像位图一样因为缩放而让图片质量下降。它的优点在于节约空间,使用方便。
SVG 特点
SVG 指可伸缩矢量图形 (Scalable Vector Graphics)
SVG 用来定义用于网络的基于矢量的图形
SVG 使用 XML 格式定义图形
SVG 图像在放大或改变尺寸的情况下其图形质量不会有所损失
SVG 是万维网联盟的标准
SVG 与诸如 DOM和 XSL 之类的W3C标准是一个整体
SVG 和 Vector
Vector 只实现了 SVG 语法的 Path 标签(为了提高解析效率),在 Android 中使用。
Vector 的语法通过字母和数字的组合来描述一个路径,不同字母则代表不同含义,例如:
M = moveto(M X,Y): 将画笔移动到指定的坐标位置
L = lineto(L X,Y): 画直线到指定的坐标位置
Z = closepath(): 关闭路径
Vector 还提供了一些封装好的方法:
H = horizontal lineto(H X): 画水平线到指定的X坐标位置
V = vertical lineto(V Y): 画垂直线到指定的Y坐标位置
例如下面这个 Vector Asset 代表一个黑色的正方形:
<vector xmlns:android="http://schemas.android.com/apk/res/android"
    android:width="24dp"
    android:height="24dp"
    android:viewportWidth="24.0"
    android:viewportHeight="24.0">
    <path
        android:name="square"
        android:fillColor="#FF000000"
        android:pathData="M10,10 L20,10 L20,20 L10,20 z"/>
</vector>
解释:
- 1)如上是依次以 M10,10 -> L20,10 -> L20,20 -> L10,20 -> z 进行绘制;
- 2)width/height 代表 vector 的大小;viewportWidth/viewportHeight 则代表把 vector 均匀分为 24 整份,pathData 就按照这里的标准来绘制。
矢量图属性与绘制
尺量图属性
<?xml version="1.0" encoding="utf-8"?>
<vector xmlns:android="http://schemas.android.com/apk/res/android"
    android:width="200dp"
    android:height="200dp"
    android:viewportWidth="500"
    android:viewportHeight="500">
    <group
        android:scaleX="5.0"
        android:scaleY="5.0">
        <path
            android:name="start"
            android:pathData="M 50.0,90.0 L 82.9193546357,27.2774101308 L 12.5993502926,35.8158045183 L 59.5726265715,88.837672697 L 76.5249063296,20.0595700732 L 10.2916450361,45.1785327898 L 68.5889268818,85.4182410261 L 68.5889268818,14.5817589739 L 10.2916450361,54.8214672102 L 76.5249063296,79.9404299268 L 59.5726265715,11.162327303 L 12.5993502926,64.1841954817 L 82.9193546357,72.7225898692 L 50.0,10.0 L 17.0806453643,72.7225898692 L 87.4006497074,64.1841954817 L 40.4273734285,11.162327303 L 23.4750936704,79.9404299268 L 89.7083549639,54.8214672102 L 31.4110731182,14.5817589739 L 31.4110731182,85.4182410261 L 89.7083549639,45.1785327898 L 23.4750936704,20.0595700732 L 40.4273734285,88.837672697 L 87.4006497074,35.8158045183 L 17.0806453643,27.2774101308 L 50.0,90.0Z"
            android:strokeWidth="2"
            android:strokeColor="#000000" />
    </group>
</vector>
效果
<vector>
根标签,表示一个矢量动画
支持的属性:
- android:name:定义矢量图形的名称
- android:width:定义 Drawable 的宽度,支持所有 dimension 单位,一般使用 dp。drawable 的宽度不一定是最终绘制宽度,比如给 ImageView 设置 background 则 Drawable 绘制宽度等于 ImageView 的宽度,给 ImageView 设置 src 则在 ImageView 大于 Drawable 宽度时,Drawable 绘制宽度等于自己定义的宽度。
- android:height:定义 Drawable 的宽度,支持所有 dimension 单位,一般是 dp。其它同上。
- android:viewportWidth:定义矢量图形的视图 (viewport) 空间的宽度,viewport 是一个虚拟的 canvas,后面所有的 path 都在该坐标系上绘制。坐标系左上方为 (0,0),横轴从左向右,纵轴从上到下。横轴可视区域就是 0~viewportWidth。
- android:viewportHeight:定义矢量图形的可视区域的高度。其它见上。[0,0]~[viewportWidth,viewportHeight] 定义了虚拟 canvas 的可视区域。
- android:tint:作为染色 (tint) 的色彩应用到 drawable 上。默认不应用 tint。
- android:tintMode:tint 颜色的 Porter-Duff 混合模式,默认是 src_in。
- android:autoMirrored:如果 drawable 布局方向是 RTL(right-to-left) 时,drawable 绘制是否需要镜像化(镜像化就是绕自身 x 轴中线旋转 180 度)。
- android:alpha:drawble 的透明度,取值 0~1
<group>
定义一组路径和子 group,另外还定义了转换信息 (transformation information)。转换信息定义在 vector 指定的视图区域内(与 viewport 坐标系相同)。定义的应用转换的顺序是缩放 -->旋转 -->平移,所以同时定义的这些属性最先应用 scaleX/scaleY 属性,最后应用 translateX/translateY 属性。
支持的属性:
- android:name:定义 group 的名称
- android:rotation:group 对应矢量图形的旋转角度,取值是 360 度制。
- android:pivotX:Group 旋转和缩放时的中心点的 X 轴坐标。取值基于 viewport 视图的坐标系,不能使用百分比。
- android:pivotY:Group 旋转和缩放时的中心点的 Y 轴坐标。取值基于 viewport 视图的坐标系,不能使用百分比。
- android:scaleX:Group 在 X 轴上的缩放比例,最先应用到图形上。
- android:scaleY:Group 在 Y 轴上的缩放比例,最先应用到图形上。
- android:translateX:Group 在 X 轴的平移距离,取值基于 viewport 视图的坐标系。最后应用到图形上。
- android:translateY:Group 在 Y 轴的平移距离,取值基于 viewport 视图的坐标系。最后应用到图形上。
<path>
定义一个路径,一个路径即可以表示一块填充区域或一根线条。
支持的属性:
- android:name:定义路径的名称
- android:pathData:定义路径的数据,路径由多条命令组成,格式与 SVG 标准的 path data 的 d 属性完全相同,路径命令的参数定义在 viewport 视图的坐标系。
- android:fillColor:指定填充路径的颜色,一般是一个颜色值,在 SDK24 及以上,可以指定一个颜色状态列表或者一个渐变的颜色。如果在此属性上做渐变动画,新的属性值会覆盖此值。如果不指定,则 path 不被填充。
- android:strokeColor:指定路径线条的颜色,一般是一个颜色值,在 SDK24 及以上,可以指定一个颜色状态列表或者一个渐变的颜色。如果在此属性上做渐变动画,新的属性值会覆盖此值。如果不指定,则 path 的线条不会绘制出来。
- android:strokeWidth:指定路径线条的宽度,基于 viewport 视图的坐标系(不要 dp/px 之类的结尾)。
- android:strokeAlpha:指定路径线条的透明度。
- android:fillAlpha:指定填充区域的透明度。
- android:trimPathStart:取值从 0 到 1,表示路径从哪里开始绘制。0~trimPathStart 区间的路径不会被绘制出来。
- android:trimPathEnd:取值从 0 到 1,表示路径绘制到哪里。trimPathEnd~1 区间的路径不会被绘制出来。
- android:trimPathOffset:平移可绘制区域,取值从 0 到 1,线条从 (trimPathOffset+trimPathStart 绘制到 trimPathOffset+trimPathEnd),注意:trimPathOffset+trimPathEnd 如果超过 1,其实也是绘制的的,绘制的是 0~trimPathOffset+trimPathEnd-1 的位置。
- android:strokeLineCap:设置线条首尾的外观,三个值:butt(默认,向线条的每个末端添加平直的边缘), round(向线条的每个末端添加圆形线帽), square(向线条的每个末端添加正方形线帽。)。
- android:strokeLineJoin:设置当两条线条交汇时,创建什么样的边角(线段连接类型):三个值:miter(默认,创建尖角),round(创建圆角),bevel(创建斜角) 。
- android:strokeMiterLimit:设置设置最大斜接长度,斜接长度指的是在两条线交汇处内角和外角之间的距离。只有当 lineJoin 属性为 "miter" 时,miterLimit 才有效。
SVG 语法
M = moveto(M X,Y) :将画笔移动到指定的坐标位置,相当于 android Path 里的moveTo()
L = lineto(L X,Y) :画直线到指定的坐标位置,相当于 android Path 里的lineTo()
H = horizontal lineto(H X):画水平线到指定的X坐标位置
V = vertical lineto(V Y):画垂直线到指定的Y坐标位置
C = curveto(C X1,Y1,X2,Y2,ENDX,ENDY):三次贝赛曲线
S = smooth curveto(S X2,Y2,ENDX,ENDY) 同样三次贝塞尔曲线,更平滑
Q = quadratic Belzier curve(Q X,Y,ENDX,ENDY):二次贝赛曲线
T = smooth quadratic Belzier curveto(T ENDX,ENDY):映射 同样二次贝塞尔曲线,更平滑
A = elliptical Arc(A RX,RY,XROTATION,FLAG1,FLAG2,X,Y):弧线 ,相当于arcTo()
Z = closepath():关闭路径(会自动绘制链接起点和终点)
以上所有命令均允许小写字母。大写表示绝对定位,小写表示相对定位。
SVG 资源
| 资源 | 地址 | 备注 |
|---|---|---|
| Android 实现炫酷 SVG 动画效果 | http://blog.csdn.net/crazy__chen/article/details/47728241#reply |
https://www.jianshu.com/p/4707a4738a51
1、获取尺量图
- 海量在线矢量图 (阿里出品)
http://iconfont.cn/ - Android Studio 的 Material Icon 入口
鼠标选中 drawable 文件夹,右键, New, Vector Asset - 用软件或工具导出
美工帮忙做
在线制作https://svg-edit.github.io/svgedit/releases/svg-edit-2.8.1/svg-editor.html
Vector Magic 制作
2、转换
- svgtoandroid
https://github.com/misakuo/svgtoandroid
svgtoandroid 插件不好用,有透明度的 svg 被转换成不透明的了
3、预览
将 svg 转换成 vector xml 格式
- AS - new Vector Asset
SVG 相关库
android-pathview
https://github.com/geftimov/android-pathview
使用 Android 自带的绘图类和函数,复杂的曲线路径,我们可以使用 Path 这个类来制定
那会不会 SVG 里面的 path,其实也是这样,那么我们就可以将 SVG 中的 path,对应到 android,然后绘制出来就好了。
SVG 里面还有各种标签:
包括 line 直线,circle 圆,rect 矩形,eliipse 椭圆,polygon 多边形,等等
这些只要我们又一个 SVG 文件,都可以将其转换成 java 代码
作为一个程序员,我们当然不能手动去做这个工作,那就涉及两个问题,一个是 SVG 的解析,一个是解析后的绘制
幸运的是,已经有人完成了这个工作,并且在 Github 上开源 https://github.com/geftimov/android-pathview
Lottie
SVGAPlayer-Android(YY)
https://github.com/yyued/SVGAPlayer-Android
VectAlign
https://github.com/bonnyfone/vectalign
VectorDrawable(静态 SVG)
[toc]
VectorDrawable
VectorDrawable 是 Google 从 Android 5.0 开始引入的一个新的 Drawable 子类,能够加载矢量图。到现在通过 support-library 已经至少能适配到 Android 4.0 了(通过 AppBrain 统计的 Android 版本分布来看,Android 4.1 以下(api<15)几乎可以不考虑了)。Android 中的 VectorDrawable 只支持 SVG 的部分属性,相当于阉割版。
在 Android 中,我们不能直接使用原始的 .svg 格式图片,而是需要将其转化为 VectorDrawable,可以理解为一个 XML 格式的 svg 文件,即矢量图形在 android 中的原始资源
它虽然是个类,但是一般通过配置 xml 再设置到要使用的控件上。在 Android 工程中,在资源文件夹 res/drawable/ 的目录下(没有则需新建),通过 <vector></vector> 标签描述,例如 svg_ic_arrow_right.xml:
引入
添加 gradle 配置:
android {
  defaultConfig {
    vectorDrawables.useSupportLibrary = true
   }
}

dependencies {
  compile "com.android.support:appcompat-v7:21+" // 至少Api21
}
项目的 Activity 中都包含(通用做法是在 BaseActivity 中加):
static {
  AppCompatDelegate.setCompatVectorFromResourcesEnabled(true);
}
vector 命令
直线命令
例子 1 画一个方向图标(直线命令)
<?xml version="1.0" encoding="utf-8"?>
<!--android:width="50dp"  android:height="50dp" 画布的宽度与高度-->
<!--android:viewportWidth="50.0" android:viewportHeight="50.0" 视图的宽度和高度-->
<vector xmlns:android="http://schemas.android.com/apk/res/android"
    android:width="50dp"
    android:height="50dp"
    android:viewportWidth="50.0"
    android:viewportHeight="50.0">
    <!--strokeColor=  笔画颜色 线条的颜色-->
    <!--fillColor=  填充颜色  注意2个颜色 有明显区分,填充颜色只是在图形闭合后颜色-->
    <!--strokeWidth=  线宽-->
    <path
        android:pathData="M10,10
        L26.7,26.9
        M25,25
        L10,40"
        android:strokeWidth="5"
        android:strokeColor="@color/colorPrimaryDark" />
    <!--这里使用的都是大写字母,所以坐标值都是绝对坐标-->
    <!--M10,10 = 首先将画笔移动到X10,Y10的地方-->
    <!--L26.7,26.9 = 然后画一条直线到X26.7,Y26.9 -->
    <!--M25,25 = 在将画笔移动到 X25.7,Y25 -->
    <!--L10,40 = 画一条直线到 X10.7,Y40 -->
</vector>

例子 2 画一个矩形(直线命令)
<?xml version="1.0" encoding="utf-8"?>
<vector xmlns:android="http://schemas.android.com/apk/res/android"
    android:width="100dp"
    android:height="100dp"
    android:viewportWidth="100.0"
    android:viewportHeight="100.0">
    <path
        android:name="stars"
        android:pathData="M10,10 L90,10 L90,90 L10,90 Z"
        android:strokeWidth="2"
        android:strokeColor="@color/colorPrimaryDark" />
</vector>
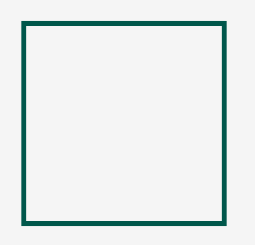
- 我们的画布是
100*100的,首先在X10,Y10的坐标上向右画直线,然后在下线画直线,在向左画直线,最后使用 Z 闭合图形。注意!需要闭合图形需要在一个图形里一直保持线段的连贯,如果在中间使用 M 移动画笔,那么 Z 闭合只与最后一次 M 移动的点闭合图形。这点与自定义 View 里的 path 画法类似。 - 另外,如果你需要一个填充全部颜色的矩形,只需要修改
android:strokeColor="@color/colorPrimaryDark"为android:fillColor="@color/colorPrimaryDark"这样,图形中间就会被全部填充。但是建议初学者在画的时候设置 strokeColor 和 strokeWidth 在来绘制图形,否则图形如果不设置线条颜色和线宽,图形在闭合之前是不会显示图形的。
曲线命令
绘制平滑曲线的命令有三个,其中两个用来绘制贝塞尔曲线,另外一个用来绘制弧形或者说是圆的一部分.
在 path 元素里,只存在两种贝塞尔曲线:三次贝塞尔曲线 C,和二次贝塞尔曲线 Q
三次贝塞尔曲线 C
三次贝塞尔曲线 C,三次贝塞尔曲线需要定义一个点和两个控制点,所以用 C 命令创建三次贝塞尔曲线,需要设置三组坐标参数:
C x1 y1, x2 y2, x y (or c dx1 dy1, dx2 dy2, dx dy)
这里的最后一个坐标 (x,y) 表示的是曲线的终点,另外两个坐标是控制点,(x1,y1) 是起点的控制点,(x2,y2) 是终点的控制点
<?xml version="1.0" encoding="utf-8"?>
<vector xmlns:android="http://schemas.android.com/apk/res/android"
    android:width="400dp"
    android:height="400dp"
    android:viewportWidth="400"
    android:viewportHeight="400">

    <path
        android:name="rect_vector"
        android:fillColor="#04f91d"
        android:pathData="M 100 100 C 200 0 300 0 400 100 "
        android:strokeWidth="5"
        android:strokeColor="#f76f07" />

</vector>
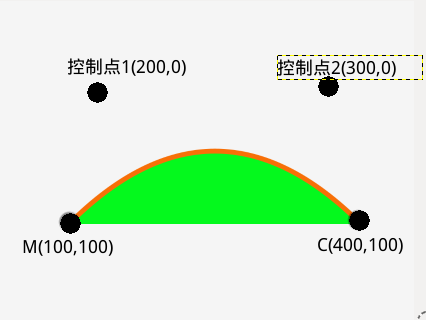
M 定义起点为(100,100)
C 定义终点为(400,100)
其中两个控制点 (200,0)(300,0)
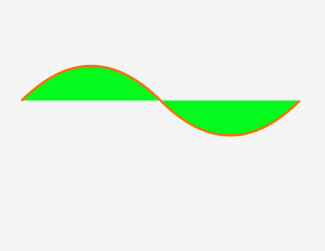
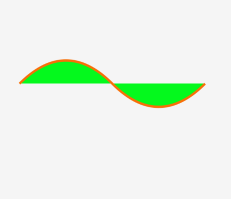
连接贝塞尔曲线 S
<?xml version="1.0" encoding="utf-8"?>
<vector xmlns:android="http://schemas.android.com/apk/res/android"
    android:width="800dp"
    android:height="800dp"
    android:viewportWidth="800"
    android:viewportHeight="800">

    <path
        android:name="rect_vector"
        android:fillColor="#04f91d"
        android:pathData="M 100 100 C 200 0 300 0 400 100 S 600 200 700 100"
        android:strokeWidth="5"
        android:strokeColor="#f76f07" />

</vector>
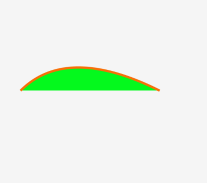
二次贝塞尔曲线 Q
它比三次贝塞尔曲线简单,只需要一个控制点,用来确定起点和终点的曲线斜率。因此它需要两组参数,控制点和终点坐标Q x1 y1, x y (or q dx1 dy1, dx dy)
<?xml version="1.0" encoding="utf-8"?>
<vector xmlns:android="http://schemas.android.com/apk/res/android"
    android:width="400dp"
    android:height="400dp"
    android:viewportHeight="800"
    android:viewportWidth="800">

    <path
        android:name="rect_vector"
        android:fillColor="#04f91d"
        android:pathData="M 100 100 Q 200 0 400 100"
        android:strokeColor="#f76f07"
        android:strokeWidth="5" />

</vector>
连接贝塞尔曲线 T
就像三次贝塞尔曲线有一个 S 命令,二次贝塞尔曲线有一个差不多的 T 命令,可以通过更简短的参数,延长二次贝塞尔曲线。
T x y (or t dx dy)
<?xml version="1.0" encoding="utf-8"?>
<vector xmlns:android="http://schemas.android.com/apk/res/android"
    android:width="800dp"
    android:height="800dp"
    android:viewportWidth="800"
    android:viewportHeight="800">

    <path
        android:name="rect_vector"
        android:fillColor="#04f91d"
        android:pathData="M 100 100 Q 200 0 300 100 T 500 100"
        android:strokeWidth="5"
        android:strokeColor="#f76f07" />

</vector>
弧形
弧形命令 A 是另一个创建 SVG 曲线的命令。基本上,弧形可以视为圆形或椭圆形的一部分。假设,已知椭圆形的长轴半径和短轴半径,另外已知两个点(它们的距离在圆的半径范围内),这时我们会发现,有两个路径可以连接这两个点。每种情况都可以生成出四种弧形。所以,为了保证创建的弧形唯一,A 命令需要用到比较多的参数:
A rx ry x-axis-rotation large-arc-flag sweep-flag x y

a rx ry x-axis-rotation large-arc-flag sweep-flag dx dy
- 弧形命令 A 的前两个参数分别是 x 轴半径和 y 轴半径
- 参数 x-axis-rotation (第三个)表示弧形的旋转情况
- 参数 large-arc-flag (第四个)决定弧线是大于还是小于 180 度,0 表示小角度弧,1 表示大角度弧。
- 参数 sweep-flag(第五个)表示弧线的方向,0 表示从起点到终点沿逆时针画弧,1 表示从起点到终点沿顺时针画弧。
- 最后的参数 x y 是弧线的终点
<?xml version="1.0" encoding="utf-8"?>
<vector xmlns:android="http://schemas.android.com/apk/res/android"
    android:width="800dp"
    android:height="800dp"
    android:viewportHeight="800"
    android:viewportWidth="800">

    <path
        android:name="rect_vector"
        android:fillColor="#04f91d"
        android:pathData="
        M 100 400
        A 100 120 0 0 1 400 400 Z"
        android:strokeColor="#f76f07"
        android:strokeWidth="5" />

</vector>
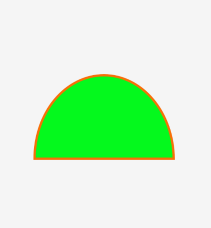
这里 起点坐标是 (100,400) 弧线的半径 rx =100 ry=120 旋转角度为 0 度,第四个参数 0 代表取的是小角方向的弧度,这里正好两而相等
终点坐标是 (400,400) 最后 Z 闭合曲线
兼容
1.ImageView
将 android:src 属性,换成 app:srcCompat 即可
可以发现,这里我们使用的都是普通的 ImageView,好像并不是 AppcomatImageView,这是因为使用了 Appcomat 后,系统会自动把 ImageView 转换为 AppcomatImageView。
2. 在非 src 属性的地方使用矢量图时,需要将矢量图用 drawable 容器 (如 StateListDrawable, InsetDrawable, LayerDrawable, LevelListDrawable, 和 RotateDrawable) 包裹起来使用。否则会在低版本的情况下报错
如通过 selector
3. Button 和 TextView 等
android.support.v7.widget.AppCompatTextView
drawableLeft 等不支持,需要设置才能支持
static {

    AppCompatDelegate.setCompatVectorFromResourcesEnabled(true);

}
RadioButton 的 button 属性
需要设置这个 flag 的原因:
First up, this functionality was originally released in 23.2.0, but then we found some memory usage and Configuration updating issues so we it removed in 23.3.0. In 23.4.0 (technically a fix release) we've re-added the same functionality but behind a flag which you need to manually enable.
开启这个 flag 后,你就可以正常使用 Selector 这样的 DrawableContainers 了。同时,你还开启了类似 android:drawableLeft 这样的 compound drawable 的使用权限,以及 RadioButton 的使用权限,以及 ImageView's src 属性。
4.将 VectorDrawable 用于 View 背景时,需要通过以下代码设定
Resources resources = context.getResources(Resources, int, Theme);

Theme theme = context.getTheme();

Drawable drawable = VectorDrawableCompat.create(resources, R.drawable.vector_drawable, theme);

view.setBackground(drawable);
代码中需要进行 Drawable 的实现类型转换时,可使用以下代码段执行:
if (Build.VERSION.SDK_INT >= Build.VERSION_CODES.LOLLIPOP) {

   VectorDrawable vectorDrawable = (VectorDrawable) drawable;

} else {

   BitmapDrawable bitmapDrawable = (BitmapDrawable) drawable;

}
5.0 以下使用 VectorDrawable 是不是有问题
请问 5.0 以下使用 VectorDrawable 是不是有问题?我在 Gradle 中将 vectorDrawables.useSupportLibrary 设置为 true,还是报资源找不到的错,我用的是另一个 library 的控件,然后控件设置了 vectorDrawable,一直报错
解决:
解决方法:Gradle 2.0 以上,在模块的 gradle 文件中添加 vectorDrawables.useSupportLibrary = true,Activity 的 static 代码块中添加
AppCompatDelegate.setCompatVectorFromSourcesEnabled(true),这段代码我放在了 BaseActivity,假设使用的是 ImageView 的 android:src 属性,AS 还会提示改用 app:srcCompat,这个属性查了一下,说是会将 View 转换为对应的 AppCompat 类型。还有一点就是,如果有使用 drawableLeft 等这些属性的话,还是会出问题,还是会报资源找不到的异常,解决方法是将 vector 用 selector 包一层就好了
AnimatedVectorDrawable(动图 SVG)
AnimatedVectorDrawable
动态 vector,对 VectorDrawable 定义动画通过 ObjectAnimator 或 AnimatrorSet
动态的 Vector 需要通过 animated-vector 标签来进行实现,它就像一个粘合剂,将控件与 Vector 图像粘合在了一起
通过 <animated-vector> 标签,drawable 定义一个 vector,animation 定义
<animated-vector
    xmlns:android="http://schemas.android.com/apk/res/android"
    android:drawable="@drawable/XXXXX1">
    <target
        android:name="left"
        android:animation="@animator/XXXXX2"/>
</animated-vector>
- XXXXX1 是目标 Vector 图像,也就是静态的 Vector 图像
- XXXXX2 实际上就是模板要实现的动画,动画效果实际上就是基础的属性动画
ImageView imageView = (ImageView) findViewById(R.id.iv);
AnimatedVectorDrawableCompat animatedVectorDrawableCompat = AnimatedVectorDrawableCompat.create(
        this, R.drawable.square_anim
);
imageView.setImageDrawable(animatedVectorDrawableCompat);
((Animatable) imageView.getDrawable()).start();
案例
案例 1:加载小球动画
- 静态 vector 资源 vector_ball_vector.xml
<?xml version="1.0" encoding="utf-8"?>
<vector xmlns:android="http://schemas.android.com/apk/res/android"
    android:width="24dp"
    android:height="24dp"
    android:viewportWidth="24.0"
    android:viewportHeight="24.0">

    <group android:name="left">
        <path
            android:fillColor="#FF000000"
            android:pathData="M6,10c-1.1,0 -2,0.9 -2,2s0.9,2 2,2 2,-0.9 2,-2 -0.9,-2 -2,-2z" />
    </group>

    <group android:name="right">
        <path
            android:fillColor="#FF000000"
            android:pathData="M18,10c-1.1,0 -2,0.9 -2,2s0.9,2 2,2 2,-0.9 2,-2 -0.9,-2 -2,-2z" />
    </group>
</vector>
- 动画资源 left
<?xml version="1.0" encoding="utf-8"?>
<objectAnimator xmlns:androd="http://schemas.android.com/apk/res/android"
    androd:duration="500"
    androd:interpolator="@android:interpolator/overshoot"
    androd:propertyName="translateX"
    androd:repeatCount="infinite"
    androd:repeatMode="reverse"
    androd:valueFrom="0"
    androd:valueTo="10"
    androd:valueType="floatType"/>
    <!--
        duration="1000"          持续时间/毫秒
        interpolator             修饰动画效果,定义动画的变化率(加速,减速,重复,弹跳)
        propertyName="translateX"属性名(还有前面回顾属性动画提到的属性,另外还有颜色渐变fillColor/轨迹绘制trimPathStart)
        repeatCount="infinite"   无限次
        repeatMode="reverse"     重复模式:循环使用
        valueFrom="0"            起始值
        valueTo="10"             结束值
        valueType="floatType"    变化值的类型:浮点型变化
     -->
- 动画资源 right
<?xml version="1.0" encoding="utf-8"?>
<objectAnimator xmlns:androd="http://schemas.android.com/apk/res/android"
    androd:duration="500"
    androd:interpolator="@android:interpolator/overshoot"
    androd:propertyName="translateX"
    androd:repeatCount="infinite"
    androd:repeatMode="reverse"
    androd:valueFrom="0"
    androd:valueTo="-10"
    androd:valueType="floatType" />
- 动画粘合剂 animated-vector(vector_ball_vector_animated.xml),让属性动画作用于 VectorDrawable:
<?xml version="1.0" encoding="utf-8"?>
<animated-vector xmlns:android="http://schemas.android.com/apk/res/android"
    android:drawable="@drawable/vector_ball_vector">
    <target
        android:name="left"
        android:animation="@animator/vector_ball_anim_left" />
    <target
        android:name="right"
        android:animation="@animator/vector_ball_anim_right" />
</animated-vector>
- ImageView 用
android:srcCompat
<?xml version="1.0" encoding="utf-8"?>
<RelativeLayout xmlns:android="http://schemas.android.com/apk/res/android"
    xmlns:app="http://schemas.android.com/apk/res-auto"
    android:id="@+id/activity_main"
    android:layout_width="match_parent"
    android:layout_height="match_parent">
    <ImageView
        android:layout_width="match_parent"
        android:layout_height="45dp"
        app:srcCompat="@drawable/arrow_anim"
        android:onClick="anim"/>
</RelativeLayout>
- 在 Activity 中添加点击事件 anim:
public void anim(View view) {
    ImageView imageView = (ImageView) view;
    Drawable drawable = imageView.getDrawable();
    if (drawable instanceof Animatable) {
        ((Animatable) drawable).start();
    }
}
VectorDrawable 实现轨迹动画
轨迹动画关键的配置就是 objectAnimator 中 androd:propertyName=”trimPathStart” 属性。
- path.xml
<vector xmlns:android="http://schemas.android.com/apk/res/android"
    android:width="200dp"
    android:height="200dp"
    android:viewportHeight="500"
    android:viewportWidth="500">
    <group
        android:scaleX="5.0"
        android:scaleY="5.0">
        <path
            android:name="start"
            android:pathData="M 50.0,90.0 L 82.9193546357,27.2774101308 L 12.5993502926,35.8158045183 L 59.5726265715,88.837672697 L 76.5249063296,20.0595700732 L 10.2916450361,45.1785327898 L 68.5889268818,85.4182410261 L 68.5889268818,14.5817589739 L 10.2916450361,54.8214672102 L 76.5249063296,79.9404299268 L 59.5726265715,11.162327303 L 12.5993502926,64.1841954817 L 82.9193546357,72.7225898692 L 50.0,10.0 L 17.0806453643,72.7225898692 L 87.4006497074,64.1841954817 L 40.4273734285,11.162327303 L 23.4750936704,79.9404299268 L 89.7083549639,54.8214672102 L 31.4110731182,14.5817589739 L 31.4110731182,85.4182410261 L 89.7083549639,45.1785327898 L 23.4750936704,20.0595700732 L 40.4273734285,88.837672697 L 87.4006497074,35.8158045183 L 17.0806453643,27.2774101308 L 50.0,90.0Z"
            android:strokeColor="#000000"
            android:strokeWidth="2"/>
    </group>
</vector>
- anim_path.xml
<?xml version="1.0" encoding="utf-8"?>
<set xmlns:androd="http://schemas.android.com/apk/res/android">
    <objectAnimator
        androd:duration="10000"
        androd:propertyName="trimPathStart"
        androd:repeatCount="infinite"
        androd:repeatMode="reverse"
        androd:valueFrom="1"
        androd:valueTo="0"
        androd:valueType="floatType">
    </objectAnimator>
    <objectAnimator
        androd:duration="10000"
        androd:propertyName="strokeColor"
        androd:repeatCount="infinite"
        androd:repeatMode="reverse"
        androd:valueFrom="@android:color/holo_red_dark"
        androd:valueTo="@android:color/holo_blue_dark"
        androd:valueType="colorType">
    </objectAnimator>
</set>
- 配置动画粘合剂 animated-vector(path_anim.xml),让属性动画作用于 VectorDrawable:
<?xml version="1.0" encoding="utf-8"?>
<animated-vector
    xmlns:android="http://schemas.android.com/apk/res/android"
    android:drawable="@drawable/path">
    <target
        android:animation="@animator/anim_path"
        android:name="start"/>
</animated-vector>
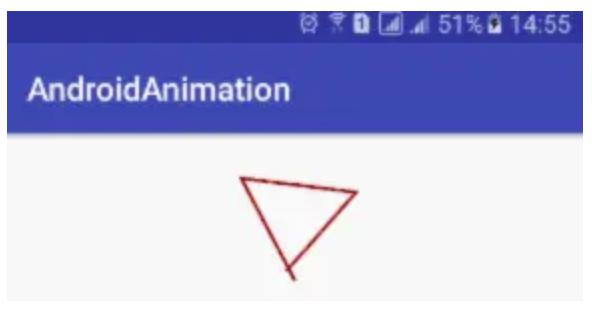
VectorDrawable 实现路径变换动画
轨迹动画关键的配置就是 objectAnimator 中 androd:propertyName=”pathData” 和 androd:valueType=”pathType” 属性。这里我们实现五角星向五边形的变换动画。
- 创建五角星 VectorDrawable 文件 fivestar.xml
<vector xmlns:android="http://schemas.android.com/apk/res/android"
    android:width="120dp"
    android:height="120dp"
    android:viewportHeight="64"
    android:viewportWidth="64">
    <group>
        <path
            android:name="star"
            android:fillColor="#22e171"
            android:pathData="M 48,54 L 31,42 15,54 21,35 6,23 25,23 32,4 40,23 58,23 42,35 z"
            android:strokeColor="#000000"
            android:strokeWidth="1"/>
    </group>
</vector>
- 为 VectorDrawable 创建属性动画:
<?xml version="1.0" encoding="utf-8"?>
<objectAnimator
    xmlns:androd="http://schemas.android.com/apk/res/android"
    androd:duration="3000"
    androd:propertyName="pathData"
    androd:valueFrom="M 48,54 L 31,42 15,54 21,35 6,23 25,23 32,4 40,23 58,23 42,35 z"
    androd:valueTo="M 48,54 L 31,54 15,54 10,35 6,23 25,10 32,4 40,10 58,23 54,35 z"
    androd:valueType="pathType">
</objectAnimator>
- 配置动画粘合剂 animated-vector(fivestar_anim.xml),让属性动画作用于 VectorDrawable:
<?xml version="1.0" encoding="utf-8"?>
<animated-vector
    xmlns:android="http://schemas.android.com/apk/res/android"
    android:drawable="@drawable/fivestar">
    <target
        android:animation="@animator/anim_fivestar"
        android:name="star"/>
</animated-vector>
- 使用
/**
  * 指该方法适用Android版本大于等于Android L
  * @param view
  */
@TargetApi(Build.VERSION_CODES.LOLLIPOP)
public void animL(View view) {
    ImageView imageView = (ImageView) view;
    AnimatedVectorDrawable drawable = (AnimatedVectorDrawable) getDrawable(R.drawable.fivestar_anim);
    imageView.setImageDrawable(drawable);
    if (drawable != null) {
        drawable.start();
    }
}
需要考虑到 VectorDrawable 实现路径变换动画的兼容性问题,故路径变换动画目前存在兼容性问题。不能在 4.X 版本运行,这一点格外注意。不过我们同样希望 Google 可以在后续版本中优化路径变换动画,提高兼容性。
兼容性
静态的 vector 通过 support 兼容很好
向下兼容问题
- Path Morphing,即路径变换动画,在 Android pre-L 版本下是无法使用的,例如将圆形变换成三角形的动画。
- Path Interpolation,即路径插值器,在 Android pre-L 版本只能使用系统的插值器,不能自定义。
- Path Animation,即路径动画,这个一般使用贝塞尔曲线来代替,所以没有太大影响。
向上兼容问题
- 路径变换动画(Path Morphing)
在 Android L 版本以上需要使用代码配置。
抽取 string 兼容问题
<PathData> 不支持从 String.xml 中读取
Android6.0 以下不支持渐变
会崩溃
进阶
用好 ObjectAnimator
所谓 Vector 动画进阶,实际上就是在利用 ObjectAnimator 的一些属性,特别是 trimPathStart、trimPathEnd 这两个针对 Vector 的属性(要注意 pathData 属性不兼容 pre-L)
Path Morph
Path Morph 动画是 Vector 动画的一个高级使用,说到底,也就是两个 PathData 的转换,但是这种转换并不是随心所欲的,对于两个 PathData,它们能进行 Path Morph 的前提是,它们具有相同个数的关键点,即两个路径的变换,只是关键点的坐标变化,掌握了这一个基本原理,实现 Path Morph 就非常容易了。